Previous lesson: basic statistics and plots
R programming basics: Tidy Data and basic data wrangling
In this lesson, we will examine the features of tidy data and consider how it differs from the way people often record data in spreadsheets. We will learn how to “tidy” a data frame and how to extract a subset of data from a tibble data frame.
Learning objectives At the end of this lesson, the learner will be able to:
- describe the three features of Tidy Data.
- use the
pivot_longer()function to transform a “wide” tibble to Tidy Data. - use the
pivot_wider()function to transform Tidy Data into the “wide” form. - use the
filter()function to subset rows from a tibble. - use the
select()function to subset columns from a tibble. - use the
mutate()function to create a new column in a tibble. - use the
transmute()function to create a new tibble from columns of another tibble.
Total video time: 31 m 11 s
Links
Tidy Data chapter from the R for Data Science book.
Data transformation chapter from the R for Data Science book (covers the dplyr() function)
Data Carpentries unit Data Analysis and Visualization in R for Ecologists: “Manipulating data” (dplyr) lesson
Cockroach electroretinogram videos
Tidy data and the tidyr package
For more examples and practice involving tidying data, see this Software Carpentries lesson: http://swcarpentry.github.io/r-novice-gapminder/14-tidyr/index.html
Options for recording data (4m32s)
Experimental factors are independent variables that the experimenter controls. Measurements are dependent variables that are responses to the experimental factors.
What is Tidy Data? (4m14s)
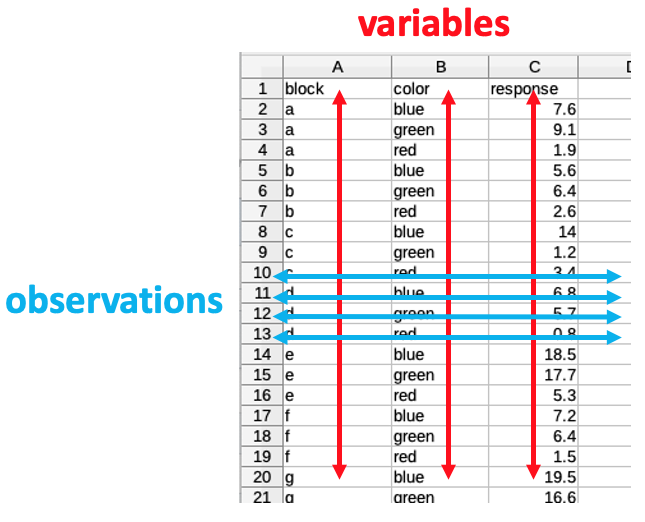
Tidy Data has three main features:
- Each variable must have its own column.
- Each observation must have its own row.
- Each value must have its own cell.

To read more about the features of Tidy Data, visit the R for Data Science website.
The pivot_longer() function (2m35s)
Use the pivot_longer() function to transform “wide” data into Tidy Data (“long” data).
The format of the pivot_longer() function is:
library("tidyr") # The tidyr library must be loaded if not already done

pivot_longer(wide_tibble_name,
    cols = c("collapse_column1", "collapse_column2", "collapse_column3, etc.),
    names_to = "new_category_column",
    values_to = "new_data_values_column")
Notice that you can make a function more readable by putting its arguments on separate lines and indenting.
Note: pivot_longer() replaces the older function gather().
Tidying and untidying data using R (5m30s)
Use the pivot_wider() function to transform Tidy Data (“long” data) into “wide” data.
The format of the pivot_wider() function is:
pivot_wider(long_tibble_name,
    names_from = "category_column_to_become_column_headers",
    values_from = "data_column_to_become_table_cells")
Note: pivot_wider() replaces the older function spread().
Subsetting a tibble using the dplyr package
Subsetting rows using filter() (6m03s)
Notice that unlike “regular” data frames, tibbles allow spaces in column names. When tibble column names include spaces, in code the column names must be enclosed in backtics (`).
The general form of the filter() function is:
filter(tibble_name, boolean_condition)
Code examples:
library("dplyr") # The dplyr library must be loaded if not already done

filter(schools_tibble, `Zip Code` == 37212) # filter rows by a particular value
filter(schools_tibble, !is.na(`Grade 12`)) # filter rows by a more complex boolean condition
high_schools_data <- filter(schools_tibble, `School Level` == "High School") # assigning the result of a filter operation to a new tibble
Subsetting columns using select() (4m05s)
The select() function has several general forms:
select(tibble_name, col1, col2, col3, ...) # select by list of columns
select(tibble_name, start_column:end_column) # select by a range of columns
select(tibble_name, boolean_condition) # select by boolean condition
Code examples:
library("dplyr") # The dplyr library must be loaded if not already done

select(schools_tibble, Male, Female)
select(schools_tibble, `School Year`:`Zip Code`)
select(schools_tibble, starts_with("Grade"))
Creating new columns with mutate() and transmute() (4m12s)
The mutate() function creates a new column at the end of an existing tibble. The column can be the result of a calcuation. The general form is:
mutate(existing_tibble, new_column_name = calculation)
Example:
library("dplyr") # The dplyr library must be loaded if not already done

mutate(schools_tibble, total_students = Male + Female)
The transmutate() column creates a new tibble from existing columns or calculations based on existing columns. The general form is:
transmute(existing_tibble, list_of_existing_or_calculated_columns)
Example:
transmute(schools_tibble, `School Name`, total_students = Male + Female, `Economically Disadvantaged`)
Note: In the case of both mutate() and transmute(), simply issuing the command displays the output, but doesn’t actually put it anywhere unless you assign it to an object using the <- assignment operator. That object can be the original data frame if you want to replace the old version with the new one. For example
mod_sch_tibble <- transmute(schools_tibble, `School Name`, total_students = Male + Female, `Economically Disadvantaged`)
would create a new tibble called mod_sch_tibble that holds the result of the modification.
schools_tibble <- mutate(schools_tibble, total_students = Male + Female)
would replace the original schools_tibble tibble with the new one having the added column on the end.
Practice assignment
The practice assignment is here. You will need to load it into the editor pane of RStudio.
Problem 1a solution
Problem 1b solution
Problem 2a and b solution
Problem 2c solution
Problem 3 solution
Problem 4a solution
Problem 4b solution
Problem 4c and d solution
Next lesson: piping and more data wrangling
Revised 2023-09-11

Questions? Contact us
License: CC BY 4.0.
Credit: "Vanderbilt Libraries Digital Lab - www.library.vanderbilt.edu"