Previous lesson: setup
GitHub for beginners: GitHub work cycle
In this lesson, you will go through a complete work cycle. You will control when things are staged, committed, and pushed to GitHub using the controls in GitHub Desktop. You will learn about the difference between raw and rendered views of documents. You will also see how versions have changed between commits by examining a diff.
Learning objectives At the end of this lesson, the learner will be able to:
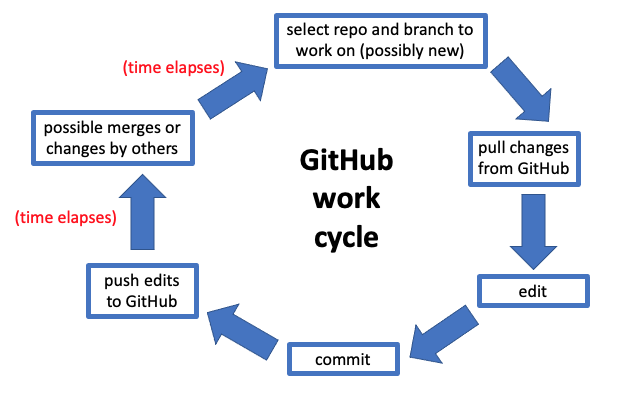
- list 5 stages in the GitHub work cycle
- compare the commit and push process on the desktop client
- work through a complete work cycle editing one or more documents.
- (Atom users only) open a repository in Atom using the
Open the repository in your external editoroption in GitHub Desktop. - explain why Excel is not the best way to edit CSV files.
- save a spreadsheet in CSV format into your repository directory using your spreadsheet software.
- use checkboxes in GitHub Desktop to control whether a file is staged to be included in a commit.
- execute more than one commit in GitHub Desktop without pushing them to GitHub.
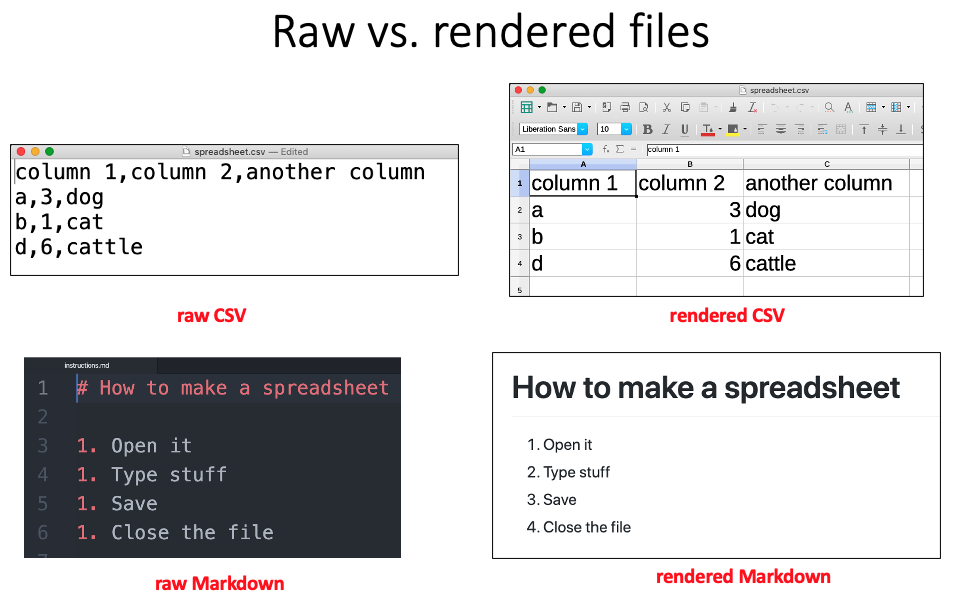
- explain how the appearance differs between a raw and a rendered file.
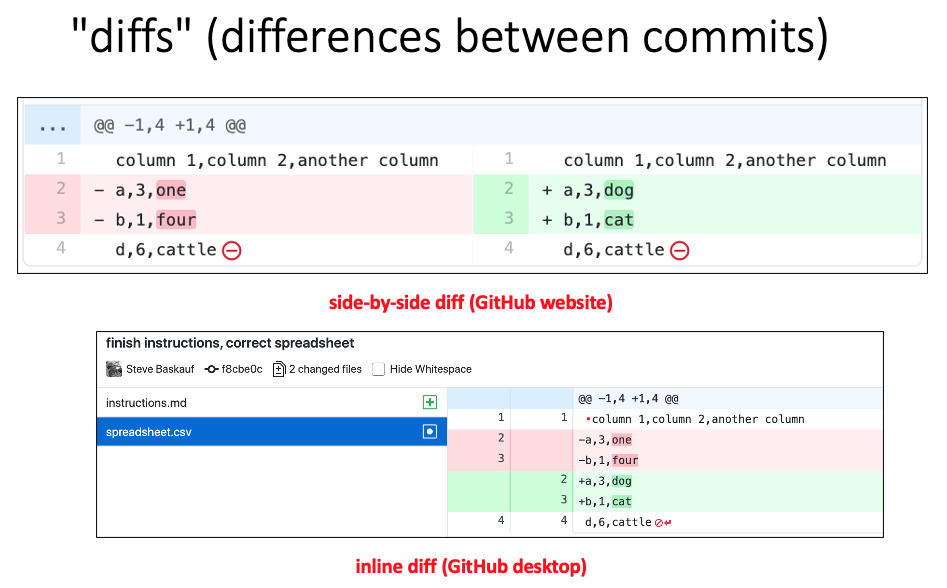
- examine a diff (online or in Desktop) and interpret the changes that have occurred between commits.
- describe why GitHub is better for working with text based files (like CSV) than binary files (like Excel
.xlsxformat). - add a file extension to the
.gitignorefile so that file type will not be suggested for staging. - commit and push a PDF and view it using the online GitHub PDF viewer.
Total video time (including optional videos): 49 m 44 s
Total video time (required videos only): 31 m 57 s
Links
The GitHub work cycle
Introduction (1m25s)
The GitHub work cycle (9m14s)
. Pulling changes
When you are editing files using GitHub desktop, it is important to have a disciplined work cycle to make sure that your work gets saved to the hub without merge conflicts.
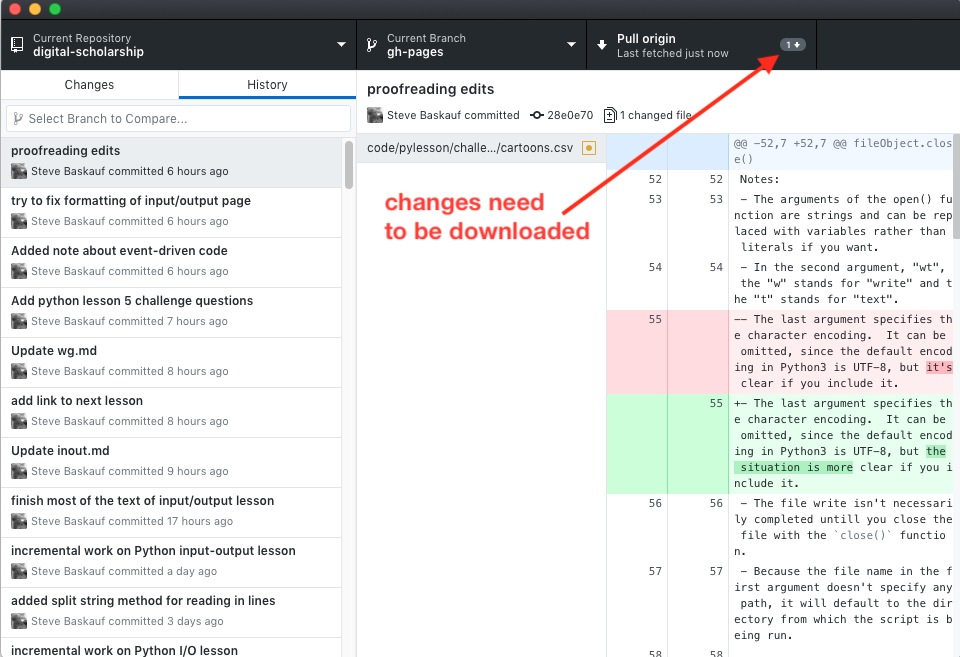
After you’ve decided what branch you need to work on, it’s very important to make sure at the start that you are working on the most recent version of it by pulling any changes from Github. Click on the Fetch origin button at the upper right of the window. If there are changes that need to be downloaded, you’ll see a small number by a downward pointing arrow. Click the button (now labeled “Pull origin”) again to download those changes.
If you forget to update your local copy of the branch, you risk creating a conflict, since you may be working on a copy that isn’t the most recent one.
Editing and committing
To make an edit, navigate to the directory where you checked out the repo. Open a file, make some edits, then save the file.
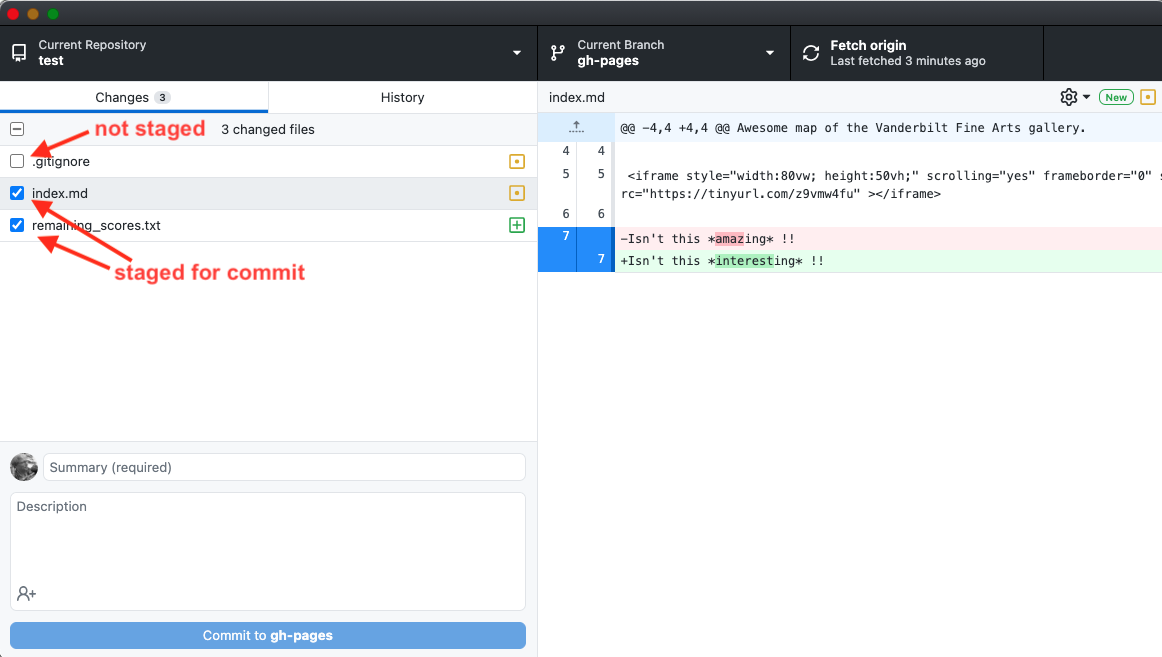
If you click on the Changes tab at the upper left of the GitHub Desktop window, you should see the files that changed since the last update and clicking on a filename will show the kind of changes at the right of the screen (additions in red, deletions in green).
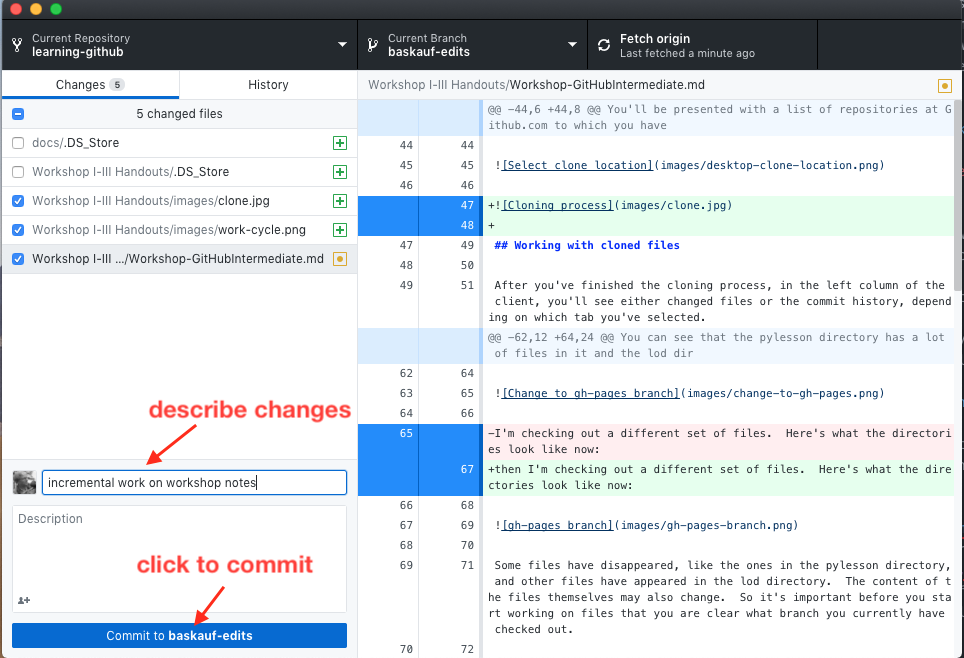
Commit your changes. You’ll then see the new commit in the history and as a change that’s ready to push up to GitHub.
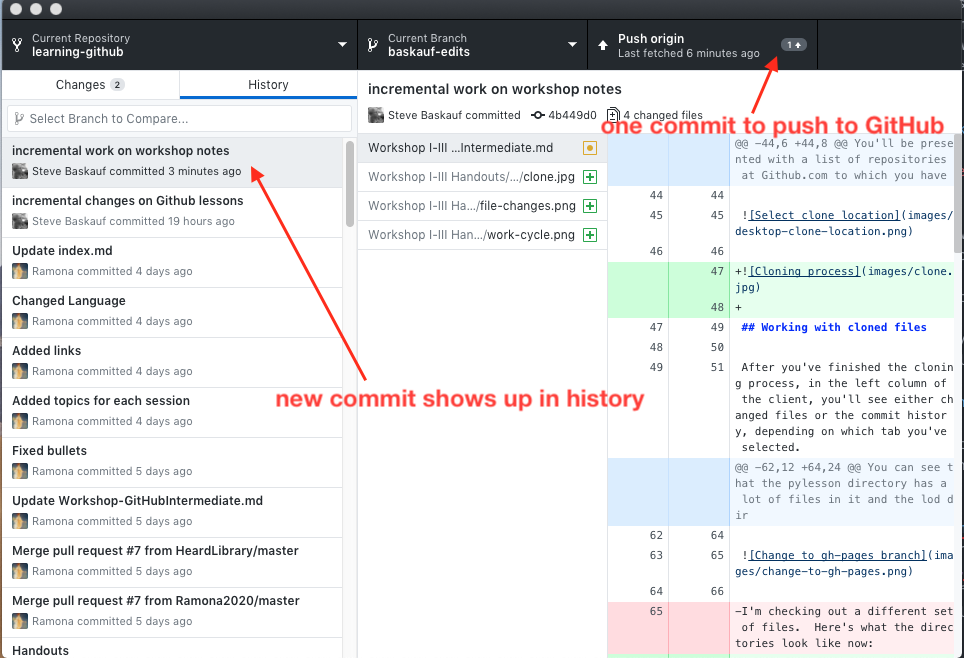
Click on the Push origin button to push your changes from the desktop client to GitHub.
Beginning the work cycle (3m53s)
This video provides a more detailed look at what we saw in the last video.
Optional: CSV spreadsheets (4m38s)
This video provides important information about what CSV files are and how they differ from Excel spreadsheets. It explains why Excel is not the preferred editor for editing CSV files. If you are using CSV files in coding, I recommend using Libre Office to edit them. Unlike Open Office it does not put a file lock on a file that is currently being edited. A file lock can crash a script if you forget that you have the CSV open in the application.
.
Kinds of files that work well with GitHub version control
Although you can use GitHub for version control on any type of file, the features of GitHub were designed with maintenance of text files in mind. If you are editing a simple text file, there is no particularly compelling reason why you can’t just do the editing in the browser using the built-in GitHub editor. However, if you are editing a file that contains markup, such as Markdown or XML, or if you are editing code, it is probably easier to do the editing on your desktop using dedicated editing software. Examples are Oxygen for XML and Visual Studio Code (not actually part of Microsoft Visual Studio) for editing many kinds of code. For working with GitHub, there are some advantages to using the Atom editor https://atom.io/. Atom was developed by the GitHub team and has some useful features for working directly with GitHub. There are a lot of plugins available for Atom that do syntax highlighting for different coding languages, and Atom also has a useful Markdown preview feature (available from the Packages menu).
GitHub works reasonably well for some other types of files like CSV spreadsheets and Jupyter notebooks. When editing these files, you’ll want to use an editor designed specifically for them, such as Open Office or Libre Office for CSV, or Anaconda/Jupyter for Jupyter notebooks. When you look at the raw text of these files, they will be a bit difficult to comprehend, but when they are pushed to GitHub, it is pretty good at displaying them so that they look the way they did in your software (i.e. as a table or notebook).
GitHub does NOT work well for managing documents written with proprietary software like Microsoft Word or Excel, at least when files created in those applications are saved in their native file formats (.docx and .xlsx). You can commit and upload the files, but GitHub can’t display them and they will be impossible to comprehend in the desktop client preview or on GitHub itself.
Checkboxes and staging (3m03s)
.
Checkboxes are used to control which files are staged for the next commit.
Making a second commit (4m05s)
Viewing rendered files and diffs (8m01s)
Optional: The problem of binary files (3m42s)
Optional: Editing .gitignore (5m09s)
Optional: Making, pushing, and viewing a PDF (4m17s)
Ending your work session (2m15s)
Practice assignment
- Using an external editor like Atom, create a Markdown document with informational content. Use several of the typical formatting features, such as level 1 and 2 headings, bold, and italics. Ideally, you would also try making something more interesting like a table or hyperlink. Save the document in your repository directory. Stage the Markdown document (check the blue checkbox) and commit the document.
- Using a spreadsheet editor (Libre Office, Open Office, or Excel), create a small spreadsheet and save it to your repository directory and commit.
- Push both of your documents to GitHub.
- Make one or more edits to the two documents you just created and examine the diffs on GitHub Desktop before committing. Make additional edits and saves as necessary. When you are satisfied with the changes, commit and push to GitHub.
- Go to GitHub desktop and find one of the documents. Examine the history and look at the side-by-side diff.
- Create a PDF, either by exporting from a Google doc or by saving as PDF in Word. Save the PDF in your repository, commit and push to GitHub. Go to GitHub online and look at the PDF.
- Delete the PDF from your local directory and push the change to GitHub. Go to GitHub oninle, find the deleted PDF in the repository’s commit history, and download the deleted PDF to somewhere on your local drive. NOTE: if the file is not a binary file, the
Downloadbutton will be aRawbutton. In that case, if you want to download the deleted file, right click on theRawbutton and selectSave Link As...or something similar depending on your browser. - Complete you editing session by going to GitHub Desktop and checking the
Changestab to make sure that you don’t have any edits that should be committed and pushed before you quit.
Next lesson: recovering from disasters
Revised 2022-01-24

Questions? Contact us
License: CC BY 4.0.
Credit: "Vanderbilt Libraries Digital Lab - www.library.vanderbilt.edu"