Note: this is an addendum lesson to a beginner’s introduction to Python. For the whole schedule, see the Vanderbilt Python Working Group homepage
prevous lesson on data from the Internet
Get a Twitter developer account
Click on the link in your invitation email.
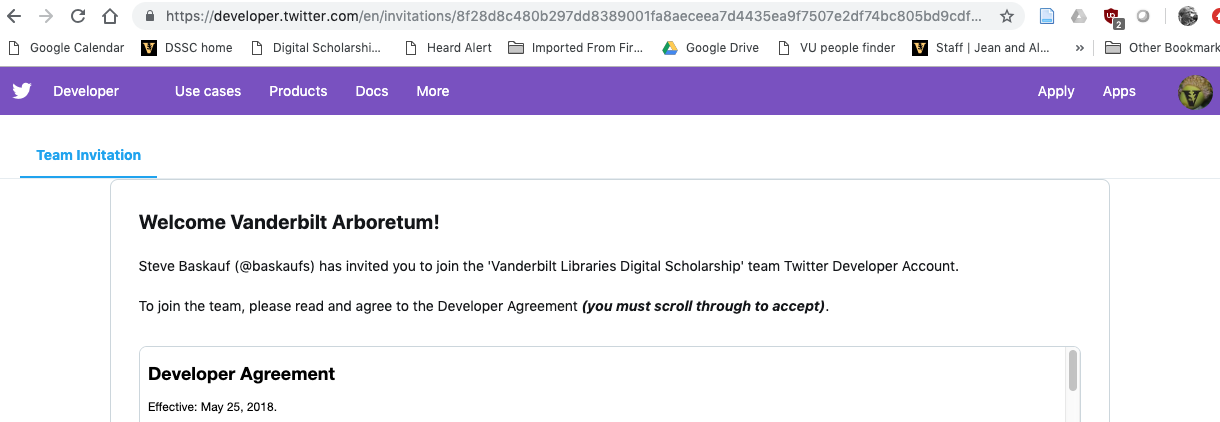
Scroll all the way through, then accept the user agreement. Note: if the checkbox for accepting is grayed out, use a different browser. Chrome seems to work.

Go to the menu in the upper right and select Apps.

Click on the Create an app button.
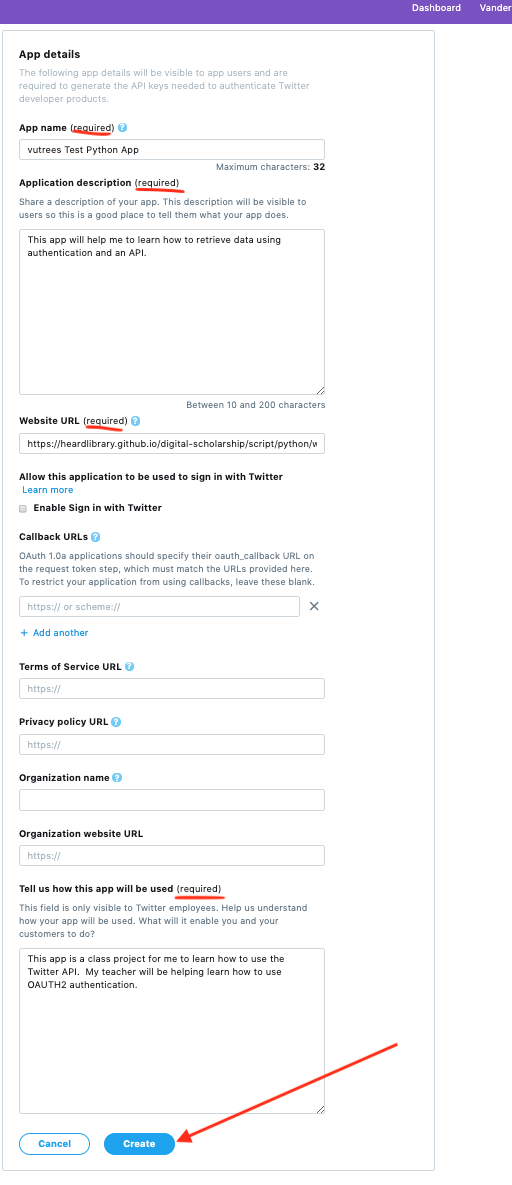
Fill in the App name and description. The name has to be unique, so include your Twitter handle in it. For the description, you can say that it is a classroom project to learn how to use an API in Python. For the Website URL, you can use your website or the Python Working Group web page. Do not enable Sign in with Twitter. Leave the rest of the stuff blank except for the required “Tell us how this app will be used” box. Again, you can explain that it is a class project to learn how to use an API. Your explanation has to be at least 100 characters.
Read the next popup, then click Create.

Click on the Keys and tokens tab.
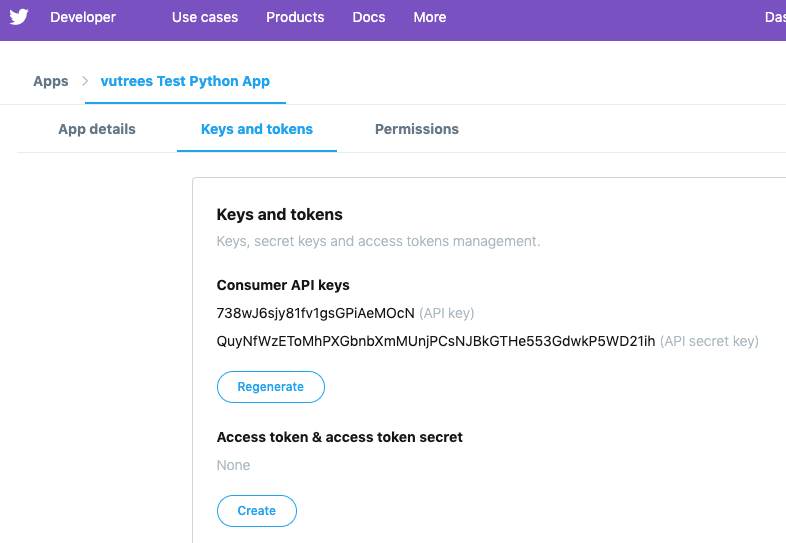
Copy your API key and API secret key from the next screen. You will need them for the next part of the exercise. Don’t use the ones in this picture because they have been revoked and new keys have been regenerated.
Note: When the class is over, I’m going to boot you off the team. You will be able to continue to use the App you’ve created, but won’t be able to create a new one without applying for your own developer account.
Understanding API authorization
If an API is read-only and contains only publicly available data, there is little damage that a client (computer software interacting with the API) can do other than hitting the API at too fast of a rate. However, if an API provides access to private data, or allows a client to write to the API, then an authorization system is necessary.
There are two commonly-used standards for authorizing an application to interact with an API. OAuth 1 is an older system that dates back to 2007 and is still used by many APIs. OAuth 2 is a newer system (started in 2010) that is simpler than OAuth 1 and works better on mobile devices. In this example we will use OAuth 2.
Why do we need an access token?
If you read up on the OAuth systems, you will immediately realize that they are very complicated. A reason for this complexity is that the same API needs to be able to interact with a variety of clients (web pages, mobile device apps, and stand-along software) that have a variety of methods of determining that the client should be allowed to access the API. Some examples of these methods are being redirected to a web page with a login screen, and logging in by virtue of already being logged into Goggle, Facebook, etc. In all of these varieties of methods the final result is an access token – a long string of characters that is sent to the API to prove that the client should be allowed to access the resource it wants.
The advantage of using an access token rather than just sending the username and password to the API is that if the access token is compromised (either by being intercepted in transit or stolen from the device that’s running the client), it can be disabled and replaced without revealing the credentials of the user of the client. In some cases, the access token has a limited lifespan and expires after some set time, for example 15 minutes.
The access token is also a sort of lingua franca for the API, allowing it to get down to the business of providing information rather than having to also handle all of the possible ways that users can be authenticated. That job is handled separately by an authentication server whose job is to issue the access tokens.
If an access token is just a “free pass” to get information from the API, you may be wondering what keeps it from just being intercepted as it goes through the Internet. OAuth 2 depends on the connection between the client and server being encrypted by using secure HTTP (i.e. HTTPS). That allows the system to assume that the access token can’t be “stolen” in transit.
Getting an access token using OAUTH 2 Client Credentials
The simplest method of getting an access token is called client credentials or application access authentication. It is much less complicated than the other methods for authenticating via websites or mobile apps. The client credentials method sends the client’s identifier (the API key) and secret (the API secret key) directly to the authorization server. This is only feasible in the situation where the user knows that the identifier and secret can safely be stored on the device from which the client is operating. Obviously this wouldn’t work if the identifier and secret were included in Javascript loaded by a web page because anyone could just download the Javascript, look at it, and get the credentials. However, if the client is a Python script being run from your personal laptop, and you can control access to that laptop, then this method is fine.
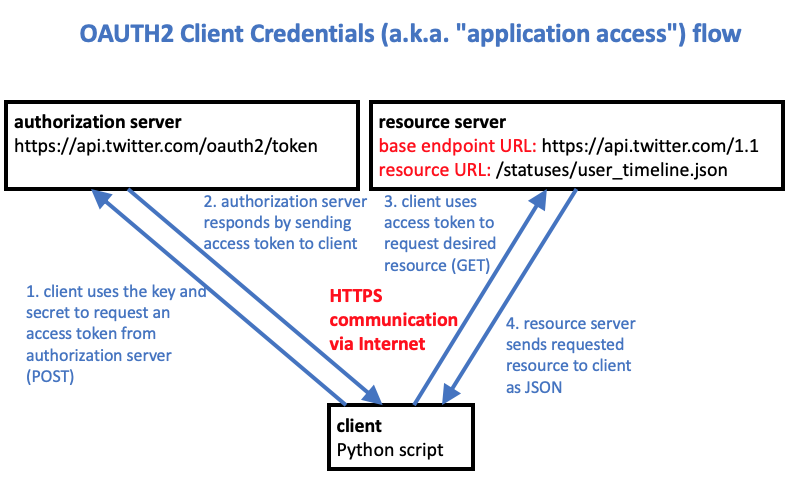
The diagram above shows how the client credentails method works. The client sends the API key (identifier) and API secret key (secret) to the authentication server using an HTTP POST request (step 1) and the server sends back the access token (step 2). The access token can be used for many API calls (steps 3 and 4) without interacting again with the authentication server. Twitter access tokens do not expire. They are only invalidated if the user revokes the application using the developer dashboard (e.g. clicking the “regenerate” button for the app), or if Twitter suspends the application because of misuse of the API.
There are a variety of Python packages that automate this process. The “Requests-OAuthlib” library (not the same as the “requests” module) is the most commonly used. It has a pretty good readthedocs instruction page with actual Python code examples. In the Requests-OAuthlib documentation, the “Backend Application Flow” is the same as the “Application access” and “client credentials” systems.
Following the example in the documentation, here is a Python script that uses requests_oauthlib to get an access token from the Twitter authorization server:
Code to get an access token
from oauthlib.oauth2 import BackendApplicationClient
from requests_oauthlib import OAuth2Session

clientKey = 'client key goes here'
clientSecret = 'client secret goes here'
requestTokenUrl = 'https://api.twitter.com/oauth2/token'

clientObject = BackendApplicationClient(client_id=clientKey)
oauth = OAuth2Session(client=clientObject)
accessToken = oauth.fetch_token(token_url=requestTokenUrl, client_id=clientKey, client_secret=clientSecret)
# access token should be cached/saved and used repeatedly rather than making many requests fo a new token
print(accessToken)
Notes:
- Your API key and API secret key need to be inserted in the appropriate spots in the code.
- You should NOT run this authentication script every time you want to access the API. Rather, you should copy and paste the access token into your API-calling application, or even better, save it in a file that can be accessed by your application so that you don’t have to hard-code it.
Accessing the Twitter API using the access token
Once you have the access token, it is a relatively simple matter to use the requests module to get JSON from the API in a manner very similar to the way you would retrieve data from an API that does not require authorization. (See the last lesson for more info on that.) The only difference is that you need to include an Authorization request header that has the value
Bearer {accessToken}
where {accessToken} is the access token string that you stored from the authentication step above.
There are many things that you can do with the Twitter API. The getting started page is a good place to start learning about what you can do. If you have an access token, you can actually tweet, retweet, send messages, etc. These are all “write” methods that use HTTP POST and are more “dangerous” because they actually affect the twittersphere. If you want to play with them, you can do it outside of class. For this class, stick to reading data using methods that use HTTP GET, such as finding tweets in a user’s timeline, listing tweets, finding friends, etc.
There are a number of endpoint URLs in the Twitter API that are used for different resources (to do different things). There is a list here that also tells you the limitations placed on each resource type. PAY ATTENTION to these limits. Repeatedly failing to observe the limits may get your account blacklisted.
The example below shows some code for getting a Tweet timeline for a user. The API reference for this resource is here. You can see that the resource URL
https://api.twitter.com/1.1/statuses/user_timeline.json
is composed of three pieces:
- the base API URL:
https://api.twitter.com/1.1/ - the generic resource URL:
statuses/user_timeline - the extension for the specific JSON resource:
.json
Each resource type has its own generic resource URL that’s shown at the top of its API reference page.
Code to retrieve Tweets from a user’s timeline
import requests   # best library to manage HTTP transactions

bearerAccessToken = 'access token from first program goes here'
# GET statuses / user_timeline Returns a collection of the most recent Tweets posted by the indicated by the screen_name or user_id parameters.
resourceUrl = 'https://api.twitter.com/1.1/statuses/user_timeline.json'
paramDict = {'screen_name' : 'put twitter handle here', 'count' : '3', 'exclude_replies' : 'true', 'include_rts' : 'false'}
r = requests.get(resourceUrl, headers={'Authorization' : 'Bearer '+ bearerAccessToken}, params = paramDict)
data = r.json()
for tweet in data:
    print('Tweet: ' + tweet['text'])
    print('On: ' + tweet['created_at'])
    print('By: ' + tweet['user']['name'])
    print()
Notes:
- The access token needs to be inserted in the third line, either by direct hard-coding, or be reading it from a file.
- The Twitter handle (i.e. “screen name”) needs to be inserted in the appropriate spot of the parameters dictionary. The example shows it being hard-coded, but it would be better to insert it as a variable so that you can ask the user for it.
- There are several other parameters in the dictionary. You can read about them on the API reference page. In the example, the number of tweets to be retrieved is set at 3.
Response JSON
The script example above only makes use of a small amount of the data that is sent back from the API. You can see the full JSON by replacing the for loop in the example with print(data), although it’s a bit hard to look at. It’s easier to look at the example JSON at the bottom of the reference page, although it’s so long and complicated that it is difficult to parse out. Here’s a snippet that leaves a lot out so that you can see the overall structure:
[
    {
        "created_at": "Mon Apr 03 16:09:50 +0000 2017",
        "id": 848930551989915648,
        "id_str": "848930551989915648",
        "text": "RT @TwitterMktg: Starting today, businesses can request and share locations when engaging with people in Direct Messages. https://t.co/rpYn…",
        "truncated": false,
        ...
        "in_reply_to_screen_name": null,
        "user": {
            "id": 6253282,
            "id_str": "6253282",
            "name": "Twitter API",
            "screen_name": "twitterapi",
            "location": "San Francisco, CA",
            ...
            "notifications": false,
            "translator_type": "regular"
            },
        "geo": null,
        "coordinates": null,
        ...
        "favorite_count": 0,
        "favorited": false,
        "retweeted": false,
        "lang": "en"
    },
    {
        another tweet
    },
    {
        another tweet
    }
]
You can see that the outermost structure in the JSON is a list of tweet dictionaries. In the code we iterate through that list, although you could refer directly to a tweet dictionary like this:
data[1]
Within each tweet dictionary, there are a bunch of key:value pairs. In the code, we refer to the tweet text by its key text. The text of the first tweet could therefore be referenced like this:
data[1]['text']
The user data is nested one layer deeper, as another dictionary that is the value of the user key. So to refer to the user’s name, we could do this:
data[1]['user']['name']
Obviously, an important part of using the output of an API is understanding the structure of the JSON that gets returned. A good API will return lots of complex data, and there is no standard structure for JSON, so you need to sort through it with a good code editor to pick out the bits you need.
For more information
The following two blog posts are recommended reading if you want to learn more details about all of the ways OAUTH2 can be used. The first post has easy-to-understand diagrams with step-by-step explanations for each diagram. The second post has example HTTP requests that corresponded to each of the diagrams in the first post, and had a very clear explanation (with pictures) of the circumstances under which you’d use each kind of OAuth2 authentication.
Revised 2019-04-19

Questions? Contact us
License: CC BY 4.0.
Credit: "Vanderbilt Libraries Digital Lab - www.library.vanderbilt.edu"