Understanding my computer - lesson 5: Backing up your computer
This is the Mac version of this page. Click for the Windows version of this page
go back to Lesson 4: Installing software
Risks and considerations
If you use a computer for any significant amount of time, you will potentially encounter some kind of disastrous loss of data. A loss of data can result in a huge loss of time and money and it may not be possible to ever recover some of the data. The trite response to this problem is to “always back up your work”. But what exactly does that mean? It’s helpful to think about the categories of ways that one can lose data, because those different categories can have different solutions.
The most obvious way to lose data is simply to lose the files that contain the data. There are a number of ways this can happen:
- you accidentally delete the files
- someone steals your computer
- you get a bitlocker virus and your hard drive is encrypted
- your hard drive crashes
The obvious solution to this problem is to make copies of your files and put them somewhere else. There are several ways you can do that:
- put copies on a flash drive or external drive
- burn copies onto a CD or DVD
- put copies on the cloud using Box, Dropbox, or some other cloud service.
Time risk
One complicating factor is the frequency of backup. If you manually copy files to some other device, then the longer you wait between backups, the greater the amount of data you could lose. If you back up daily, you could lose up to a days worth of work. If you back up weekly, you could lose up to a week’s worth of work.
A simple solution to this problem would be to do the backups as frequently as possible. However, depending on how long it takes to do the backup process, you could waste a lot of time just running the backup if the process is slow. The ultimate solution would be to use a cloud service like Dropbox or Box that automatically synchronizes (“synchs”) files every time you save them.
Overwrite risk
Although automatic synch sounds great, that introduces another risk: the risk of overwriting a good file with a bad one. Let’s say that you’ve been working on a draft of a document for a week and you keep that document in your Dropbox folder. For some reason, you don’t notice that you deleted a large section of the document and you save the draft with the deleted section. Since the synch happens immediately, the good copy in the cloud immediately gets overwritten by the bad copy and you’ve lost your data. (Dropbox actually has a feature for recovering deleted files for some period of time, but that’s beyond the scope of this lesson.)
A solution to this problem is version control. In version control, you create distinct versions of your document as you work rather than always overwriting eariler versions with the latest version. A simple version control system is to create a new version of a file each day that you work on it and append the ISO 8601 date to the end of the file name. Here’s an example:
gis-project-2019-03-04.xlsx
With a system like this, you would not lose more than a day’s worth of work if you made the mistake of saving a bad version with a big deletion or other kind of mess-up related to the working file. Because of the format used for the date, when the files are sorted, they are ordered from oldest to newest, and it’s extremely easy to see what the state of the file was at any particular time. If the system were also combined with a cloud service, you would also be protected against hazards like a hard-drive crash or loss of your computer. With the free Dropbox account, you can restore a previous version of a file within 30 days of the change, so if you were a victim of a bitlocker virus, you could recover the files as long as you discovered the attack quickly.
There are much more sophisticated version control systems than this. This page has links to more information on the topic of version control.
Backup tradeoffs
The discussion so far assumes that you are working on a project that’s limited to a single file. Many projects involve multiple files that may be added or deleted over time. It generally isn’t practical to try to manage copying a large number of individual files to, or deleting them from the backup media. Instead, we need a system that automatically takes care of backing up all of the files in the system at once.
There are many varieties of backup systems, but the fall into two broad categories. A full backup makes a copy of all of the files that are included in the scope of files to be backed up. An incremental backup backs up only files that have changed (added or modified) since the last backup. In an incremental backup system, you start with a full backup, then run additional incremental backups at intervals after that.
A full backup has the advantage that it’s easy to restore. All you need to do is copy all of the files back to your original system. It has the disadvantages that it can take a long time to run if there are a lot of files involved and can take up a lot of space if you keep copies of multiple past backups.
An incremental backup has the advantage that it runs much more quickly since only recently changed files need to be copied. It also doesn’t take much space since many of the files in the scope of the backup don’t change from backup to backup. It has the disadvantage that it takes longer to restore the system because you have to start by restoring the last full backup, then restore every incremental backup from then until the present time. An additional problem arises if the incremental backup system only tracks files that have been changed or added and not files that were deleted. Over time, the number of deleted files in the system will increase and if the system is restored by working through all of the incremental backups, the restored system may have many files present that were actually deleted when the original copy failed.
A good compromise is to carry out a new full backup after a certain number of incremental backups. For example, you could run a full backup once a month and incremental backups twice a week.
Scope
The simplest way to back up your system would be to simply copy your entire hard drive to the backup system with each full backup. That idea has two problems. The first is that your backup media would have to have a size that was a multiple of your entire hard drive for each full backup. The second is that it would take a very long time to carry out the backup.
A better system would be to make sure that the files that you actually change over time are isolated into one particular part of the computer (your Documents directory, for example). You could then limit the backups to that directory under the assumption that if you had a drive loss or computer theft that you could reinstall the software from its original source. This strategy does require that you redo all of the software customization any time you have to restore the system.
Physical risks
One final thing to take into consideration is the risk of catastrophic destruction to the media itself. For example, if your backup media are stored in the same building as the system that is being backed up, both could be lost in a fire, flood, or tornado. You should also consider that any media (including DVDs and hard drives) could be degraded over time. So for critical data, it’s good to have more than one backup copy, with one copy stored offsite from the system that’s being backed up.
Cloud storage systems provide good protection against this hazard, although they introduce their own hazards. For example, if a computer or phone that’s linked to a Dropbox account is stolen, a malicious thief could delete all of the files in the account using the device. A disgruntled or incompetent collaborator or employee who has access to a shared account could also delete all of the files.
Time Machine backup
Note: for details about Time Machine, see this page.
Macs have a built-in backup system called Time Machine. In order to use Time Machine, you must have an external storage device such as a network drive or removable drive. When you connect a removable drive to your computer, you might be asked if you want to use it with Time Machine. If not, then you can manually initiate setting up a drive for use with Time Machine.
What does Time Machine do?
The first time that Time Machine runs, it does a full backup. However, after that, it does incremental backups. It has a relatively sophisticated system for managing the backups that provides a higher degree of protection for more recent work. It makes a backup every hour for the past day, every day for the past month, and every week for as far back in time as space is available.
Another important feature of Time Machine is that it provides some degree of protection even when the computer hasn’t recently been connected to removable storage (important if you aren’t using a network drive that’s connected all the time). When Time Machine is not able to connect to the storage drive, it will make local copies (called local snapshots) on the computer’s hard drive until the next time it’s connected to the removable storage. When the removable storage device is connected again, the local snapshots are moved from the hard drive to the external storage.
There are two important limitations of the local snapshots. One is that the number of local snapshots that are kept depends on how full your hard drive is. Once the hard drive is more than 80% full, older backups start to be deleted. The second limitation is that the local snapshots only protect you against deletions or corrupted files – they do not protect you against physical risks like theft, drive crashes, or physical destruction of the computer and drive. So it is still important to regularly connect the external storage device if it isn’t connected all the time. (See this post for more about local snapshots.)
Setting up Time machine
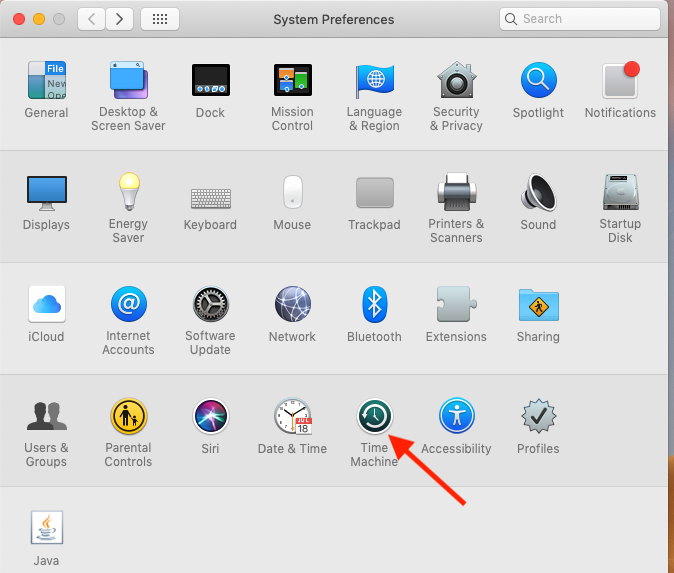
From the apple menu in the upper left of the screen, select System Preferences.... Click on the Time Machine icon.
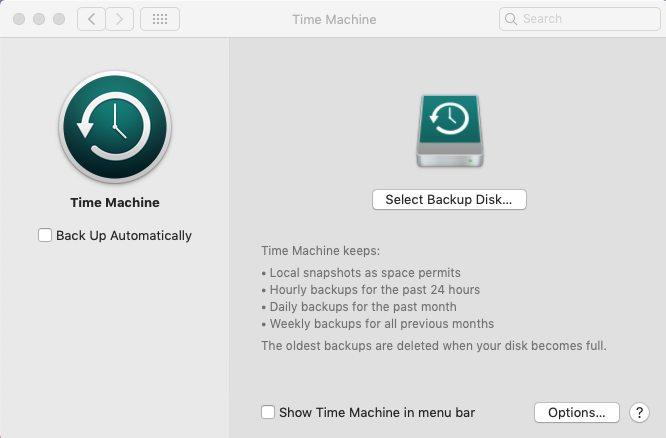
Click on the Select Backup Disk... button and select your external storage from the list. When selecting the disk, you have the option to encrypt the backups. This is more secure, but if you don’t remember the password, you won’t be able to access the backups. Note: there are some limitations related to using an external storage device for both Time Machine and other file storage. You may need to partition the drive depending on how you want to use the parts of the drive that aren’t used by Time Machine. See this page for more details.
![]()
If you check the Show Time Machine in menu bar, an icon will appear in the menu bar in the upper right of the screen.
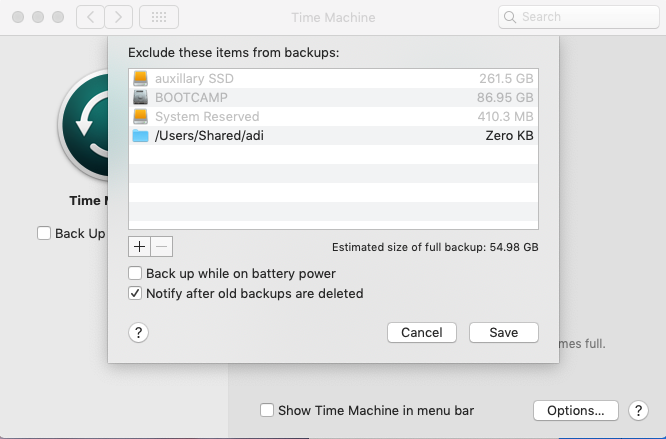
Clicking the Options... button brings up a dialog that allows you to control what parts of the drive to back up by excluding some directories. For example, if you figure that you will reinstall all of the applications by downloading them from the Internet, you can exclude the /Applications/ folder and the size of the backup may be significantly smaller.

Compare this screenshot with the previous one. By excluding the Applications and Downloads folder, the backup size was decreased from 55 to 36 GB.
One complaint about Time Machine is that when backups are done infrequently, they take a long time to run and the application does not give an indication of its progress. So be patient if it seems like nothing is happening. If you back up frequently, or have your computer connected to the external storage all the time, this is less likely to be a problem.
Restoring Files
If you need to recover from a disaster, you can use Time Machine to recover some or all of your files. Time Machine has an option to restore the entire Mac OS and all files for the ultimate disaster recovery (NOTE: it erases the entire hard drive in the process!), or you can restore only the files. Be aware that since Time Machine uses incremental backups, restoring the entire drive could take a long time. (See this page for more information.) You can also step back in time to any particular point where a snapshot exists and recover individual files (described on this page).
Alternatives to Time Machine
If there are only a few files on your computer that need to be backed up, there are other options besides Time Machine. For instance your computer may be a clone of a standard disk image with only a few data files that differ from the clone, or you may have some directories already backed up using a cloud service like Dropbox or Github. In that case, you can essentially create full backups by just dragging and dropping a folder or folders to a dated folder on an external drive.
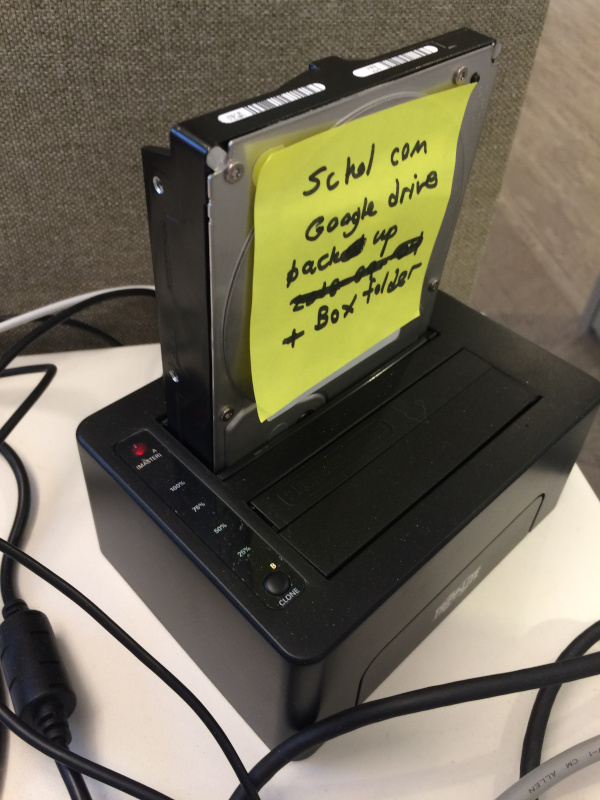
An inexpensive storage alternative is to attach a regular non-USB hard drive (magnetic media or solid state) using an external drive dock that connects by USB (see image above). If you have several large-capacity drives salvaged from old desktop systems, you can store a number of full backups on a single drive. The drives can be undocked and stored in a safe location away from the computer.
For perspective, the system above has been used to make weekly full backups of all of my work files on Fridays for 8 months without erasing any previous backups. The drive is removed from the system and stored until the next week. After that amount of time, about 50 GB of the available 950 GB available on the drive has been used. At that rate, the drive will be filled in about 12 years.
This system has the same disadvantage as Time Machine with a removable drive: you need to remember to plug in the drive and do the backup.
Some suggestions
For individual files that are being edited, use the dated-version system with cloud storage (Box or Dropbox), or use a private repository in Github. When the file revision is complete, a final copy can be stored in a permanent location and most or all of the dated versions can be deleted.
Keep most of the files you edit within your user directory and use Time Machine to make regular backups to a network server (if one is available) so that you don’t have to remember to do the backup. If your cloud storage directory (e.g. Dropbox) is located within your user directory, it will be backed frequently in two ways.
Once a week, use a removable drive to do a full backup of your user directory via drag and drop, and store the drive offsite or in a safe location. If your backup drive is large and the size of your user directory is relatively small, you should be able to save a number of past versions of your user directory.
Having three copies of your data (with at least one copy offsite)ß should protect you against most risks. Not only will it make restoring your data easier after a disaster, it also will position you for setting up a new, upgraded computer at some point in the future.
go on to Lesson 6: Command line
Revised 2019-03-24

Questions? Contact us
License: CC BY 4.0.
Credit: "Vanderbilt Libraries Digital Lab - www.library.vanderbilt.edu"