Understanding my computer - Lesson 4: Connected devices
This is the Mac version of this page. Click for the Windows version of this page
go back to Lesson 3: Installing software
Physical ports
A computer can have a confusing array of physical ports where cables can be connected to the computer. Over time, the number and kind of ports has been reduced and we will only be covering ports typically found on more recent models of computers.
Note: For a good summary of all of the ports on various models of Macs, see this page.
Display ports
Although laptops have built-in displays, most have a place where an external display can be connected - either to provide more screen space for the user, or to connect to a projection system like an LCD projector. Let’s look at some of the connectors from oldest to newest.

Since the early 2000’s, HDMI (high-definition multimedia interface) has been an extremely popular way to connect to monitors. Because it’s the default for high definition television, it is now the most widespread system. Most new desktops and many laptops now come equipped with HDMI ports.
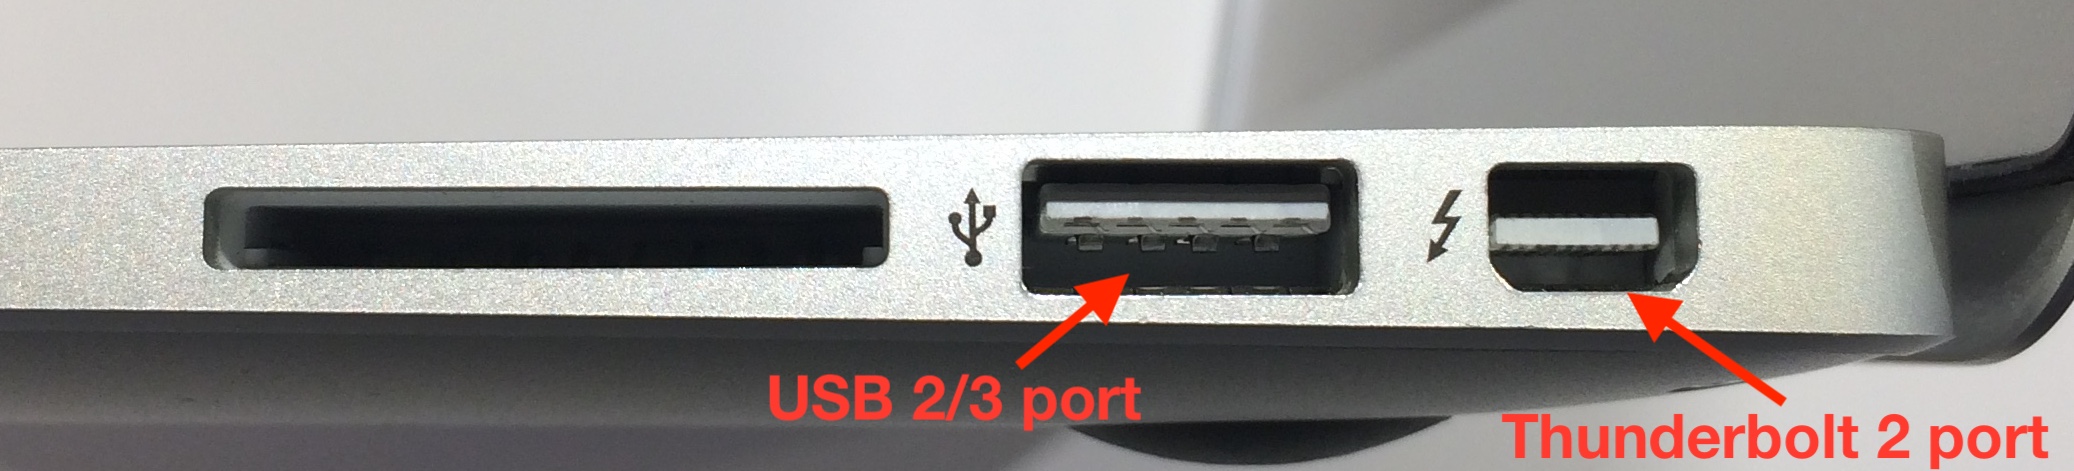
Thunderbolt and Thunderbolt 2 ports are used to connect displays and other devices. They have the same form as the older Mini DisplayPort, but can be identified by the little thunderbolt symbol next to the port.

Recently, USB-C has been developed as an “everything” port that can connect to external displays as well as power supplies and peripherals. Over time, it is likely to become more common as a way to connect to external displays. A Thunderbolt 3 port uses the USB-C connector, and any USB-C device should be able to be connected through a Thunderbolt 3 port (although Thunderbolt 3 devices will not work in generic USB-C ports that are not specifically designated as Thunderbolt 3).
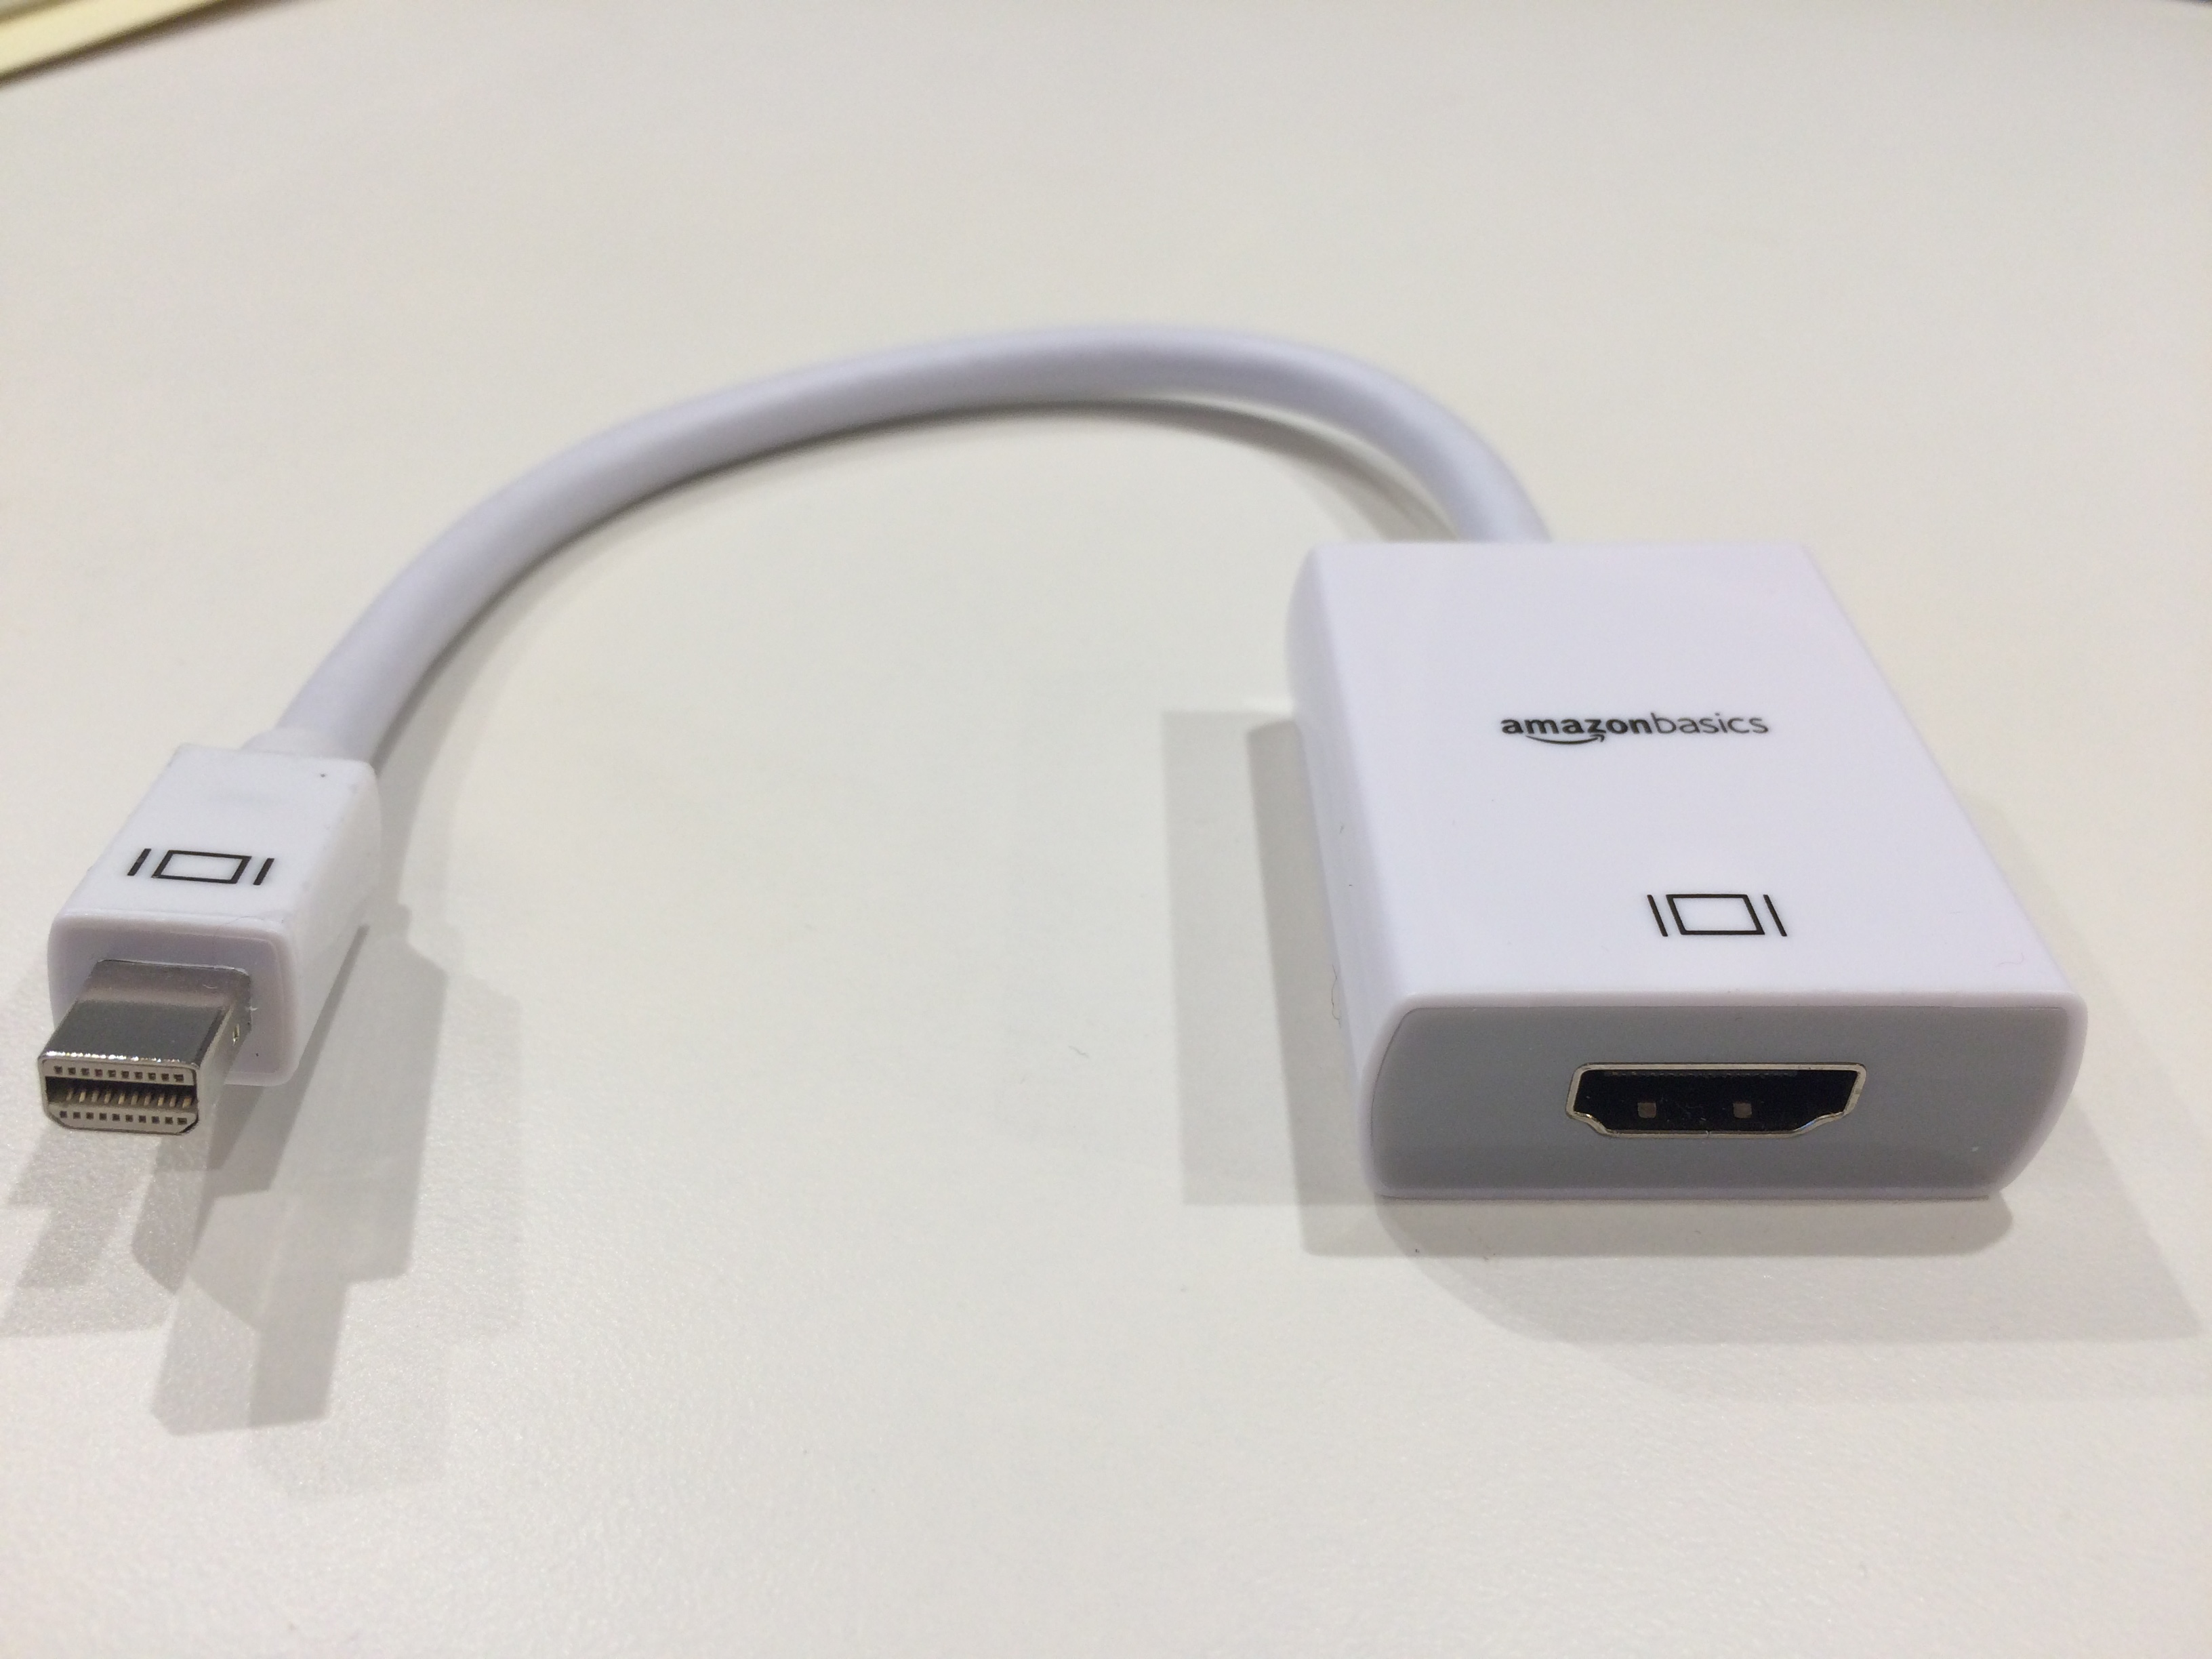
Thunderbolt 2 to HDMI converter
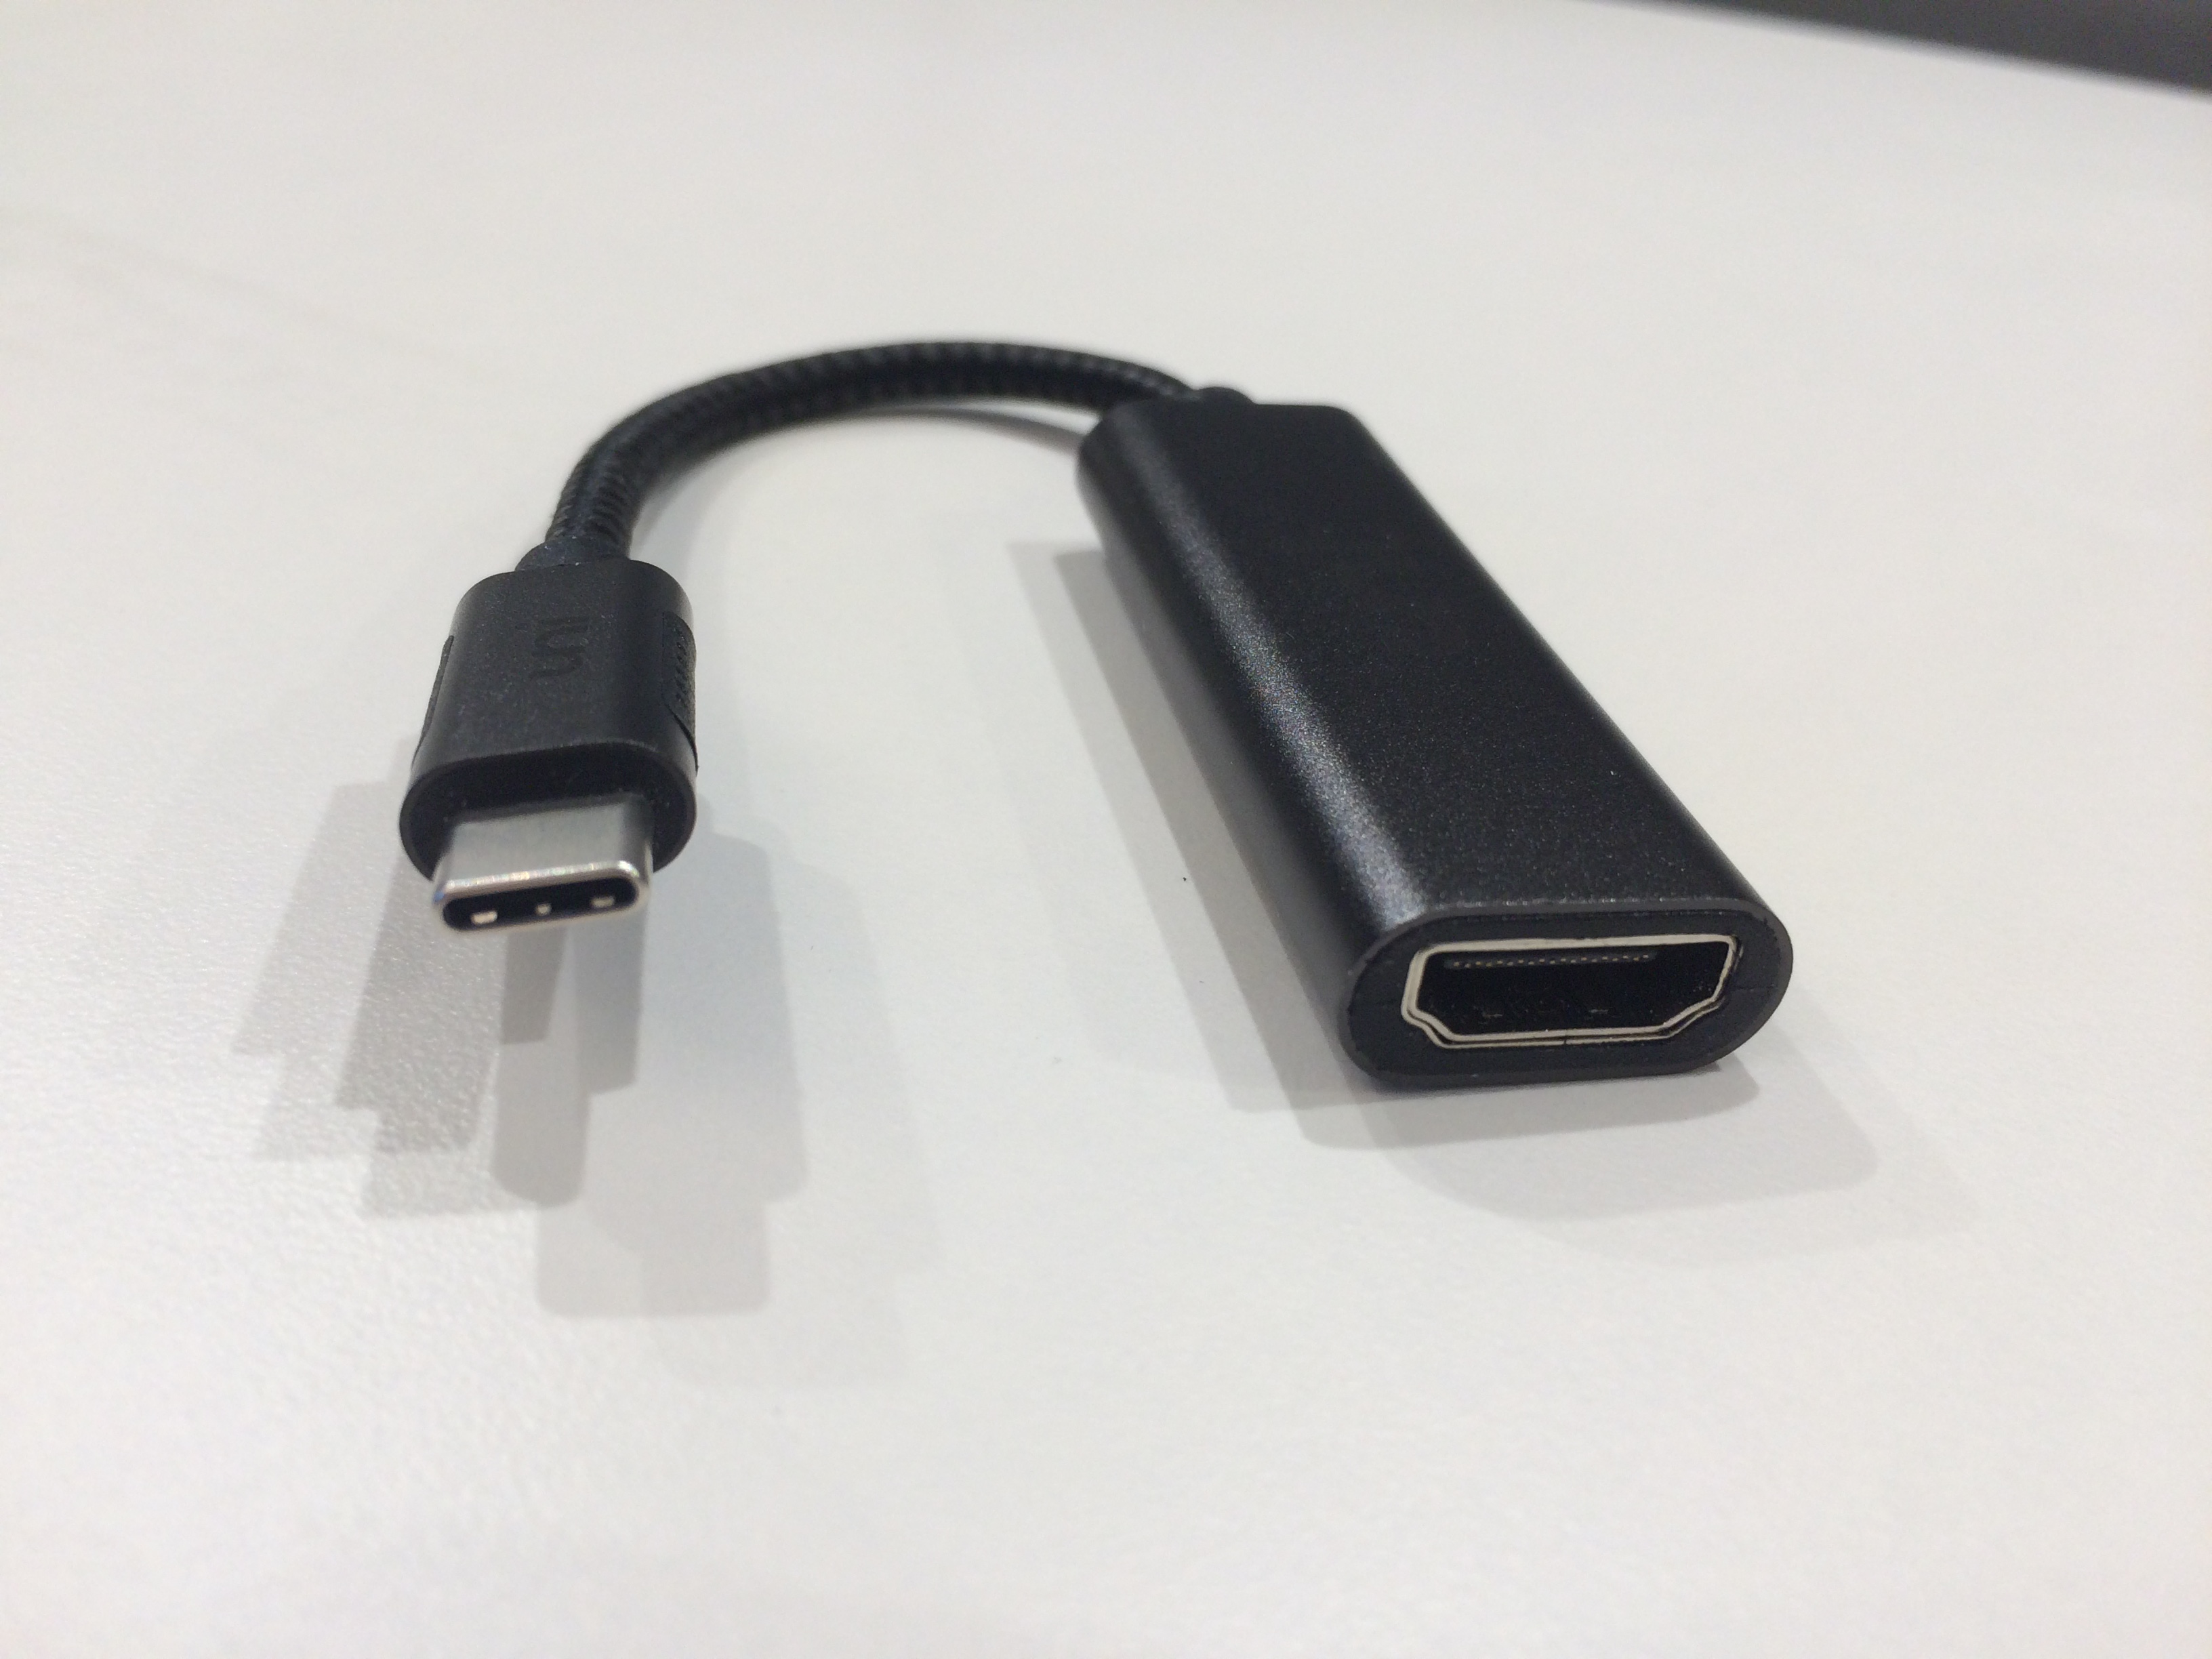
Thunderbolt 3 to HDMI converter
Since many external monitors (including LCD projectors) may not have any means to connect to a laptop that has only Thunderbolt 2 or 3 ports, an inexpensive converter can be purchased to allow the laptop to connect via an HDMI cable.
USB ports
Since the 1990’s USB (universal serial bus) connectors have been replacing the wide variety of connectors that were used previously.
USB cords can have many different connectors. The most common type for plugging into computers is the “type A” connector and it has been present on most computers since the 1990s.
Over the years, USB technology has improved, with each of the versions 1.0, 2.0, and 3.0 greatly increasing the transmission speed from the previous version. Fortunately, the versions are backwards compatible, so a USB 1.0 device can be plugged into a USB 2.0 or 3.0 port and a USB 2.0 device can be plugged into a USB 3.0 port as long as the connector type is the same. The faster devices can also generally be plugged into an older port, although their performance will be limited by the speed supported by the older version.
Very recently, USB-C has been introduced. It is also backwards compatible with versions 1.0 through 3.0, but it uses the “type C” connector, so many devices cannot be plugged directly into a USB-C port. One nice feature of the type C connector is that unlike the old type A connector, the type C connector can be inserted either way.
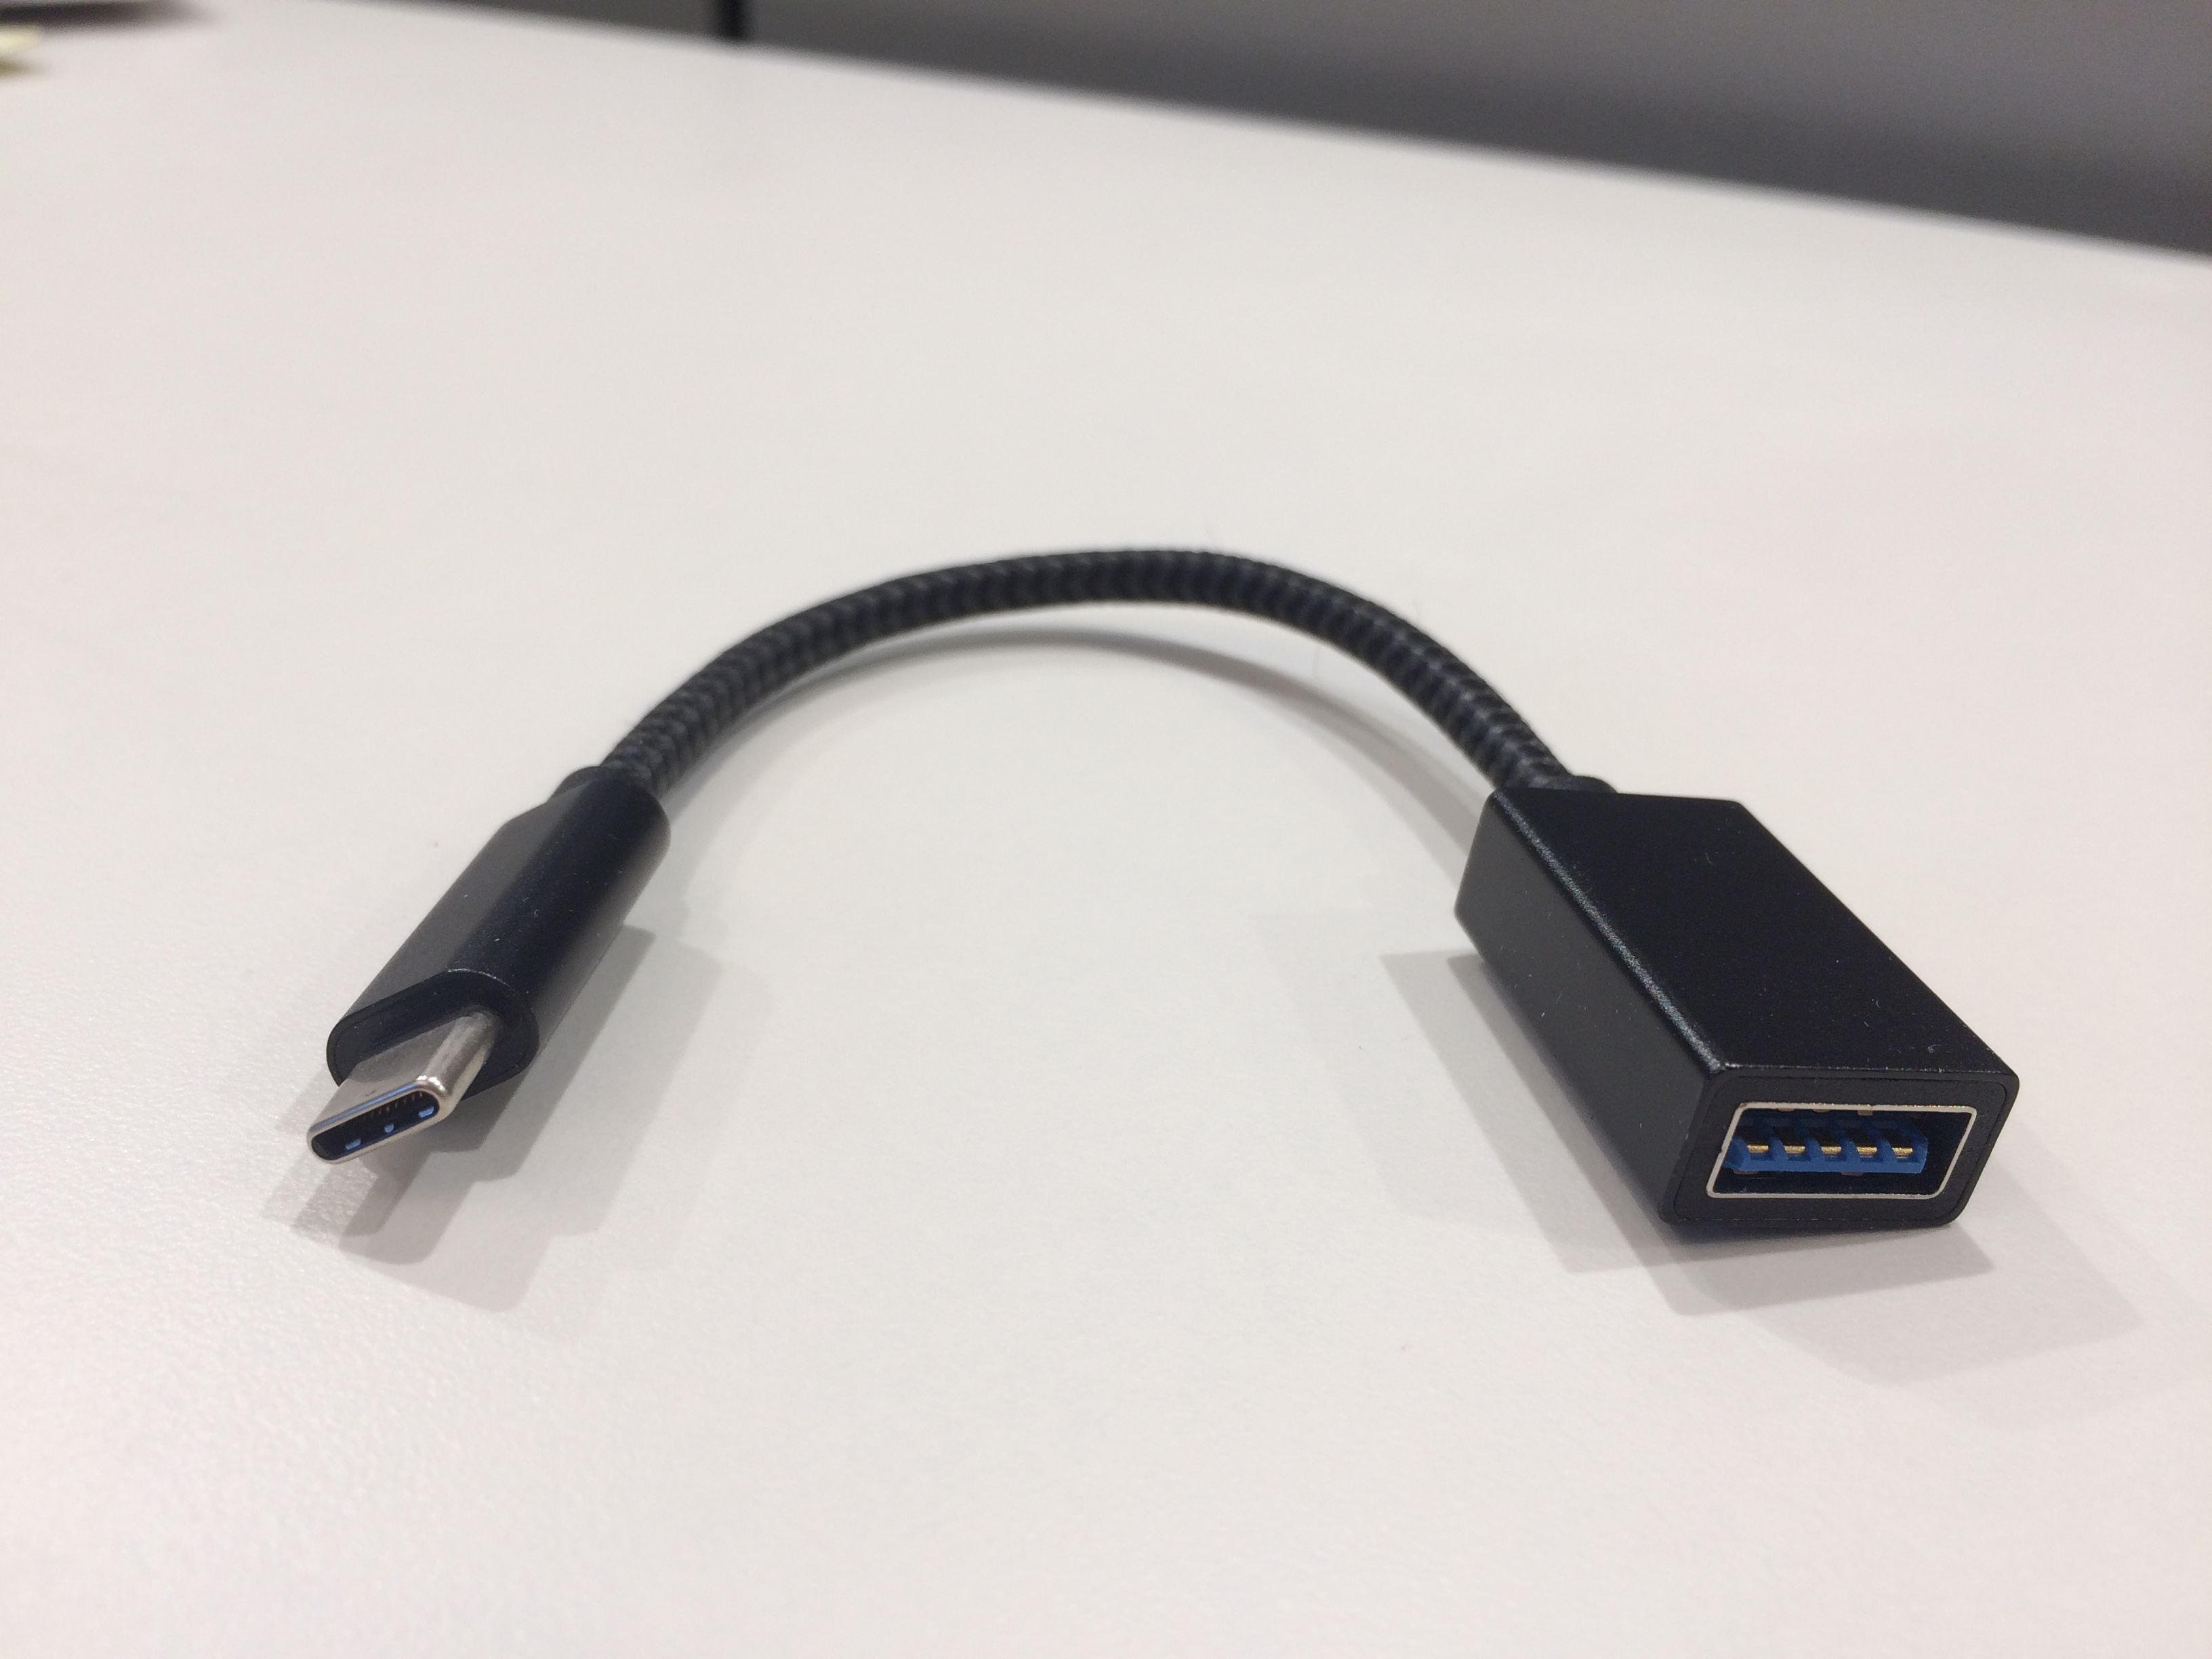
For users with very new computers that have only USB-C ports, relatively inexpensive converters are available that will allow older devices with type A cords to be plugged into the new ports.
Other connectors
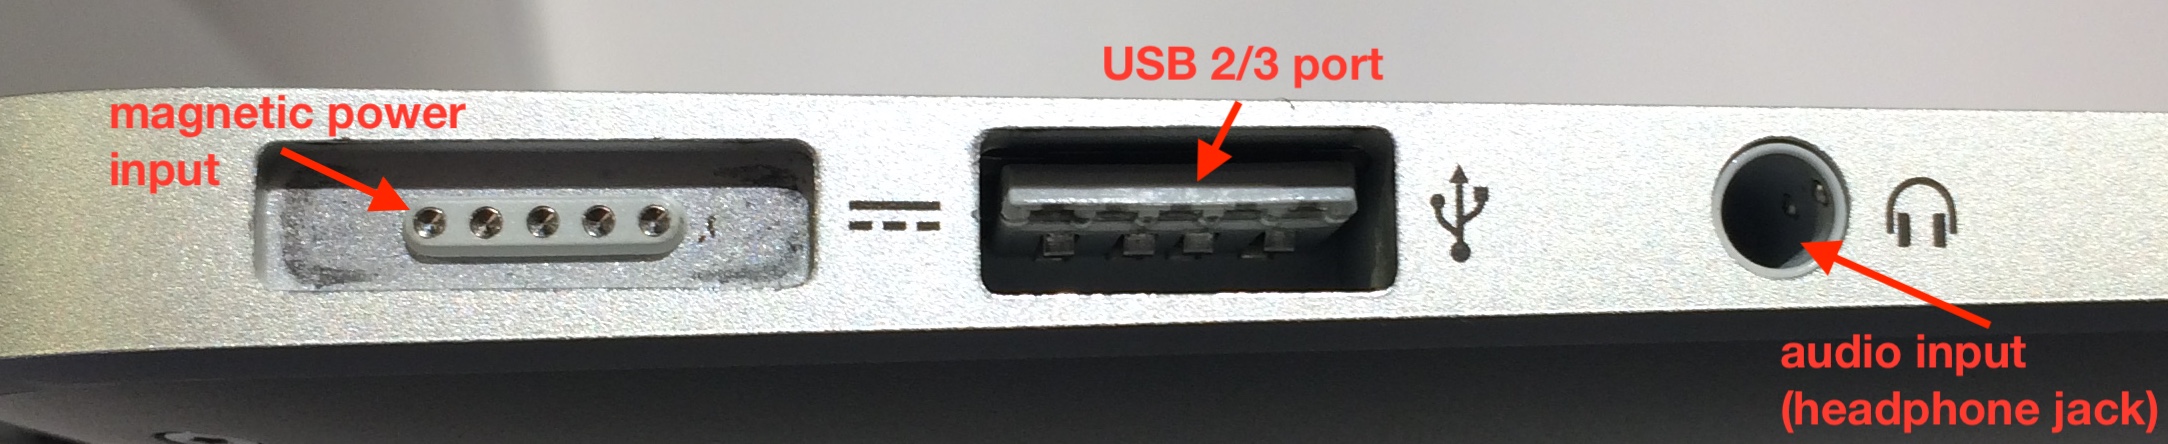
The most common other connection that is present on most computers is an audio out jack (more commonly known as the “headphone jack”). It is simply a small round hole.
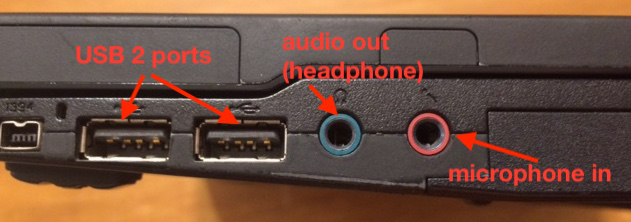
If a computer has only a single jack, it is nearly always an audio out jack. However, some computers have separate jacks for audio in (microphone) and audio out. In that case, it is common for the headphone jack to be colored blue or green and the microphone jack to be colored red.
There is a wide variety of connector types for power input. The one shown above is the type used in older MacBook Pros and Airs that have a magnetic power connector. Newer MacBooks (post 2015) have only Thunderbolt 3 (USB-C) ports (see pictures above), since they can also be used to connect to an external power supply.
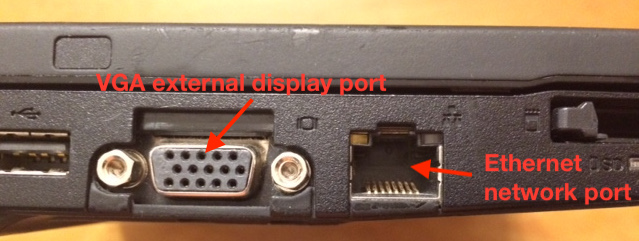
On older laptops, it was common to provide an Ethernet port to enable a wired connection to the network. With the widespread availability of WiFi, including Ethernet ports on laptops is increasingly uncommon.
Device drivers and firmware updates
Because manufacturers build peripheral devices to work with a wide variety of computers and operating systems, a computer needs specific software that helps the computer to “talk” to the device. This software is known as a driver. Drivers for many devices are routinely included as part of the files associated with the operating system (OS). When a newly acquired device (printer, monitor, external hard drive, etc.) is plugged into the computer for the first time, the plug and play system kicks in. The device identifies itself to the system, and plug and play searches through the drivers that are available to try to find the best available one for the device.
If the device is new and the OS is old, it’s possible that the OS will use a more generic driver that will allow the device to work, but which might not support all of the features of the device. In that situation, a user might be frustrated that fancy features of the new device don’t work. There probably isn’t anything wrong with the device, it may simply be the case that a more recent driver needs to be installed after downloading it from the Internet. Teaching you how to install new drivers is beyond the scope of this lesson, but it is realtively easy if you can get help from a more advanced user.
There may also be driver updates that fix bugs or patch security risks. However, on Macs most device drivers are automatically upgraded automatically with OS upgrades.
Drivers are software that resides on the computer. But the device itself probably has its own software that it uses to communicate with the computer. That software is often called firmware. Sometimes there will be an update to a device’s firmware that is intended to solve bugs or security problems. Such firmware updates are usually downloaded from the Internet through the computer, but since the change needs to be made on the device, the new updated software has to be transferred from the computer to the device through a cable or WiFi.
During the firmware update, erasable programable memory in the device (similar to the memory on a flash drive) has to be rewritten by transferring the new software from the computer to the device. It’s important that this process doesn’t get interrupted since a disruption might cause the device to become non-functional. A firmware update is something like a “brain transplant” for the device – disrupting something during the “transplant” could cause the device to only have half a brain.
Once the firmware update is finished, any downloaded files on the computer aren’t needed any more and can be deleted.
Printers
Note: This information is related to printers attached directly to a computer or through a home network. Printers connected through the Vanderbilt network are more complicated and you’ll probably need help with them.
The Mac OS has a system for connecting to printers called AirPrint. Most popular printers support AirPrint. You can connect to a printer using AirPrint through WiFi, a wired network connection, or USB. Usually all that is required to use the computer is to connect to it.
Not every printer is compatible with the Mac OS, so you should check before you make a purchase to make sure you can use it with your Mac. If a printer doesn’t support AirPrint but is supposed to be Mac compatible, the Mac OS should be able to download the necessary driver software automatically.
If you do have problems with a printer, you can try removing the printer, then adding it back again. Instructions for manually removing and adding printers are here
Removable storage
Addition file storage can be added to a computer by connecting a flash drive or external hard drive via a USB port.
Flash drives and external hard drives
Flash drives are also known as thumb drives, memory sticks, jump drives, or USB drives. They consist of re-writable electronically erasable programable memory (EEPROM; also known as flash memory) in a small package that can be plugged into a USB port. They are relatively inexpensive and over time their capacity has increased, with sizes of 128 GB (gigabyte) or more currently common.
External hard drives originally contained spinning magnetic disk media, powered directly through the USB port. Recently, it has become more common for them to be replaced by solid state drives (SSD), which use the same kind of memory as flash drives. Solid state drives are faster, require less power, and are less easily damaged by being dropped or struck. They are, however, at least twice as expensive as magnetic media drives of the same size. External SSD drives are now commonly found in sizes of 500 GB and spinning disk drives of 4 TB (terabytes or about 4000 GB) or more.
Safely remove hardware/dismount drive
When you are finished with removable media, you shouldn’t just pull the device from the USB port. There are two ways to eject the removable media. (The term “eject” is a holdover from the time when floppy disks were physically ejected from their drives.)
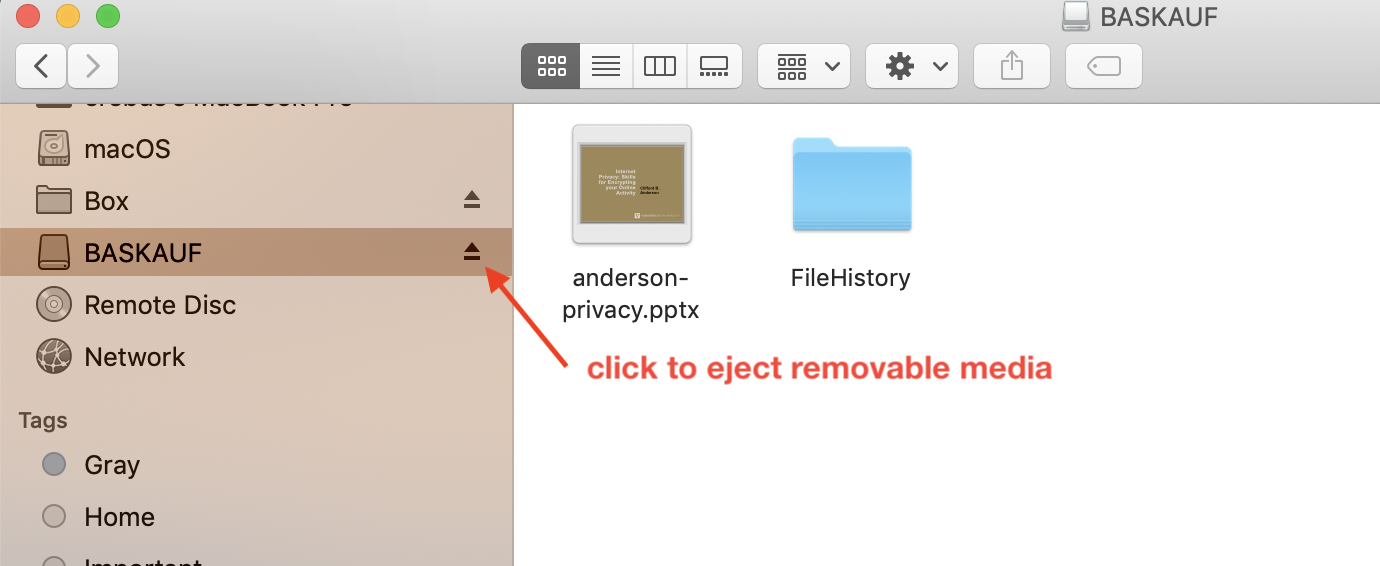
In Finder, scroll down until you see the name of the removable media (in this case, a flash drive named “BASKAUF”). Click on the “eject” symbol to the right of the name.
![]()
Alternatively, find the icon for the removable media on the desktop. It will look like a little external hard drive regardless of what kind of media it is.
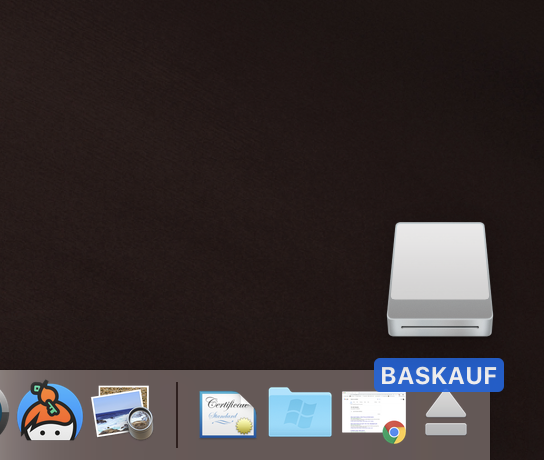
Drag the drive icon to the trash can. The trash can will turn into an eject symbol. Drop the drive on the symbol.
Once the drive has been ejected, you can physically unplug it from the USB port.
Using multiple monitors
There are two typical situations where a computer is connected to multiple displays. One is where a laptop is “docked” to a larger external monitor. The other is when the computer is connected to a projection system, such as an LCD projector. The instructions here will show you how to make the displays work the way you want.
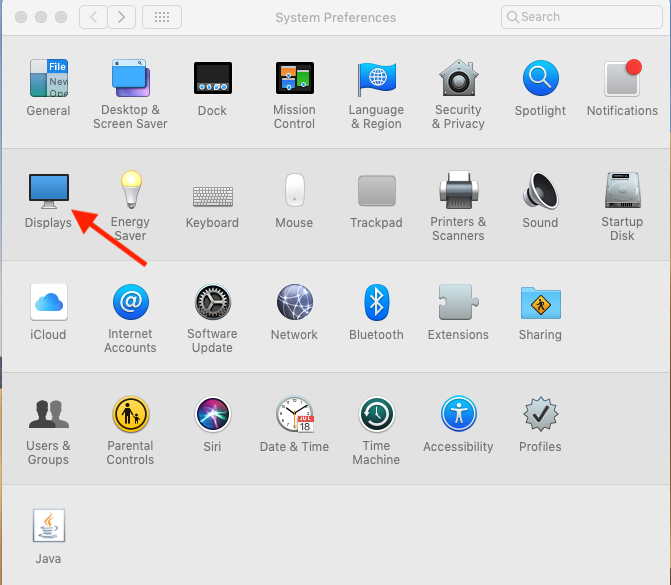
From the apple menu at the upper left, select System Preferences.... Click on Displays.
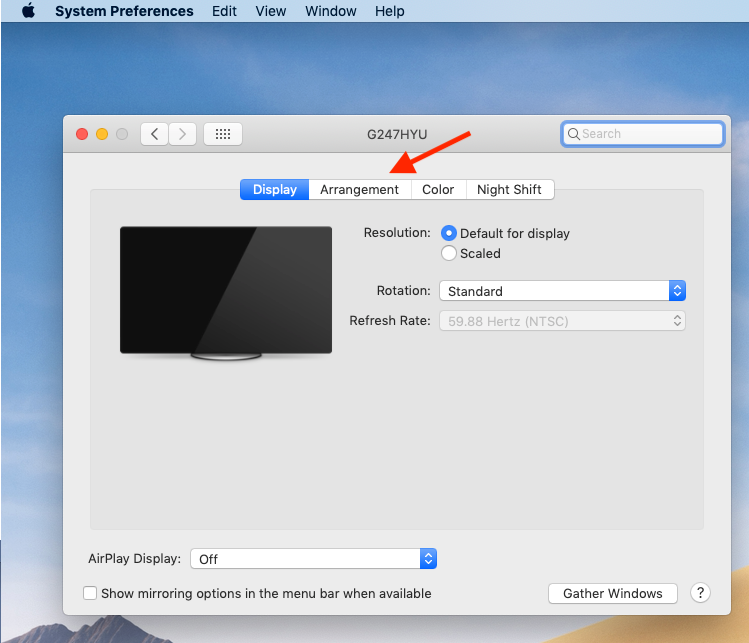
A window will appear for each monitor. If both displays are mirroring the same desktop, they will appear together in each display. If the external monitor is extending the desktop, each window will appear on the display they represent. Using the Rotation dropdown for each monitor, you can control whether the monitor is oriented as landscape or portrait. In some cases, users prefer to rotate a monitor 90 degrees to have a screen that is higher than it is wide. For that configuration, you would change the orientation to Portrait.
One of the windows will have an Arrangement tab. Click on that tab.

The Mirror displays checkbox controls whether the same material is shown on both monitors (checked) or if the display extends from one to the other (unchecked). Extending the displays is usually the best choice for an external monitor connected to a laptop. Mirroring the displays is usually the best choice if the laptop is connected to a projection system (allowing the user to see on the laptop what is being displayed on the prjector).
If the checkbox is unchecked, you will see a schematic of your monitors. Drag them around until their configuration on the screen matches their physical arrangement on your desk.
To determine which monitor is the primary monitor, drag the white menu bar on the schematic to the monitor you wish to make primary.
Revised 2019-03-24

Questions? Contact us
License: CC BY 4.0.
Credit: "Vanderbilt Libraries Digital Lab - www.library.vanderbilt.edu"