Understanding my computer - Lesson 2: Directories
This is the Windows version of this page. Click for the Mac version of this page
Directories
Reminder: “directory” means the same thing as “folder”
The directory tree
The operating system works with the hard drive of your computer to manage a complex system for tracking the location of all of the bytes of data stored there. Fortunately, we generally don’t have to worry about that. The operating system has a built-in file management system that helps you keep track of where files are located.
In the first lesson, a directory was described as an index telling the computer where the data included in files were located on the hard drive of your computer. That index also keeps track of the file names, sizes, modified dates, etc. – all of the information we saw in the File Properties box in the first lesson. Although as a practical matter there isn’t a limit to the number of files you can put in a directory, it is difficult to manage a large number of files in a single directory. For that reason, a hard drive can have many directories.
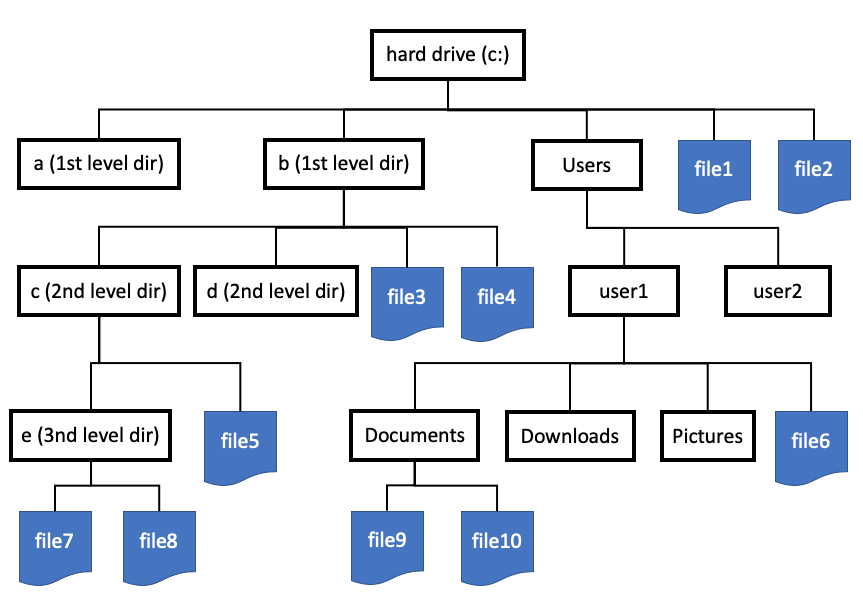
To help humans keep track of directories and files, the file management system lets users nest directories inside of other directories in a hierarchical manner. There are a number of ways you can visualize this hierarchical structure, but the diagram above is typical. Because of the branching nature of the directories, this organizational system is called the directory tree. When organized in this way, the “tree” is upside-down, since its branches point down (unless you want to envision the branches as roots!). But this arrangement is probably better since we refer to directories lower down on the diagram as subdirectories and talk about moving “up” the tree when we move towards the top of the diagram.
On Windows systems, file storage drives are assigned drive letters. The typical drive letter assigned to a computer’s hard drive is c. The drive letter is followed by a colon, so we would refer to the c drive as c:.
The very top of the directory tree is called the root directory. You can think of it as sitting directly on the hard drive. It can contain first-level directories, and there can be second-level directories nested inside the first-level ones. There is theoretically no limit to the number of levels of nesting of directories within directories. Files can be located inside any directory, including the root directory.
We can describe the position of a file within the directory tree using an expression called the path to the file. The path describes the position of the file by listing all of the directories from the root to the file, in order and separated by backslashes (\).
The root directory is simply a backslash by itself. When writing full paths in Windows, the directory path is written following the drive letter, so the full path to a file in the root directory (like file2 in the diagram) would be:
c:\file2
The path to files 3, 5, and 8 would be:
c:\b\file4
c:\b\c\file5
c:\b\c\e\file8
If there are other drives connected to the system, they are assigned different drive letters, such as d: or z:. There is a directory tree within each of these drives, so
c:\b\c\file5
d:\b\c\file5
z:\b\c\file5
could all be paths to different files that were located on different drives. Often, if we are only concerned with a particular drive, we will omit the drive letter from the path and the system will assume that the drive letter is the one for the current (most recently designated) drive. A path like
\b\c\file5
would be valid, and would assume whatever drive letter was in current use.
Note: for simplicity the names used for the directories in this example are a single letter. Normally, they would have longer names. In general, directories have the same naming rules as files. The guidelines given for “safe” file names in the first lesson also apply to directory names. Although Windows generally supports spaces in directory names, using spaces in directory names is a bad idea! In some programming languages and applications, spaces in file and directory names are NOT supported, so using spaces can “break” scripts and programs. So don’t use them if you can avoid it!
Tech tip: Annoyingly, the Mac operating system, which is based on Linux, separates parts of the path with forward slashes (/) instead of backslashes. Otherwise, the way of specifying a path on a Mac or Linux is the same as in the Windows system.
Special directories in Windows
In the first lesson, we saw that several special folders in Windows PC (Documents, Downloads, Pictures, etc.) were duplicated for each user of the computer. These special folders (a.k.a. directories) are kept sorted by placing them in what is known as the home directory for the user. When a user logs onto the computer, the operating system takes note of which user home directory is appropriate, and uses that home directory as the basis of reference for the other special folders (Documents, Downloads, etc.).
A user’s home directory is located in the Users directory, a first-level directory on the default hard drive of the computer (usually drive c:). If the user’s name is user1, this could be a path to the file file6 in the user’s home directory:
c:\users\user1\file6
Making File Explorer work the way you want
When you open a File Explorer window, its exact appearance is going to depend on how you’ve used it in the past, since it usually remembers how you had it set up the last time you used it to look at a particular directory. There are certain modifications that you can do to make File Explorer easier to use based on how you like to organize things.
Navigation pane and ribbon
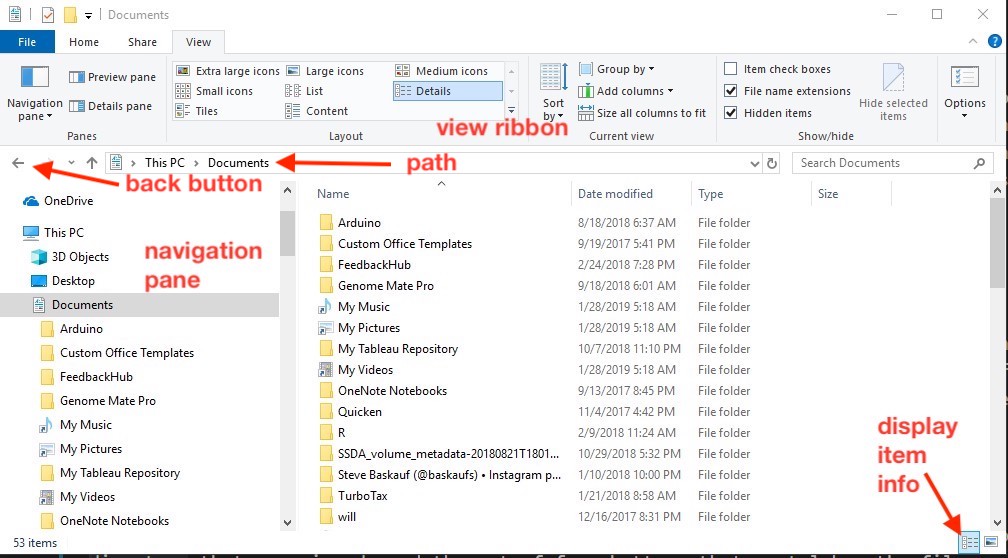
There are two parts of the File Explorer window that you can choose to display or not. The ribbon is at the top of the window. The Home and View tabs open the most useful ribbons. The Home tab allows you to perform tasks such as creating new folders and deleting files. The View tab has many useful features and we will focus on it.
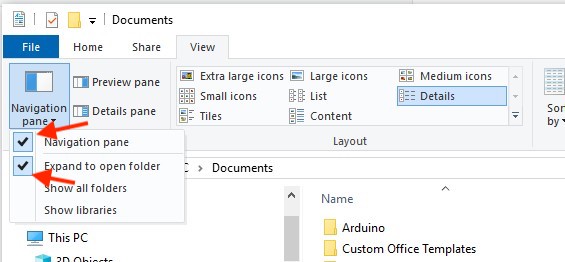
The first item in the View tab is a dropdown that controls whether the second part (the navigation pane) is visible or not, and how it works. You should check the Navigation pane checkbox if it isn’t already checked. Also check the Expand to open folder checkbox.
The second set of items (Preview pane and Details pane) open and close panes at the right of the window that provides a preview of the contents or gives details of the selected file, respectively.
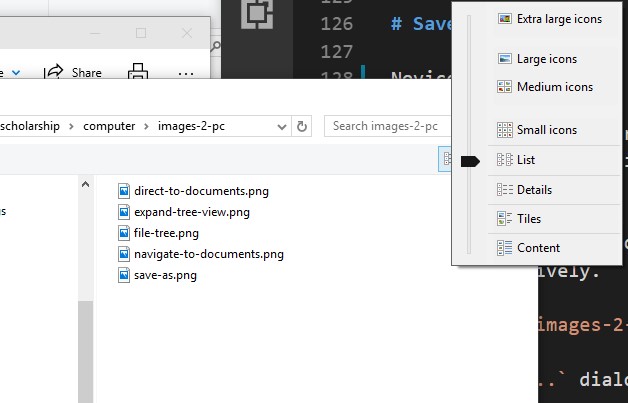
The third set of items allows you to select how you want to view the files. The most useful view styles are Details and the various sizes of icons.
![]()
The Large icons option is mostly useful for directories that contain images, since it presents reasonably sized thumbnails of images in the folder. It’s probably the easiest way to find a particular image from a large collection in a directory.
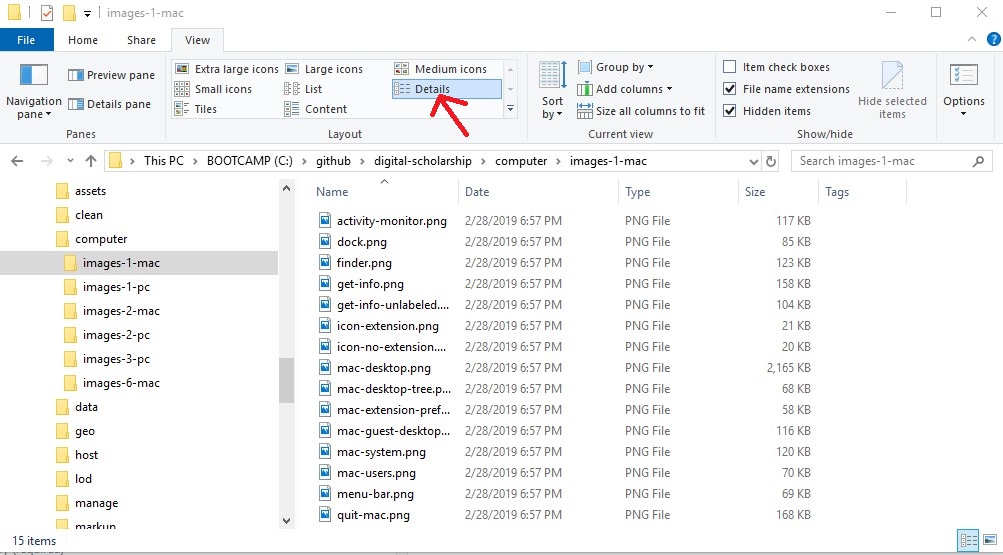
The Details option is probably the most useful of the remaining views. This view displays columns of metadata about the files, including the time when it was last modified and the file size. You can sort by any of the columns, which is particularly useful for finding the most recently modified, or the oldest files.
There is also a set of buttons in the lower right of the window that allows you to switch between displying item info and just displaying the icons. It’s best to just leave it selected to display item info and control the view style using the view ribbon options.
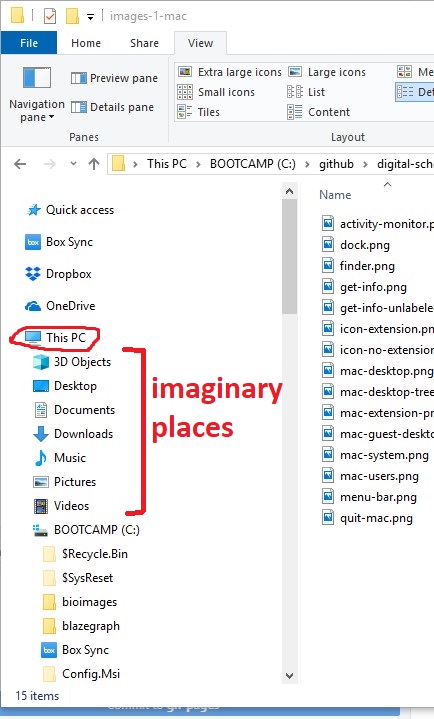
The navigation pane is extremely useful for navigating around in the directory tree. Near the top of the navigation pane is This PC, which is sort of the imaginary root of every file storage thing in the directory tree. Located under it hierarchically are the “imaginary” places: Desktop, Documents, Downloads, Pictures, etc. that actually are located within the user’s home directory. Below them is the actual hard drive of the computer. It might have various names, but can be recognized by its labeling as (C:).
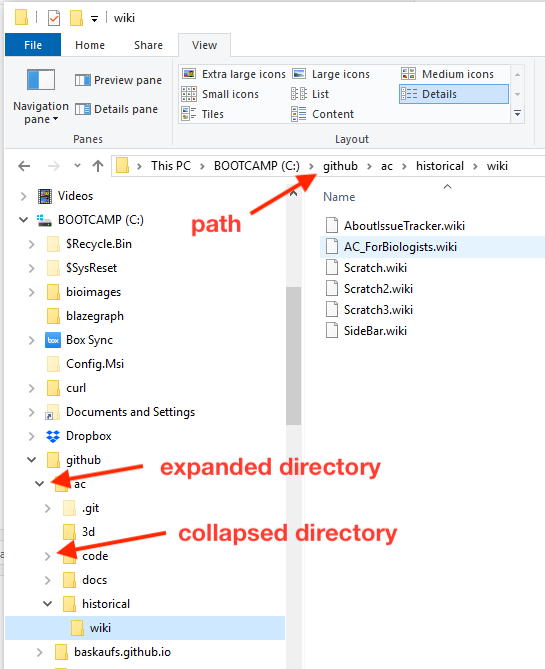
Any of these items can be expanded or collapsed by clicking on the arrow to the left of the folder icon. The arrow points to the right for collapsed directories and points down for expanded directories. At any point in the process of expanding the dirctory tree, you can click on a folder and its contents will be displayed on the pane to the right and the hierarchy will be displayed in the path bar below the ribbon. If you checked the Expand to open folder option in the Navigation pane options, then double-clicking on a folder at the right will also automatically expand that folder in the navigation pane on the left.
After you have gone down into deeper subdirectories of the directory tree, you can go back up the tree in several ways. You can click the back button (left-facing arrow at the upper left) and it will return you to previous directories you have viewed. You can click on the up arrow and it will move you one level up in the directory tree. You can also jump to any higher level in the path by single-clicking on a folder in the path bar.
Exploring the entire directory tree
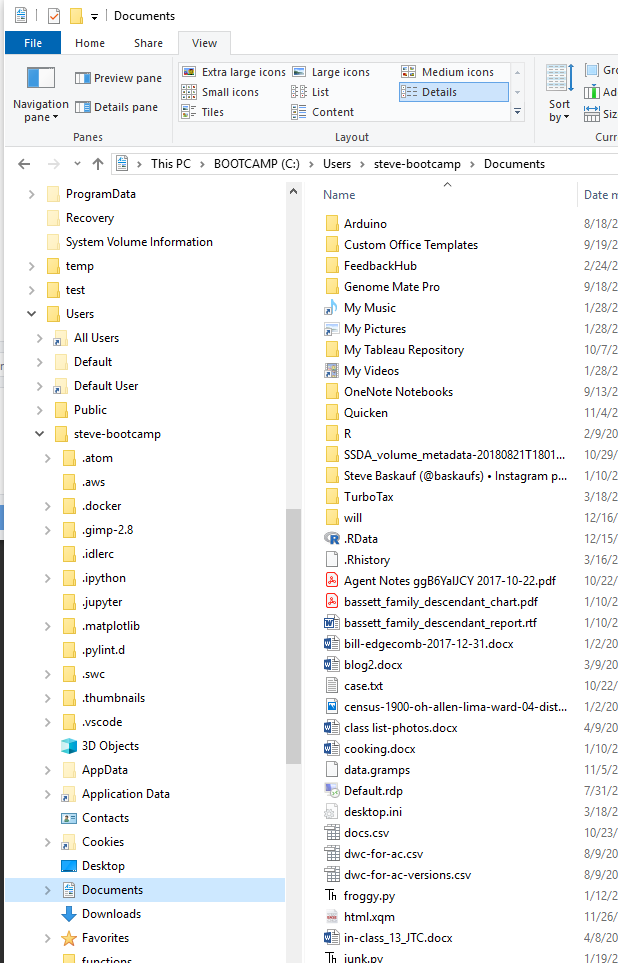
In File Explorer, make sure that the navigation pane is enabled and that you are using Details view. Starting with This PC, dive deep into the directory tree. Expand This PC if necessary, then the root directory your hard drive (probably named something but labeled as C:), to the users directory, then to your home folder, and finally to your Documents folder.
You should be able to see your path to the Documents folder in the Path box under the ribbon.
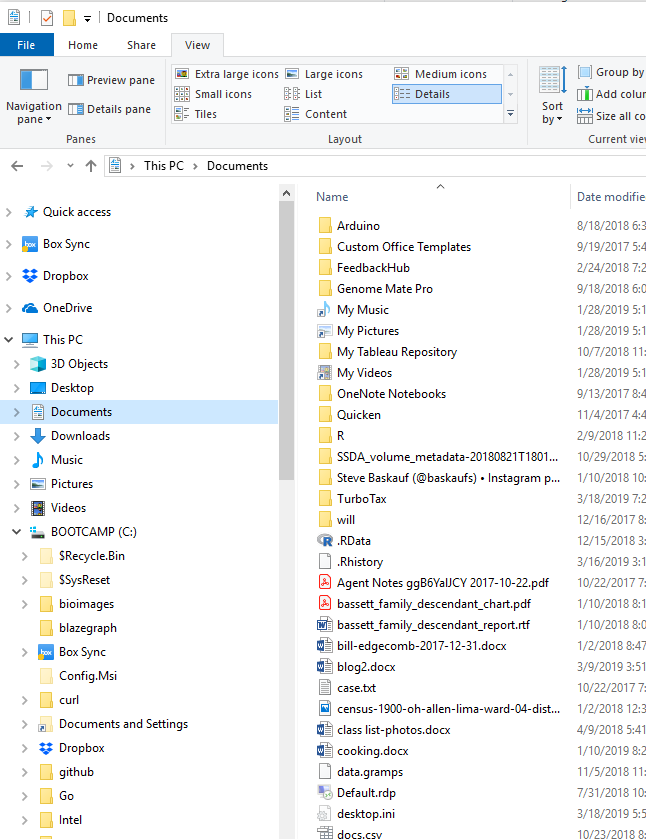
Now for contrast, click on the Documents folder directly under This PC. That will take you directly to your Documents directory. You should see the same files that you saw when you navigated to your Documents directory through the C: drive. If you look at the Path box, you’ll see that Windows is continuing the charade of pretending that your Documents folder is directly connected to your computer separately from the directory tree.
Save file dialog
Novice computer users often don’t have very many files on their computers at the start. So they tend to save all of their files on the Desktop or in the Documents folder. However, after accumulating more files, it becomes important to save them in a more organized manner that probably involves creating some hierarchical directories.
The Save as… dialog has many of the same features as File Explorer, so understanding how to navigate File Explorer will also help you do understand how to use the Save as... dialog effectively.
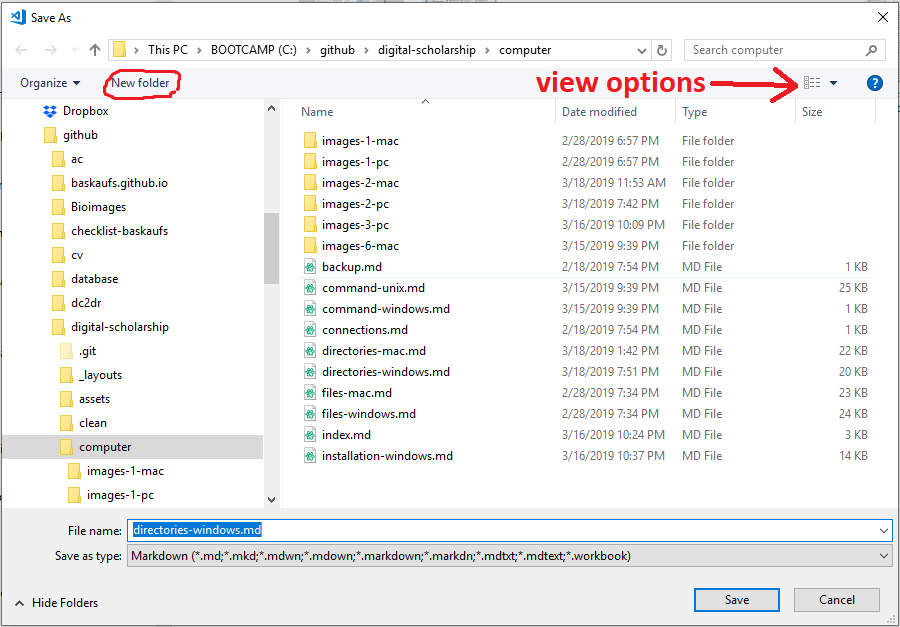
The Save as... dialog box allows you to navigate in a manner nearly identical to File Explorer.
To save space, the display view options are in a dropdown rather than a ribbon.
You can create a new folder in the current directory by clicking on the New folder option in the upper left if you want to develop the directory tree in a way that makes sense for storing the file. Just as in File Explorer, you can also click on the up arrow to the left of the path to move a level higher in the directory tree, or click on the path itself to move directly to a higher level.
Copying and moving files
When used with the File explorer navigation pane, click and drag is an efficient way to move files around. First, expand the directory tree in the navigation pane until you can click on the folder containing the file(s) you want to move. Click on the folder. Now scroll the navigation pane and expand the directory tree until you can see the folder where you want the file to go. Just drag the file from the pane on the right to the folder in the navigation pane where you want it to go, and drop the file.
A very important aspect of working with files in File Explorer is understanding the effect of drag-and-drop. In some cases, dragging and droping a file or folder causes it to be moved to the new location (moving), while in other cases, it causes a copy of the file to be created in the nwe location (copying). Whether drag-and-drop results in copying or moving depends primarily on the place where the file is dropped relative to its starting location.
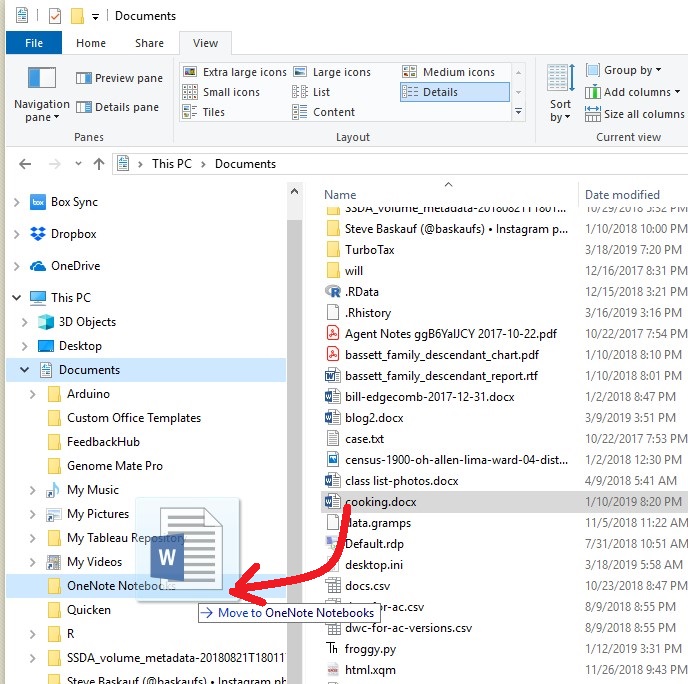
In the example above, I’m dragging and dropping a file from the Documents directory to a subdirectory of Documents. Both directories are located on my hard drive C:, so File Explorer assumes that I want to move the file. There are two ways that I can know that the file will be moved rather than copied: under the icon that I’m dragging an arrow appears as well as the words “Move to”.
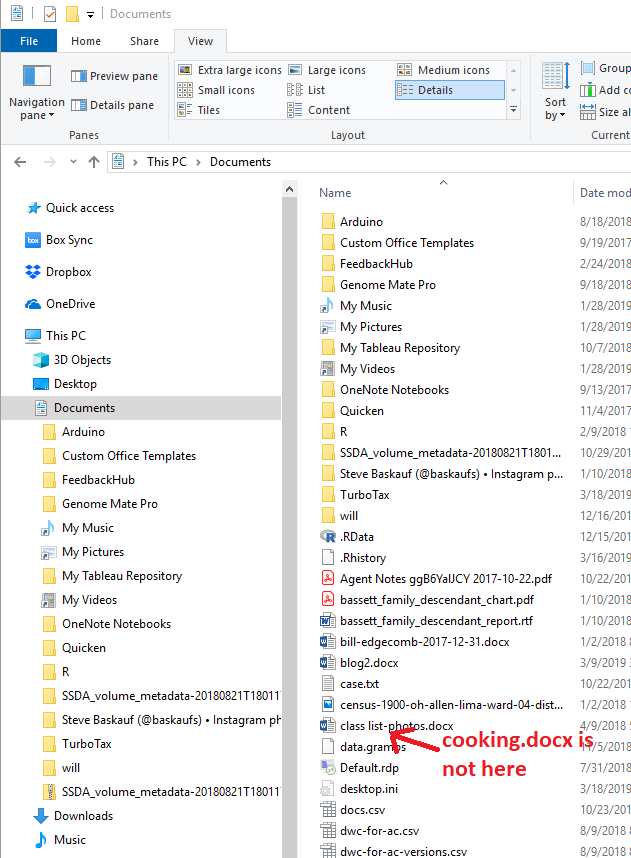
After I drop the file, I see that it has been moved to the new directory and is no longer in the old directory.
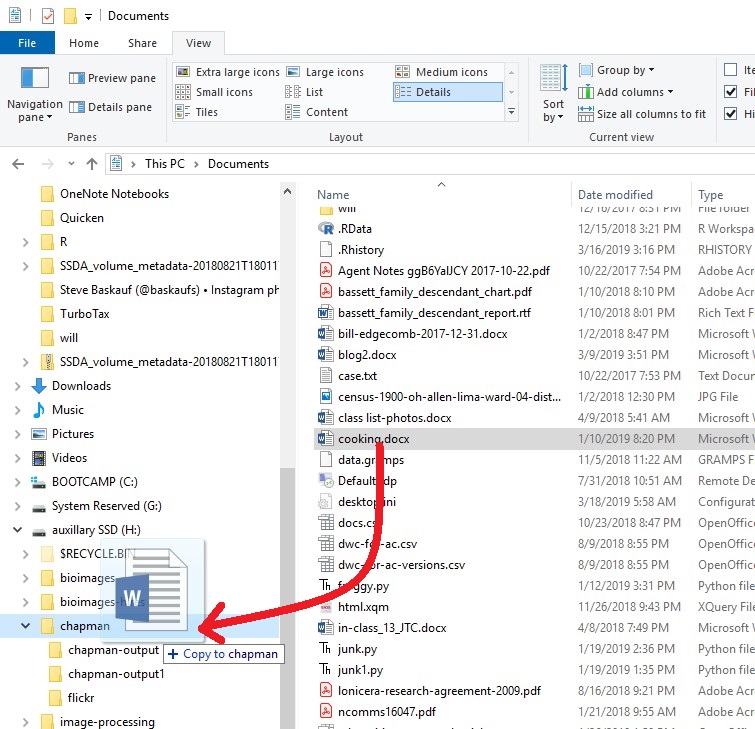
In the second example, I’m dragging and dropping a file from my Documents folder to an external drive that I’ve connected to my system, called auxillary SSD. I can see that Finder considers this to be a different drive rather than just a folder within my C: drive. To the left of the drive name, I see a little hard drive icon instead of a folder icon. To the right of the drive name, I see the H: drive letter (different from C:). Because I’m moving a file from one drive to another, File Explorer assumes that I want to copy the file.
This time, when I drag and drop, I see a plus (+) sign under the icon that I’m dragging and also the words “Copy to”. That means that the file I’m dragging will be added to the other drive as a copy, not moved.
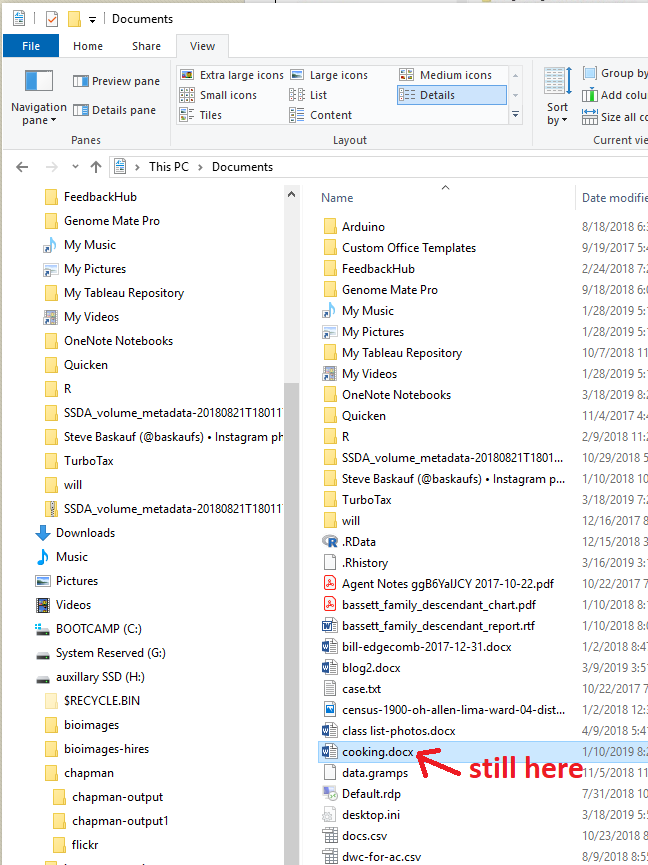
Once I’ve dropped the file, I can see that Finder did indeed do a copy operation because the original file is still where it was before I did the drag and drop.
The bottom line is that if you are ever unsure about whether you are copying or moving a file, look to see whether there is an arrow or a plus sign under the icon and notice whether it says “Move to” or “Copy to”.
Dropbox and Box
Dropbox and Box are two common and similar systems used to synch local files on a computer with an analogous directory tree in the cloud. You can use either system entirely by uploading and downloading files using a web interface, but it is far more convenient to set up folders in the cloud to by synched directly with directories on your local computer. This section assumes that you have enabled that kind of synch to your local computer.

When you install Dropbox or Box so that it will synch with your local computer, you will see the root folders for those services under the “Quick access” item in the navigation pane. However, the actual real location of the directory will be somewhere else. You can specify a location other than the default chosen during initial installation by right-clicking on the icons in the system tray at the lower right of the screen and accessing the settings or preferences. On the computer above, the folders were changed to be first-level directories under the C: drive.
Moving files into and out of subdirectories of the Box or Dropbox folders works just like moving files in and out of any other directories. However, the software associated with the services will automatically mirror those actions in the parallel directory trees in the cloud.
The synch process does not happen instantaneously. Depending on how big the files are and how many were moved, it could take seconds or even minutes for the synch process to complete. You can hover over, or right click on the icons in the system try to see the status of the synch.
Alternatives to drag and drop
Dragging and dropping files is OK for moving single files, but selecting and moving/copying a particular set of files (or a large number of files) can be a bit unnerving. Most people have probably had the experience of dropping files in the wrong place and struggling with how to undo the damage, particularly if a bunch if copied files get mixed in with a bunch of other files. (A quick answer to the problem is to hold the Ctrl key and press the Z key, which nearly always will undo the last action you’ve taken.) Here we will learn an alternative that doesn’t depend on dropping files in the correct place.
The other issue we will deal with here is what to do if you actually want to copy (NOT move) files within a drive, or move (NOT copy) files between drives.
The best way to handle this situation is a three-step process that is easier to control: select the files you want to move, either copy or cut them, then paste them where you want them to go. Whether the files are copied or moved depends on whether you copy or cut them.
Selection methods
You can select files by clicking and dragging, but you can get better control using shift-click or command-click.
To select a range of files in a list, click on the first file in the list, then hold down on the shift key and click on the final file in the list. To select particular files, click on the first one, then hold down on the Ctrl key and click on each of the other files to select them (or click a second time to de-select them). You can also hold on the Ctrl key, then press on the A key to select all of the files in a directory.
Copy/Cut

Once you have selected the set of files you want to copy, right-click on one of the files and select Copy. Alternatively, you can select Copy from the Home ribbon. The sortcut for this action is holding on the Ctrl key, then pressing the C key.
Alternatively, if you want to move the files instead of copying them, right-click on one of the files and select Cut. Alternatively, you can select Cut from the Home ribbon. The sortcut for this action is holding on the Ctrl key, then pressing the X key.
Paste
Regardless of whether you chose copy or cut, click on or in the directory where you want the files to go, then right-click and select Paste (or select Paste from the Edit menu). The sortcut for this action is holding on the Ctrl key, then pressing the V key.
Note:
Using the copy/cut and paste method distinguishes between moving and copying solely based on whether you choose copy or cut. It does not depend on whether the operation is done within or between drives.
go on to Lesson 3: Installing software
Revised 2019-03-18

Questions? Contact us
License: CC BY 4.0.
Credit: "Vanderbilt Libraries Digital Lab - www.library.vanderbilt.edu"