Understanding my computer - Lesson 2: Directories
This is the Mac version of this page. Click for the Windows version of this page
Directories
Reminder: “directory” means the same thing as “folder”
The directory tree
The operating system works with the hard drive of your computer to manage a complex system for tracking the location of all of the bytes of data stored there. Fortunately, we generally don’t have to worry about that. The operating system has a built-in file management system that helps you keep track of where files are located.
In the first lesson, a directory was described as an index telling the computer where the data included in files were located on the hard drive of your computer. That index also keeps track of the file names, sizes, modified dates, etc. – all of the information we saw in the Get Info box in the first lesson. Although as a practical matter there isn’t a limit to the number of files you can put in a directory, it is difficult to manage a large number of files in a single directory. For that reason, a hard drive can have many directories.
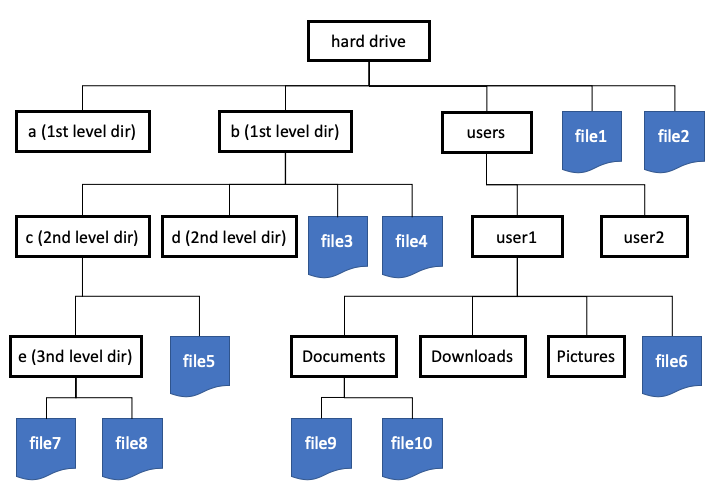
To help humans keep track of directories and files, the file management system lets users nest directories inside of other directories in a hierarchical manner. There are a number of ways you can visualize this hierarchical structure, but the diagram above is typical. Because of the branching nature of the directories, this organizational system is called the directory tree. When organized in this way, the “tree” is upside-down, since its branches point down (unless you want to envision the branches as roots!). But this arrangement is probably better since we refer to directories lower down on the diagram as subdirectories and talk about moving “up” the tree when we move towards the top of the diagram.
The very top of the tree is called the root directory. You can think of it as sitting directly on the hard drive. It can contain first-level directories, and there can be second-level directories nested inside the first-level ones. There is theoretically no limit to the number of levels of nesting of directories within directories. Files can be located inside any directory, including the root directory.
We can describe the position of a file within the directory tree using an expression called the path to the file. The path describes the position of the file by listing all of the directories from the root to the file, in order and separated by forward slashes (/). This system is also used by the Linux operating system (based on Unix), which is actually the underlying system on Macs.
The root directory is simply a slash by itself, so the path to a file in the root directory (like file2 in the diagram) would be:
/file2
The path to files 3, 5, and 8 would be:
/b/file4
/b/c/file5
/b/c/e/file8
Note: for simplicity the names used for the directories in this example are a single letter. Normally, they would have longer names. In general, directories have the same naming rules as files. The guidelines given for “safe” file names in the first lesson also apply to directory names.
Tech tip: Annoyingly, the Windows operating system separates parts of the path with backslashes (\) instead of forward slashes. Otherwise, the way of specifying a path in Windows is the same as in the Unix system that Macs use.
Special directories on Macs
In the first lesson, we saw that several special folders in a Mac (Documents, Downloads, Pictures, etc.) were duplicated for each user of the computer. These special folders (a.k.a. directories) are kept sorted by placing them in what is known as the home directory for the user. When a user logs onto the computer, the operating system takes note of which user home directory is appropriate, and uses that home directory as the basis of reference for the other special folders (Documents, Downloads, etc.).
Because of the special status of the home folder, it has a special abbreviation in Linux: a tilde (~). In the diagram above, the full path of file6 would be:
/users/user1/file6
but it can be abbreviated as:
~/file6
This tilde shorthand can be thought of as “the home directory of whatever user is logged on”. If we want to refer to “file9 in the Documents directory of whatever user is logged on”, we could say:
~/Documents/file9
This is convenient if we want to indicate, for example, that a file is in the Downloads folder of the current user, but don’t actually want to have to specify who that user is. If we used the full path starting with the root directory, we would have to include the user’s home directory name in the path, and that would change if a different user logged in.
Making Finder work the way you want
When you open a Finder window, its exact appearance is going to depend on how you’ve used Finder in the past, since it usually remembers how you had it set up the last time you used it. There are certain modifications that you can do to make Finder easier to use based on how you like to organize things.
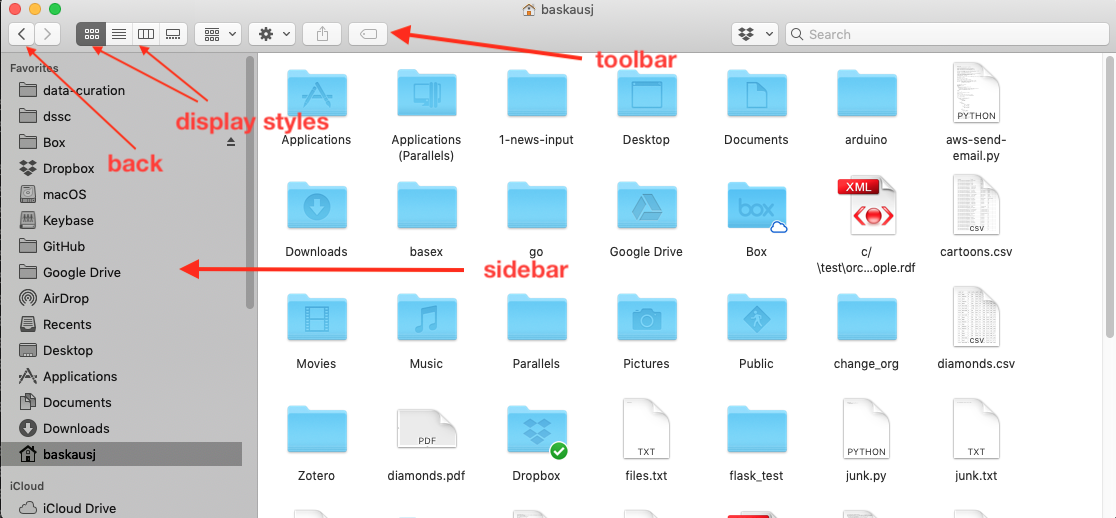
Sidebar and toolbar
There are two parts of the Finder window that you can choose to display or not. The toolbar is at the top of the window. Its most useful features are the back button, which allows you to go back to previous directory that you viewed, and the set of four buttons that contol how the files are displayed (as icons, list, columns, or gallery). The sidebar allows you to quickly jump to folders that you frequently use.
You can control whether the toolbar and sidebar are visible or not by going to the Finder View menu and toggling show toolbar/hide toolbar option. Unless you are really hard up for screen space, I recommend leaving them visible. (You can also show or hide just the sidebar, but toggling the toolbar shows or hides both).
Once the sidebar is visible, there are two ways you can control what “favorite” folders are visible. To control which of the “special” folders are visible, click on a Finder window (or the Finder icon in the dock), then from the Finder menu, select `Preferences”. Click on the Sidebar tab.
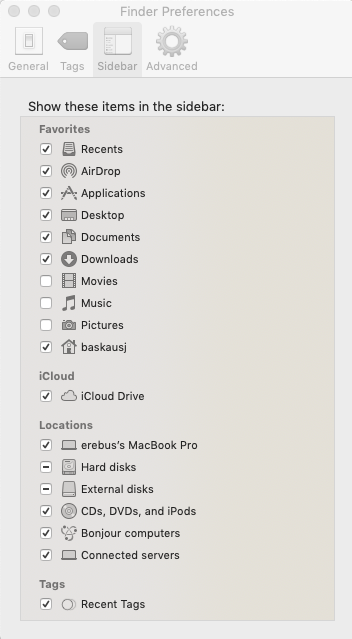
Uncheck the boxes of any items you don’t want to see, and check any that you think you might use frequently. For these exercises, make sure that your home folder is checked (the icon that looks like a little house) as well as the Location that has your computer name (in this case, erebus's MacBook Pro). When you are done, close the window by clicking on the red dot. Note: you can always go to any of the special folders by dropping down the Finder Go menu, then selecting the folder you want.
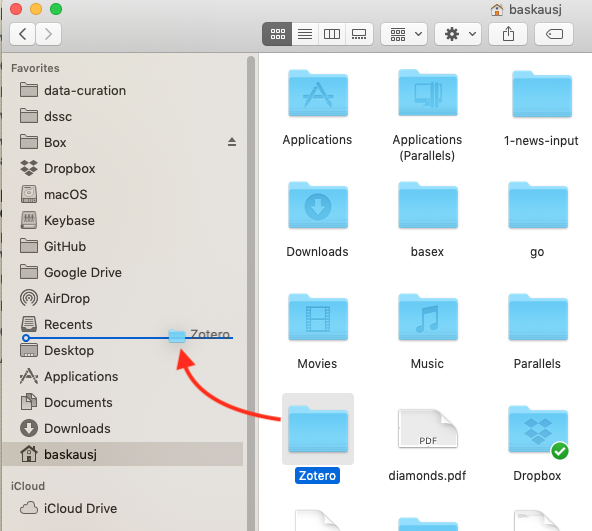
You can also add favorite “regular” folders to the sidebar. Click and drag the folder over to the sidebar until a line shows up in the position where you want the folder to be, then drop it. Note: be careful that you see the line indicating where the folder will be inserted between other folders on the list. If you hold the folder over a folder in the list, you’ll actually move the folder you were dragging into the folder on the list. If you add a folder to the favorites list, it is also still in its original location in the directory tree.
To remove a “regular” folder from the sidebar, just click and drag it somewhere out of the sidebar so that an X shows up next to its icon. Drop it and it will be removed. (If you drop it from the sidebar into a directory that is being displayed, it won’t be moved there.)
Finder display modes
If you don’t have very many files on your computer, it doesn’t matter much what display mode you chose to use.
The classic Mac viewing system is icon view. The icon view is most useful when looking for images because you can see tiny thumbnails. I find icon view the most annoying because it takes so many clicks to navigate. When you double-click on a folder, you enter that nested folder. To back out of that deeper level, you have to use the back button. It is very easy to get lost if you are deep into the directory tree, but there is a feature that can help you.
![]()
In the Finder View menu, there is an option for Show Path Bar. When you enable the path bar, you will see a little list of your path, from the highest level to the folder you are in. This option is available in any display mode.
The gallery view is mostly useful if you need to sort through images.
If you have a lot of files and many nested levels of directories, then you probably will either want to use the column or list view.

The column view is nice because it makes it easy to tell your level in the file hierarchy. Because each level is shown in a different column, it is easy to jump up several level in the hierarchy with a single mouse click. You can also scroll up and down at each level to see what’s in the various levels without changing what’s selected. The column view also has a nice preview feature that for certain file types can show you what’s in the file without you having to open it. The most annoying feature of the column view is that it shortens long file names and there is no way to adjust the column width to make the full names show up. This can be a problem if you have a lot of files with long names that are similar.
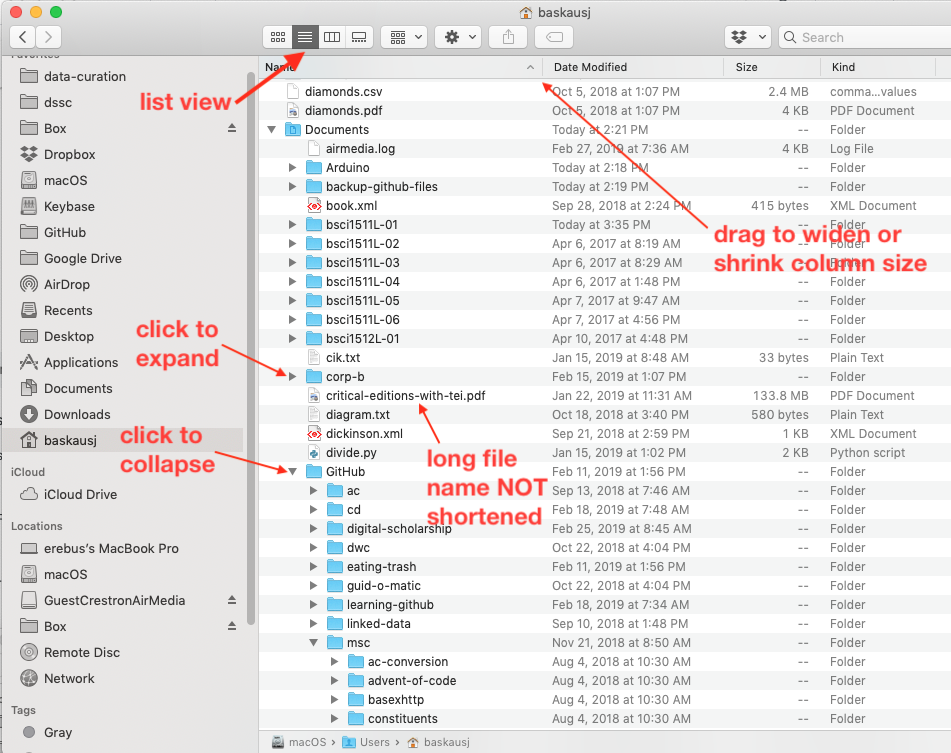
You can avoid some of these problems with the list view. In the list view, you can always see the full file name – if necessary, you can click and drag the column divisions at the top of the window to make the column wide enough to see the whole name. You can navigate to deeper layers in the file hierarchy by clicking on the little triangles at the left of the folder names to expand that folder. Each level in the hierarchy is indented to the right of the previous level. An advantage over the column view is that you can see deeper into several folders at once by expanding each of them. The disadvantage of this viewing option is that it requires a lot of vertical space on your computer. If you have a lot of files or folders in a folder, you may not be able to see other parts of the directory tree without doing a lot of scrolling up and down the page, particularly if you have a wide screen that is not very tall. Another disadvantage of this view is that there is no file preview. However, the view does show you detailed metadata about the files and folders, such as when they were last modified, and their size. This is the only view that allows you to see these metadata, and you can quickly sort what’s visible on the screen by clicking on the column header for the characteristic that you want to sort by. For example, you can easily tell which files were most recently modified by clicking on the Date Modified column header.
Exploring the entire directory tree

If you included your computer in the sidebar, click on it and select columns view. If your computer isn’t in the sidebar, drop down the Finder Go menu and select Computer. Starting on the level of your whole computer, you can dive down into the directory, starting with the root directory in your hard drive (probably named macOS), to the users directory, then to your home folder, and finally to your Documents folder.
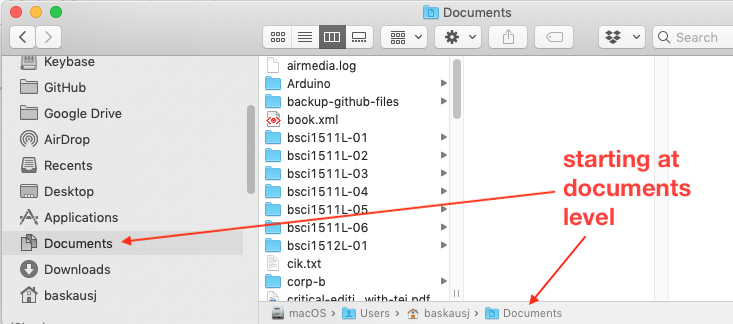
Now for contrast, click on the Documents favorite in the sidebar. You will go directly to your Documents directory. Although if you’ve enabled the Show Path Bar, you’ll know where you are in the directory tree, and you can easily jump to a higher level than the one you chose from the sidebar Favorites by simply double-clicking on the higher level in the path bar. This feature is useful if you start exploring at a low level in the directory tree but later realize that you need to jump up to a higher level.
Save file dialog
As a relatively new Mac user, I was somewhat horrified to discover the large number of users who seem to mostly save documents to their desktop instead of in some organized place in the directory tree. I think part of the reason for that is that they weren’t aware of the features available in the Save as... (or Save...) dialog from the File menu. Fortunately, that dialog has many of the same features as Finder, so understanding how to navigate Finder will also help you do understand how to use the Save as... dialog effectively.
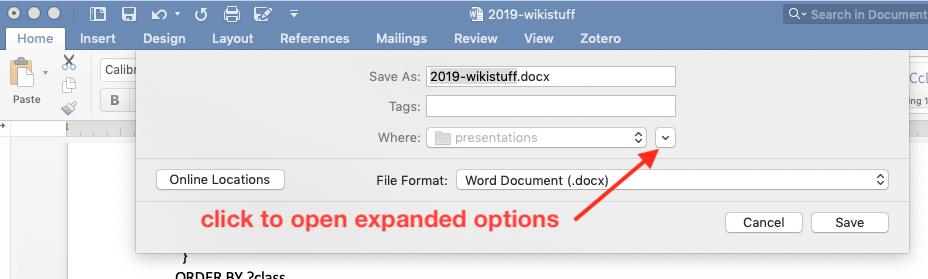
By default, the Save as... dialog is in its abbreviated form. Dropping down the Where list will let you choose any location that normally appears on your Finder sidebar. But to navigate to other locations, you need to click on the small down arrow to the right of the Where dropdown.
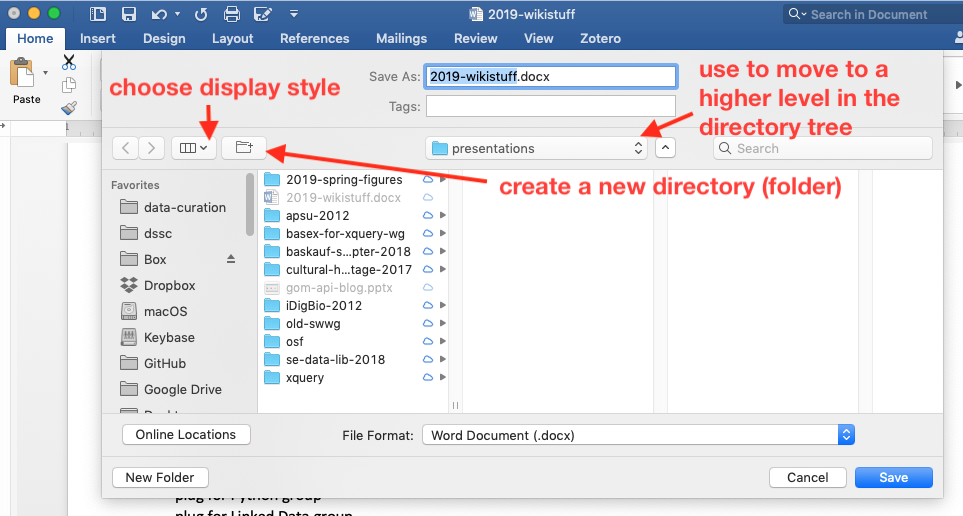
The expanded Save as... dialog box allows you to navigate in a manner nearly identical to Finder. To save space, the display style options are in a dropdown. You can create a new folder in the current directory if you want to develop the directory tree in a way that makes sense for storing the file. You can also drop down the Where option to jump to a higher position in the directory tree.
Copying and moving files
A very important aspect of working with files in Finder is understanding the effect of drag-and-drop. In some cases, dragging and droping a file or folder causes it to be moved to the new location (moving), while in other cases, it causes a copy of the file to be created in the nwe location (copying). Whether drag-and-drop results in copying or moving depends primarily on the place where the file is dropped relative to its starting location.
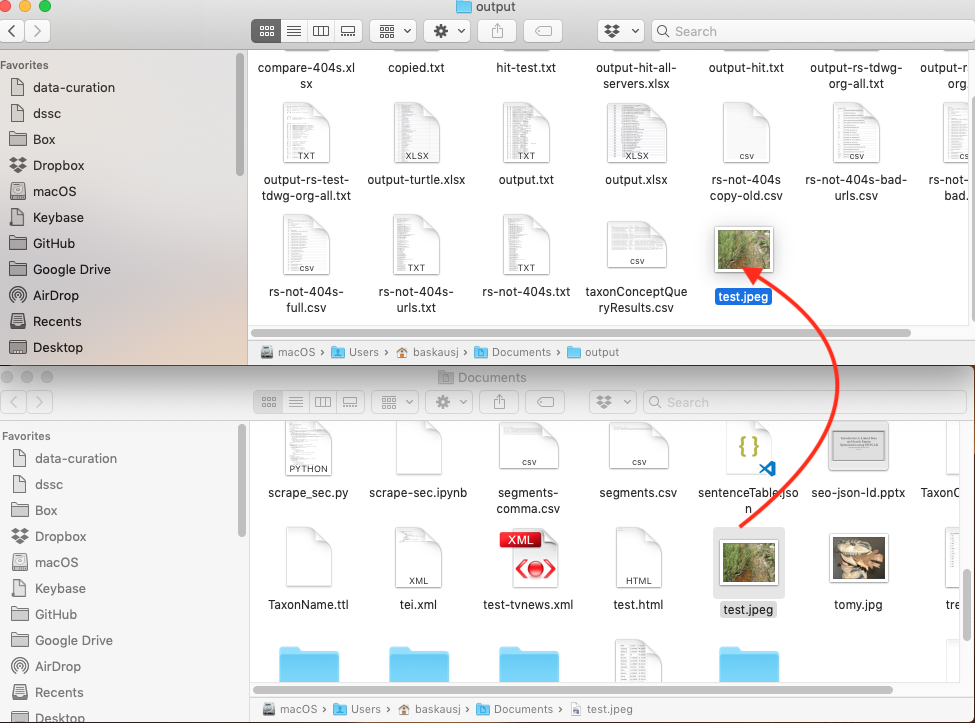
In the example above, I’m dragging and dropping a file from the Documents directory to a subdirectory of Documents called output. Both directories are located on my hard drive (called macOS by default), so Finder assumes that I want to move the file.
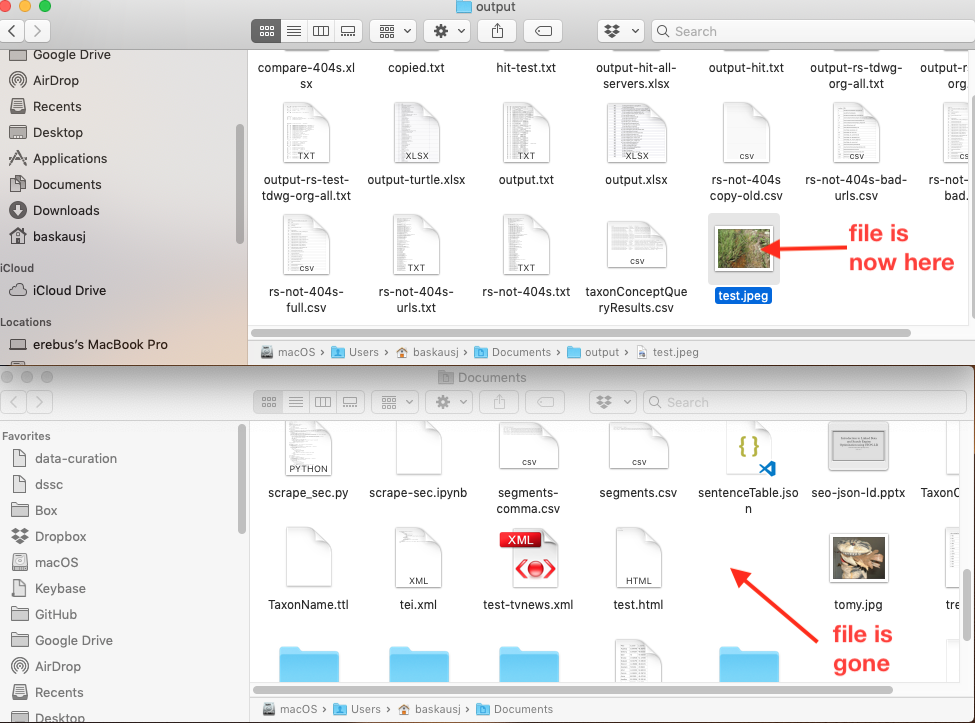
After I drop the file, I see that it has been moved to the new folder and is no longer in the old one.
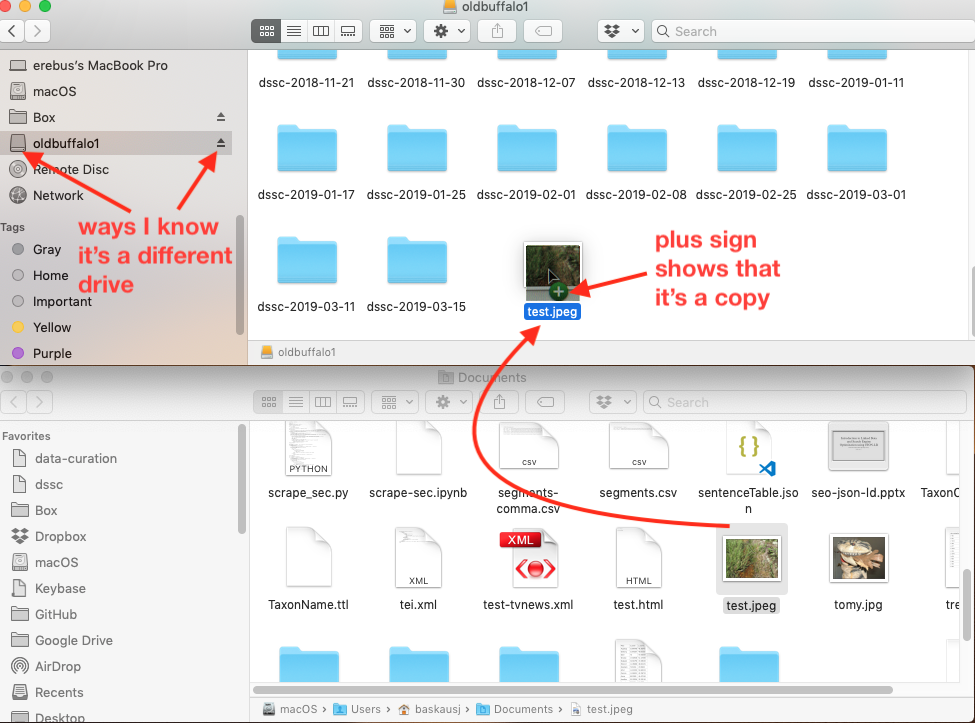
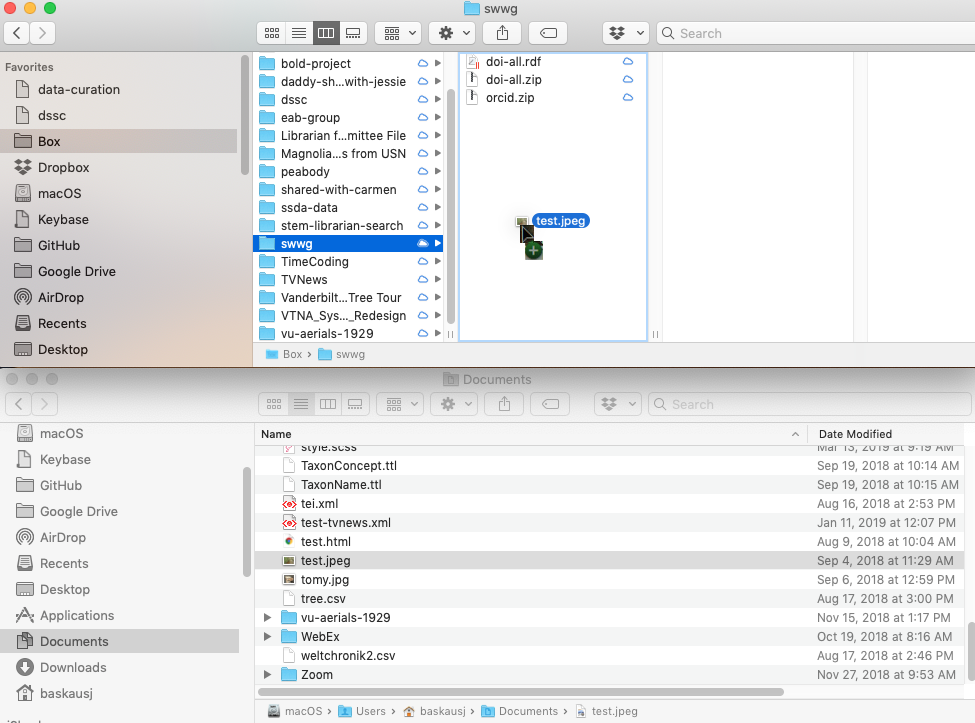
In the second example, I’m dragging and dropping a file from my Documents folder to an external drive that I’ve connected to my system, called oldbuffalo1. There are two ways I can see that Finder considers this to be a different drive rather than just a folder within my macOS drive. To the left of the drive name, I see a little hard drive icon instead of a folder icon. To the right of the drive name, I see an eject symbol that I should use when I want to remove the drive from the system. Because I’m moving a file from one drive to another, Finder assumes that I want to copy the file.
This time, when I drag and drop, I see that a green circle with a plus sign inside it appears under the icon when I hover over the drive where I want to drop the file. That means that the file I’m dragging will be added to the other drive as a copy.
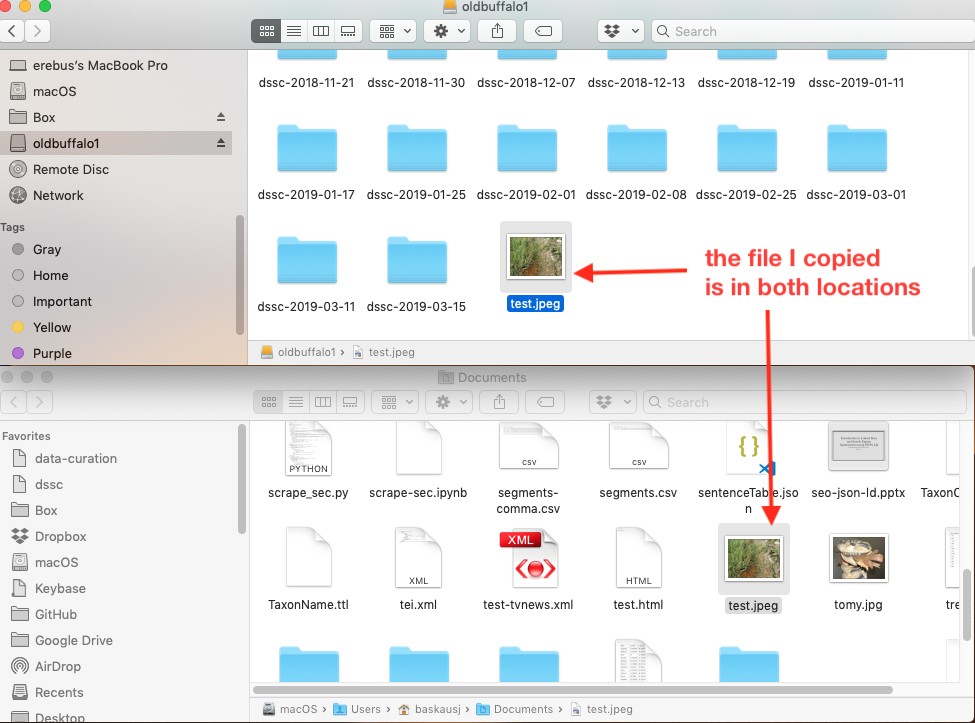
Once I’ve dropped the file, I can see that Finder did indeed do a copy operation because the original file is still where it was before I did the drag and drop.
The plus sign appears regardless of the display style you’ve chosen for Finder.
The bottom line is that if you are ever unsure about whether you are copying or moving a file, look to see whether there is a green plus sign.
Dropbox and Box
Dropbox and Box are two common and similar systems used to synch local files on a computer with an analogous directory tree in the cloud. You can use either system entirely by uploading and downloading files using a web interface, but it is far more convenient to set up folders in the cloud to by synched directly with directories on your local computer. This section assumes that you have enabled this kind of synch to your local computer.
A very confusing thing happens when I compare what happens when I drag and drop to a Dropbox folder and a Box folder. When I drag and drop to a Box folder, I see the plus sign (indicating that I’m performing a copy), but when I drag and drop to a Dropbox folder, I don’t see the plus sign (indicating that I’m performing a move).
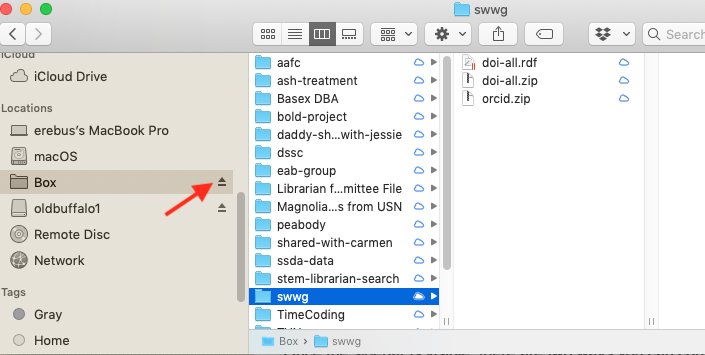
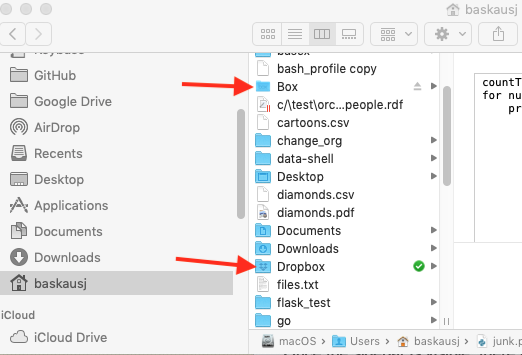
I can get to the bottom of this apparent contradiction by scrolling down my Finder sidebar to the Locations section. I see that Box is listed there (with an eject symbol), but Dropbox is not. This tells me that the two systems are set up to operate in different ways. Box folders are considered to live in a sort of virtual external drive, while Dropbox folders are just considered to be a sort of magical “regular” folder located on my hard drive.
I can understand the true situation by clicking on my home folder. I see that actually both the root Box folder and the root Dropbox folder are subdirectories of my home folder. The difference between them is some feature of the way that the synch application is set up to keep those folders synched with the server in the cloud - the operating system just considers them to be regular directories, more or less. Locating them in the user directory makes sense because different users of a computer might have different Box/Dropbox accounts and putting them in the user directory allows the operating system to distinguish between the different user accounts.
Alternatives to drag and drop
Dragging and dropping files is OK for moving single files, but selecting and moving/copying a particular set of files (or a large number of files) can be a bit unnerving. Most people have probably had the experience of dropping files in the wrong place and struggling with how to undo the damage, particularly if a bunch if copied files get mixed in with a bunch of other files. (A quick answer to the problem is to hold the Command key and press the Z key, which nearly always will undo the last action you’ve taken.) The other issue we will deal with here is what to do if you actually want to copy (NOT move) files within a drive, or move (NOT copy) files between drives.
The best way to handle this situation is to select the files you want to copy, then copy and paste them. You can select files by clicking and dragging, but you can get better control using shift-click or command-click.
To select a range of files in a list, click on the first file in the list, then hold down on the shift key and click on the final file in the list. To select particular files, click on the first one, then hold down on the command key and click on each of the other files to select them (or click a second time to de-select them). You can also hold on the command key, then press on the A key to select all of the files in a directory.
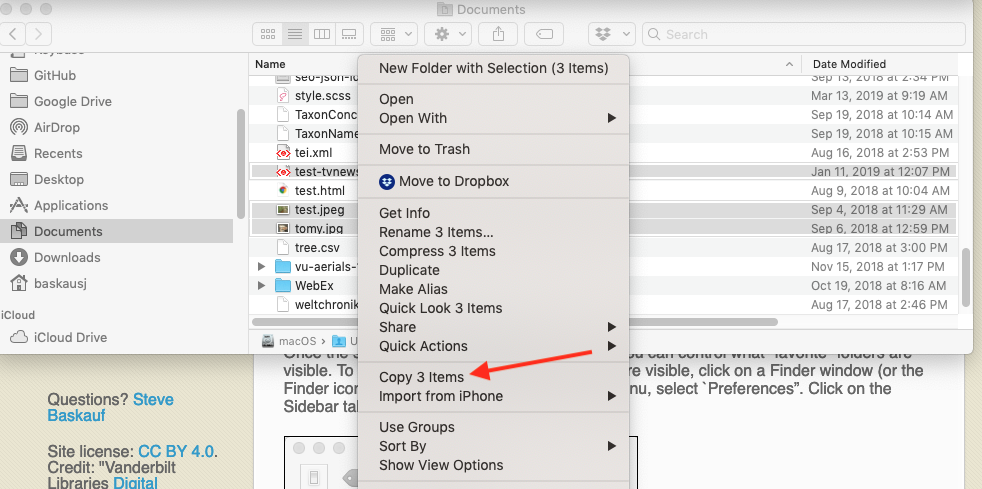
Once you have selected the set of files you want to copy, right-click on one of the files and select Copy x Items (where x is the number of items). Alternatively, you can select Copy x Items from the Edit menu.
To copy the files, click on or in the directory where you want the files to be copied to, then right-click and select Paste x Items (or select Paste x Items from the Edit menu). The files you selected should be copied (not moved) to the new folder. The sortcut for this action is holding on the command key, then pressing the V key.
To move the selected files to the new location instead of copying them, select and copy the files you want to move as described above, then click in the folder where you want them to go. Hold down on the command and option keys at the same time, then press the V key. (On a PC external keyboard, press the command key that looks like a window and the alt key at the same time, then press the V key.)
Note: using the copy and paste method distinguishes between moving and copying solely based on how you do the paste. It does not depend on whether the operation is done within or between drives.
go on to Lesson 3: Installing software
Revised 2019-03-18

Questions? Contact us
License: CC BY 4.0.
Credit: "Vanderbilt Libraries Digital Lab - www.library.vanderbilt.edu"