Understanding my computer - Lesson 1: Files
This is the Mac version of this page. Click for the Windows version of this page
Your computer assumes that you are an idiot
One of the great advances in computing came about when computers were designed to be simpler and more intuitive. With the creation of a graphical interface where users could point and click, it became possible for many people to use their computers without any real understanding of what they were doing. The interface was a “desktop”, and word-processing documents were placed in folders whose icons actually looked like little folders.
As long as everything works as it should, this simplified interface is great and easy to use. However, when things don’t work as they should, your computer often hides the details that you need to be able to see in order to diagnose the problem. Your computer assumes that if it lets you see what was actually going on, you would do something stupid and mess things up.
In this workshop, we assume that you are NOT an idiot and that you should be able to see and understand what’s actually going on with your computer without messing it up. If the situation is not too complicated, you should be empowered to take action yourself. If the problem is very technical, you should know enough to be able to seek out the help that you need.
The illusion of the desktop
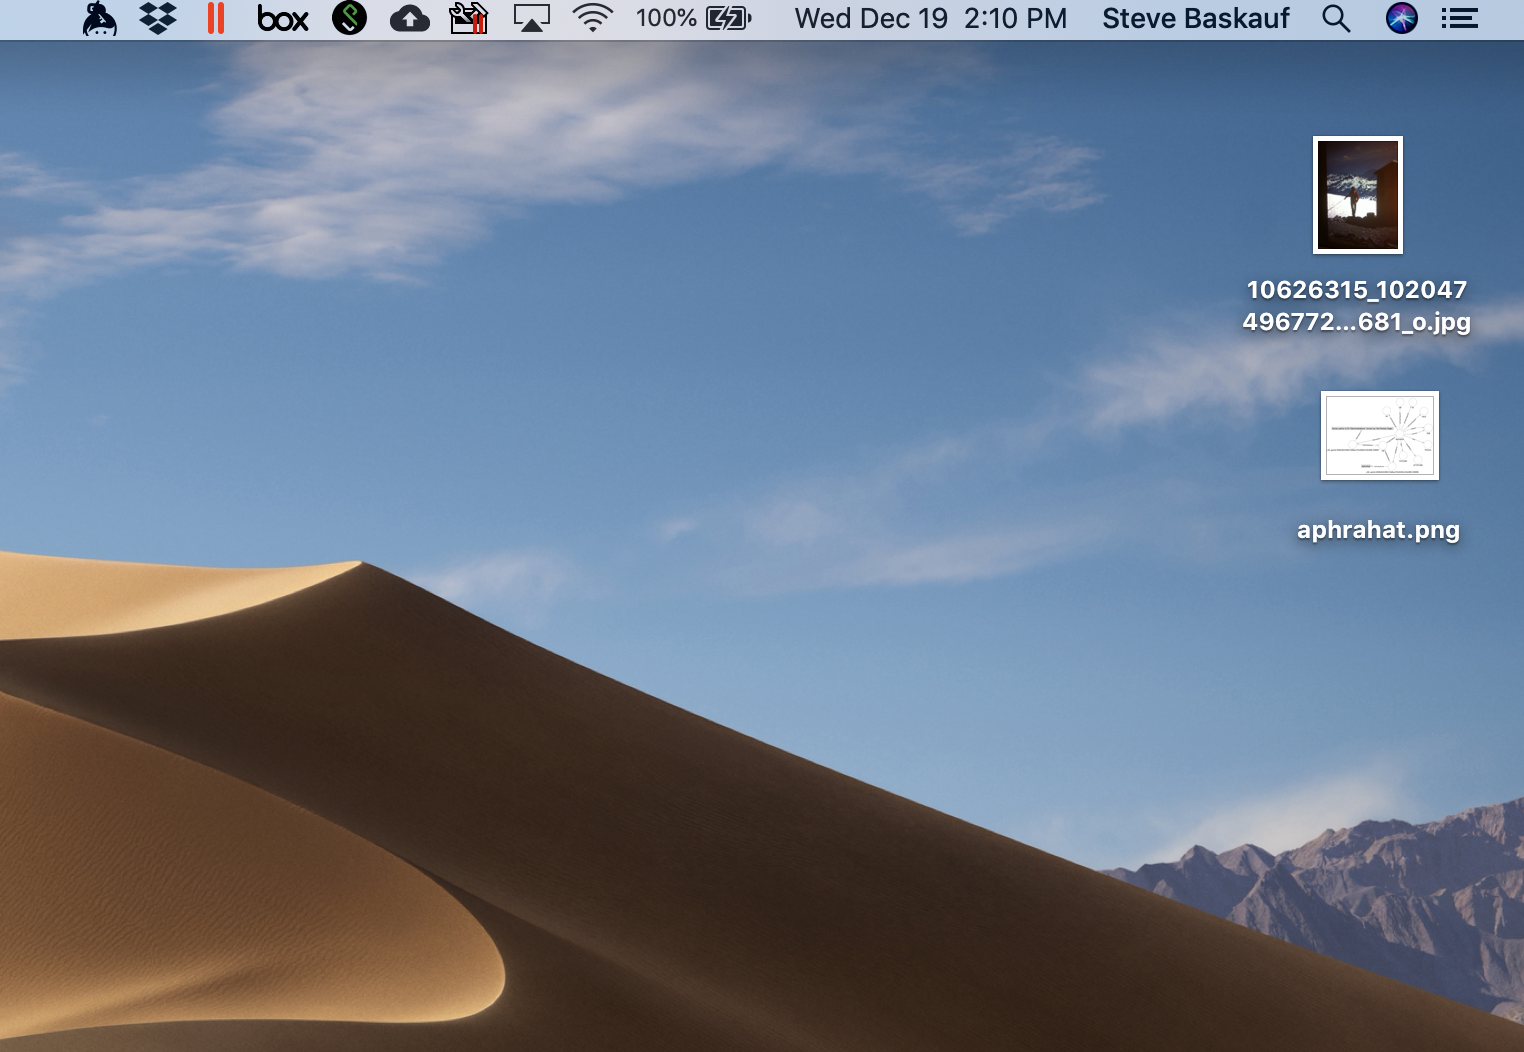
When I look at the screen of my computer, I see what appears to be a flat surface. There are some images that I’ve “saved to the desktop” and it appears that those little pictures are actually sitting on the surface of my desktop. However, this is an illusion that my computer creates.
Where actually is my desktop?
Terminology tip: “directory” and “folder” mean the same thing. We will use the terms interchangeably.
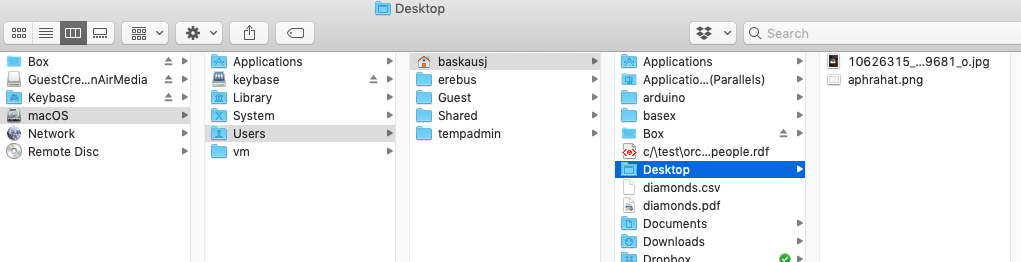
In reality, the two image files are somewhere on the hard drive of my computer. The hard drive is organized in a hierarchical way, called the directory tree. A parent directory can contain a number of child directories, and those child directories can be parents of other child directories. From the diagram above, you can see that there is a directory many layers deep called “Desktop”. That directory is an index that keeps track of the part of the hard drive that actually contains the two image files that I saw on my graphical desktop. There isn’t really anything special about that directory other than that the computer is set up to display its contents in a special graphical way that looks like a “desktop”.
What are users?
Long ago, personal computers could have only one user. Now personal computers are set up to allow different users to log on and access their own files using personalized settings. You may do some sort of login when you boot your computer, or your computer may be set up to log you in automatically.
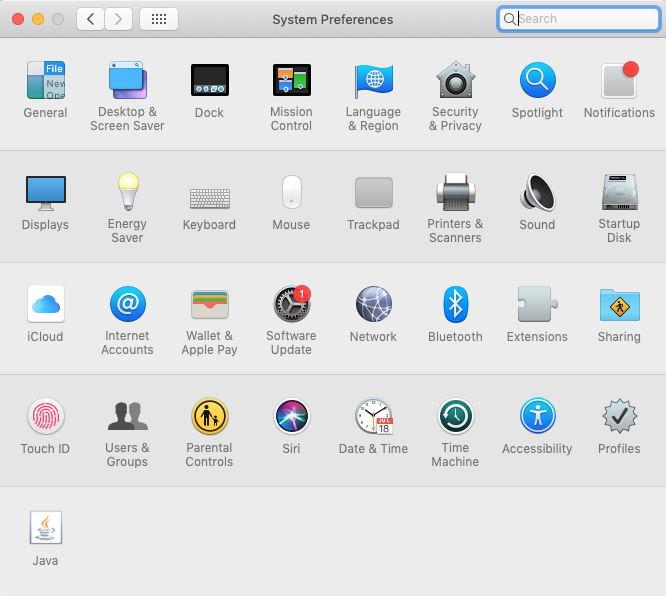
To see what users are enabled on your computer, drop down the apple menu at the upper left of your screen and select System Preferences. If necessary, click on the button at the top that contains rows of dots so that you can see the preferences options. Double click on Users & Groups.
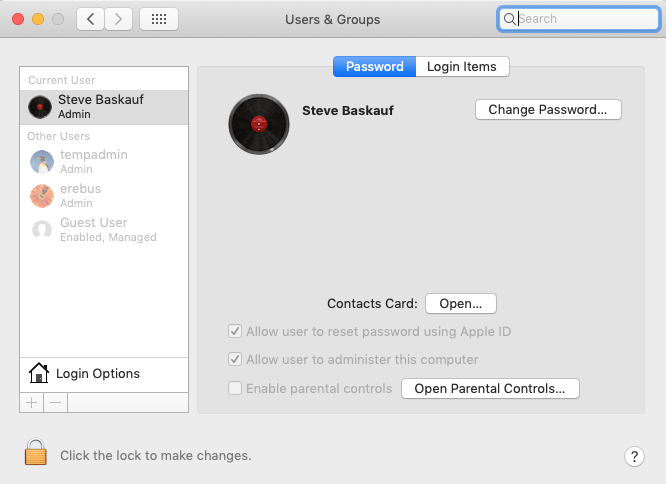
There are several important things that you can see from this window. You can see who is currently logged on, and whether the current user is an administrator user or not. If you are using your own computer, you generally should be logged on as an administrator user, otherwise you may be prevented from taking important actions like installing new software. If you are using a work computer, you may not be an administator user. In that case, there may be some changes that you won’t be allowed to make on your computer.
You can also see that there are several other users listed that are not currently logged in.
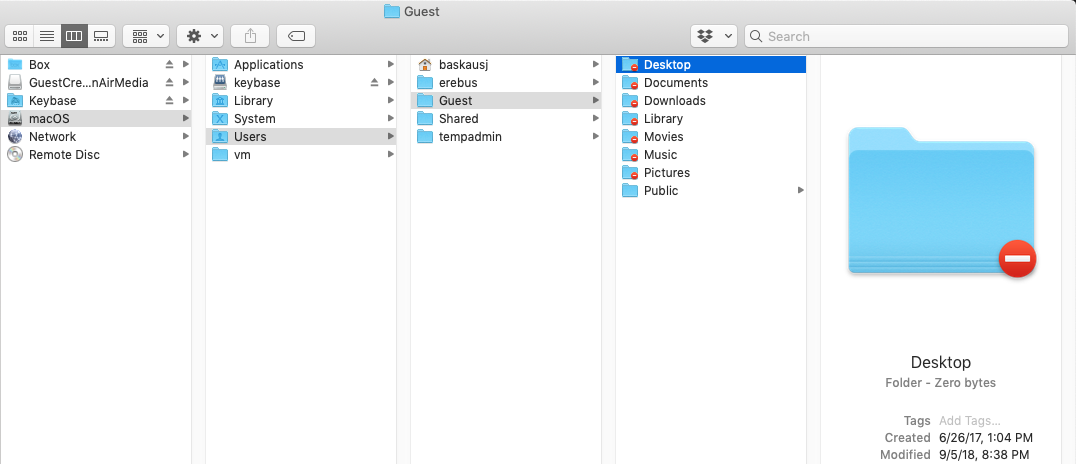
Here is another view of the directory tree. In the previous view, the home folder of the logged in user (baskausj) was selected. I could tell that it was for the logged in user because the user folder icon was a little house. In this view, the home folder of a non-logged in user (Guest) was selected. Notice that the Guest user also has a folder called “Desktop”. Most of the Guest user folders have little red “do not” symbols on them. Since I’m not logged in as the Guest user, I’m not allowed to access them.
Every user on the computer has its own Documents, Downloads, Music, etc. folders. It can be confusing if you unknowingly log out from your normal user account and log on to a different one. The graphical desktop and the contents of all of these familiar folders will be different because they aren’t actually the same folders as your user folders (even though they have the same names).
If you use your computer sometime and the desktop looks different, or folders and files appear to be missing, do not panic. First, check whether you have accidentally logged in as a different user (then panic as necessary).
Programs and files
Tech tip: The usual way to work with files in Windows is with Finder. Finder is always running on a Mac – there is no way to “turn it off”. To view files, click on the Finder icon at the lower left of your screen.

What is a file?
The fundamental unit of organization of information on a computer is a file. A file is a set of bytes that are grouped together for some purpose and given a common name. We will not worry about the details of what a byte is – we can just imagine that it is some unit of information. By itself, a byte doesn’t have any meaning. It is given meaning when we know the type of the file that it’s included in. For example, in a text file, a byte might represent a character like a number or letter. In an MP3 file, a byte is a digital representation of some part of a sound. In a JPEG image, a byte represents some component of the colored dots that are used to make an image.
A file has several fundamental properties. One is its size. File sizes are measured in units of bytes. The size of a tiny file may be measured directly in bytes. The size of a small file can be measured in kilobytes (kb; approximately a thousand bytes). A medium sized file’s size can be measured in megabytes (Mb; approximately a million bytes). A large file can have a size measured in gigabytes (Gb; approximately a billion bytes) or larger. (What is considered “large” and “small” varies over time. Twenty years ago, a 1 Mb file would have been considered very large.)
Another property of a file is its last-modified date. This is the last time that the file was changed. The last-modified date can be really useful if you are searching for a file but don’t remember its name, or for sorting files by how recently you worked on them.
File names and types are also important and will be discussed in detail below.
Get Info
There are three ways in Finder that you can get information about a particular file.
- Right click on the file, then select
Get Infofrom the menu that opens. - Click on the file, then select
Get Infofrom the Finder File menu at the upper left of the screen. - Click on the file, hold down on the
commandkey, then press theikey.
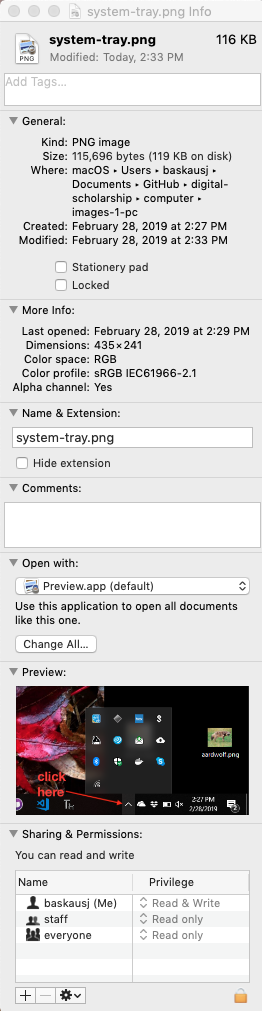
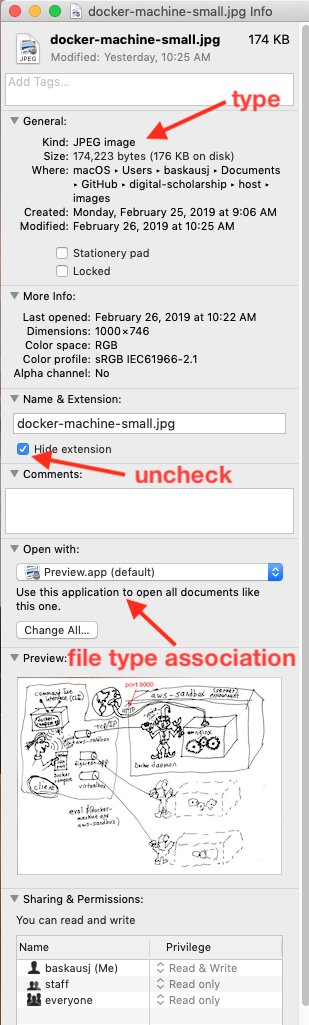
The Get Info window shows all kinds of information about the file, including its kind, size, and often a preview of how the file would be rendered.
File names
Files are given names so that they can be found and recognized by humans or computer programs. File names are a series of characters. The rules about what characters can be used in file names vary among computer systems and programs that use the files. In many cases, a computer system will let you get away with using unusual characters in a file name without complaining. However, that same file name might cause a problem in another computer system. Here are some good practices related to file names:
- The most “safe” characters to use in file names are letters, numbers, and underscore (
_). Dashes (-) are almost always safe. - It is not a good idea to put spaces in file names. Most systems are fine with spaces, but there are infrequent circumstances when they cause problems. Using spaces in file names is like not wearing your seat belt in a car. 99% of the time you can get away with it, but a small fraction of the time it can cause serious problems.
- Systems that use file names are often case-insensitive. That means they don’t distinguish between upper- and lower-case letters. However, that is not always true. If you are sloppy about the case of file names (for example, naming a file “Myfile.docx”, then referring to it as “myfile.docx”), you will usually get away with it, but on some occasions, the file won’t be recognized if the case is wrong. For that reason, it is a good general practice to use only lower-case letters in a file name unless you have a reason not to. If you choose a system of capitalization that includes capital letters (such as camelCase), use it consistently.
- Usually it doesn’t matter where you put numbers in a file name, but there are odd situations where having a file name that starts with a number could cause a problem.
- Don’t use weird characters like parentheses in file names, even if the system you are using will let you get away with it.
Examples of a “safe” file names:
my_little_pony_previous.xlsx
testing1234-old.png
userTrialResults-2018-03-27.csv
Examples of “unsafe” file names:
My little pony previous.xlsx
testing1234(old).png
27 March 2018 User trial Results.csv
What is a program?
A program is a set of instructions that cause a series of actions to take place.
Terminology tip: An “application” is a program that can interact with a user. In this context, we will use the terms “program” and “application” interchangeably. The term “app” is more commonly used to describe programs on portable devices, but it’s just short for “application”.
Programs are usually stored as files. An executable file is a program that can run by itself and a script is often a file that contains commands that are carried out by some other program (sometimes called an engine). You can usually launch executable files by double-clicking on them. Scripts have to be loaded into some other application after it is started up; they generally can’t run by themselves.
Here are some examples.
- Microsoft Word is a program that is an application. You double-click on an executable file to make it run.
- An R script can be stored in a text file. When the text file is loaded into an application like RStudio, it can run and make things happen. However, double-clicking on the script file itself won’t generally make it run (although that might cause it to be opened for editing in RStudio).
What does it mean for a application to be “running”?
In the olden days, a computer could only run one program at a time. However, now computers routinely run many programs at once. Many of those programs start running when the computer is booted up and you don’t even know it. The operating system itself is a big program that runs all the time when the computer is turned on.

Applications that have been started up by the user are usually shown in the dock at the bottom of the Mac desktop. Icons of applications that are “pinned” to the dock are there all the time, regardless of whether they are running or not. Applications that are running, but not pinned, will show up in the dock with dots under them while they are running. They may disappear when you quit them.
You should be aware that on a Mac just closing the final window of an application does not quit the application. It is still running, and you’ll see the dot under its icon in the dock.
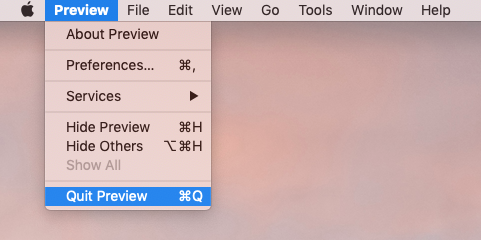
To actually quit the application, click on its icon in the dock, then go to the menu item named after the application. Drop down the menu and select quit.
Tech tip: For many of the most common tasks that are done through menu choices, there is a shortcut key sequence that allows you to avoid having to go up to the menu and make a selection. In many cases, you hold down on the command key and press some other key. For example, the shortcut for quit is hold command then press q. Some other shortcuts are nearly impossible to remember and require pressing three keys at once. The shortcuts are often shown to the right of the menu item that they are equivalent to.
You can also quit an application by right-clicking on its icon in the dock, then selecting Quit.

Some of the applications that started up automatically when the computer booted have icons in the menu bar at the upper right of the Mac desktop. In this example, Dropbox, Box, Pulse Secure VPN, Docker, and other applications that started when the computer booted are showing up there. In most cases, clicking on these icons will bring up some kind of menu that tells you the status of the application, gives notifications, or allows you to change settings. For example, clicking on the Dropbox icon will tell you whether file synching is up to date.
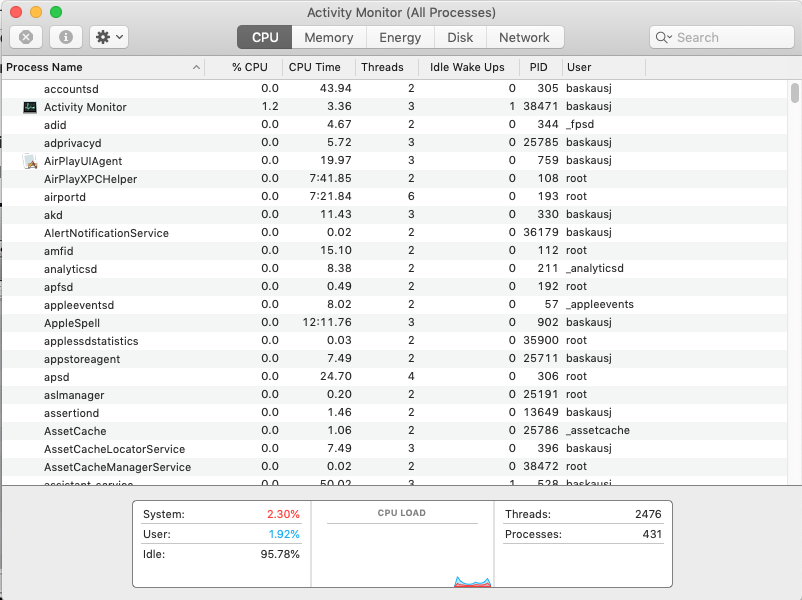
The most complete way to know about every program that is running on a Mac is to launch the Activity Monitor. To start up Activity Monitor, click on the spotlight search icon (magnifying glass) in the upper right of your computer, then start typing “activity”. When Activity Monitor.app appears as a list item, double-click on it.
You are not likely to need to look at the Activity Monitor, but sometimes there are stubborn problems caused when a program won’t finish quitting properly, or gets out of control and won’t quit. In the activity monitor, you can click on the name of the running “process”, then click on the X button at the upper left of the window.
Note: it is not advisable to use this as a routine way to quit programs, or to quit processes whose purpose you don’t understand. However, the Activity Monitor is a way to discover if an application is a “hog” that is using up a lot of your system resources and slowing down other applications. This may be relevant if you use a lot of applications, then close their windows without actually quitting them as described above.
File associations and extensions
When discussing programs, we mentioned that script files generally can’t run by themselves, but need to run within some other application. Similarly, an image file can’t display itself, an MP3 file can’t make music by itself, and a Word document can’t edit itself. In all of these cases, the files are associated with some applcation that “knows” what to “do” with the file. The connection between a type of file and the application that has been designated to handle it is called a file type association.
The file type association is important, because it controls what happens when you double-click on the icon of a file that isn’t an executable file (i.e. isn’t a file that can run by itself). “Opening” a file might mean opening it in an editor to change it, or it might mean making the file “do” something (like displaying an image, playing a sound file, or running a Python script). In a lot of cases, whether opening a file allows you to edit it, or make the file do something may seem obvious. Opening a word processing file generally means editing it, while opening a music file generally means playing it. But in some cases, it isn’t obvious. You may be just as likely to want to edit a Python script as to run it when it’s “opened”. We will learn how to control the behavior of “opening” files in a later section.
A file extension is a series of characters that follow the main part of a file name and are separated from it by a dot (.). For example, if a file is named gorilla.jpg, then .jpg is the extension for that file. File extensions are used to indicate the type of a file. They are mostly (but not completely) standardized.
How does my computer know what a file is “for”?
In the past, Macs had a special way that they kept track of the type of a file. The file type was stored as metadata within the file itself. In that system, any Mac could know the type of a file by looking at that metadata, although other brands of computers would probably not know what to do with them. However, Macs now follow the convention used by most of the rest of the computing world: use a file extension to keep track of the type of a file.
Despite this change, Macs continue to hide the file extensions from their users. Perhaps this is to reassure old Classic Mac users, or maybe Apple thinks that file extensions will be too confusing to new users. However, in the spirit of “you are not an idiot and don’t need to be treated like one”, we are going to learn how to turn off the hiding of file extensions.
Unhiding file extensions
The Get Info window has a checkbox to control whether the file extension is displayed for that particular file. Unchecking that box makes the extension show up in the file name in Finder:
Here’s what the icon looks like when the extension is being hidden:
![]()
Here’s what the icon looks like when the extension is displayed:
![]()
Obviously, this is not a solution if you want to display file extensions for every file on your computer. To accomplish that, you need to change a setting in your Preferences.
Click on an open Finder window, or on the Finder icon in the Dock to make Finder the active application. Then drop down the Finder menu in the upper left and select Preferences ....
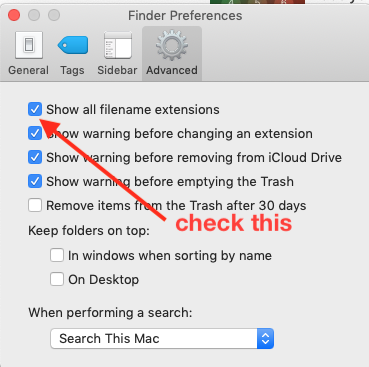
Check the box next to Show all filename extensions, then close the window. Now when you view files in finder, it should be clear what type of file they are based on their file extensions.
Here are some common file extensions and the type of file they represent
| extension | type |
|---|---|
| .txt | plain text files |
| .csv | fielded text files (usually comma-separated values); generically spreadsheets |
| .jpg or .jpeg | Joint Photography Experts Group (JPEG) image files |
| .png | Portable Network Graphics (PNG) image files |
| .docx | Microsoft Word documents |
| .xlsx | Microsoft Excel spreadsheets |
| .pptx | Microsoft PowerPoint presentations |
| .json | Javascript Object Notation (JSON) data files |
| . xml | eXtensible Markup Language (XML) data files |
| .htm or .html | Hypertext Markup Language (HTML) web pages |
| .md | Markdown formatted documents |
| .mp3 | MP3 sound files |
| .wav | WAV sound files |
Notes:
- Notice that in some cases there are two commonly used file extensions for a format.
- In the case of files from Microsoft Office products, there is in each case an older format whose extension lacks the final “x”. For example:
.docxand.docare both used for Word documents.
File type associations
On a particular computer, a part of the system settings is a list of applications that are associated with particular file types (and extensions). Generally, file type associations get set as the part of the process of installing an application. For example, when you install Microsoft Office, the file types typically associated with Office applications (.docx, .xlsx, pptx, etc.) are associated with the appropriate Office application.
However, sometimes a newly-installed application may “hijack” a file association by associating a previously assigned filetype to the new application. For example, installing an open-source office suite might change the file associations to it instead of to Microsoft Office. If the application is graceful, it will ask you whether you want to change the association before it makes the change. However, sometimes applications make the change without consulting with you, which can be really annoying.
Changing file associations
In Macs, it isn’t particularly easy to find the file type association list. However, it is relatively easy to find out what application is associated with one particular file type. In Finder, locate a file of the type whose association you’d like to change. In the Get Info window, there is a section labeled Open with:. In that section, there is a dropdown list that shows both the default application that will generally be used to open that kind of file, and all of the applications that your computer thinks might be reasonable alternatives. If you change the selection in this dropdown, it will change the application that will be used to open that particular file. However, if you then click the Change All... button below the list, that will change the default application used to open all files of that type (i.e. having that file extension).
Once you have changed the file type association, you have changed what happens when you double-click on a file of that kind. For example, if you associate .png images with Preview, the file will be opened with the typical viewing options, such as setting up a slideshow. However, if you associate .png images with Adobe Photoshop, double-clicking on .png images will launch Photoshop (if it isn’t already running), then open the file in the Photoshop application.
A final note on opening files
You should keep in mind that setting a file association only changes the application that opens a file type when you double click on the file icon. You can always open an application first, then go to the file menu and select the open option. The application will open the file if it’s able, regardless of whether the type of that file is associated with it.
This method is good if you usually open CSV files with a spreadsheet program, but want to actually look at the raw characters in the file by opening it in a text editor.
go on to Lesson 2: Directories
Revised 2019-02-28

Questions? Contact us
License: CC BY 4.0.
Credit: "Vanderbilt Libraries Digital Lab - www.library.vanderbilt.edu"