previous page: Inviting collaborators
Important note: In order to foster more inclusive terminology, as of October 2020 GitHub has changed the default name for the primary version of repositories from master to main. In a future version of this page, it will be revised to use this terminology. For now, just recognize that when text and screenshots talk about the master branch, new repositories will actually use the name main.
For information about renaming the default branch of existing repositories from master to main, see this page.
Branching and the Shared Repository Model
Branches
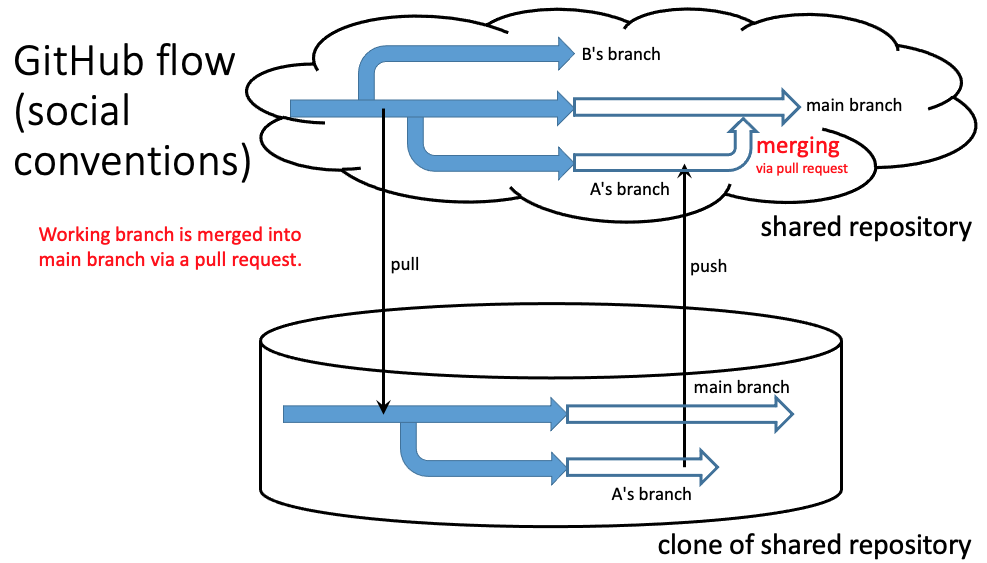
In the first lesson, we defined a branch as a set of files that changes over time. A repository can have several branches at the same time and each one is maintained with its own record of commits over time.
The main branch of a repository is called the master branch. In a very simple repository, the master branch may be the only one. But more commonly, there are several branches that have been created by branching them off of the master. (“Branch” is both a noun and a verb in Git.) When you create a branch from the master (or some other branch), it begins with exactly the same files as its source. It also carries the commit record of its “parent” branch as well.
The purpose of a branch is to allow for the development of documents independently of the master. You might choose to create a branch if you want to develop a new feature of software you are developing, or you may create a branch if you are creating a significant revision of a document. Working in a branch allows you to “take risks” without the danger of possibly messing up the master.
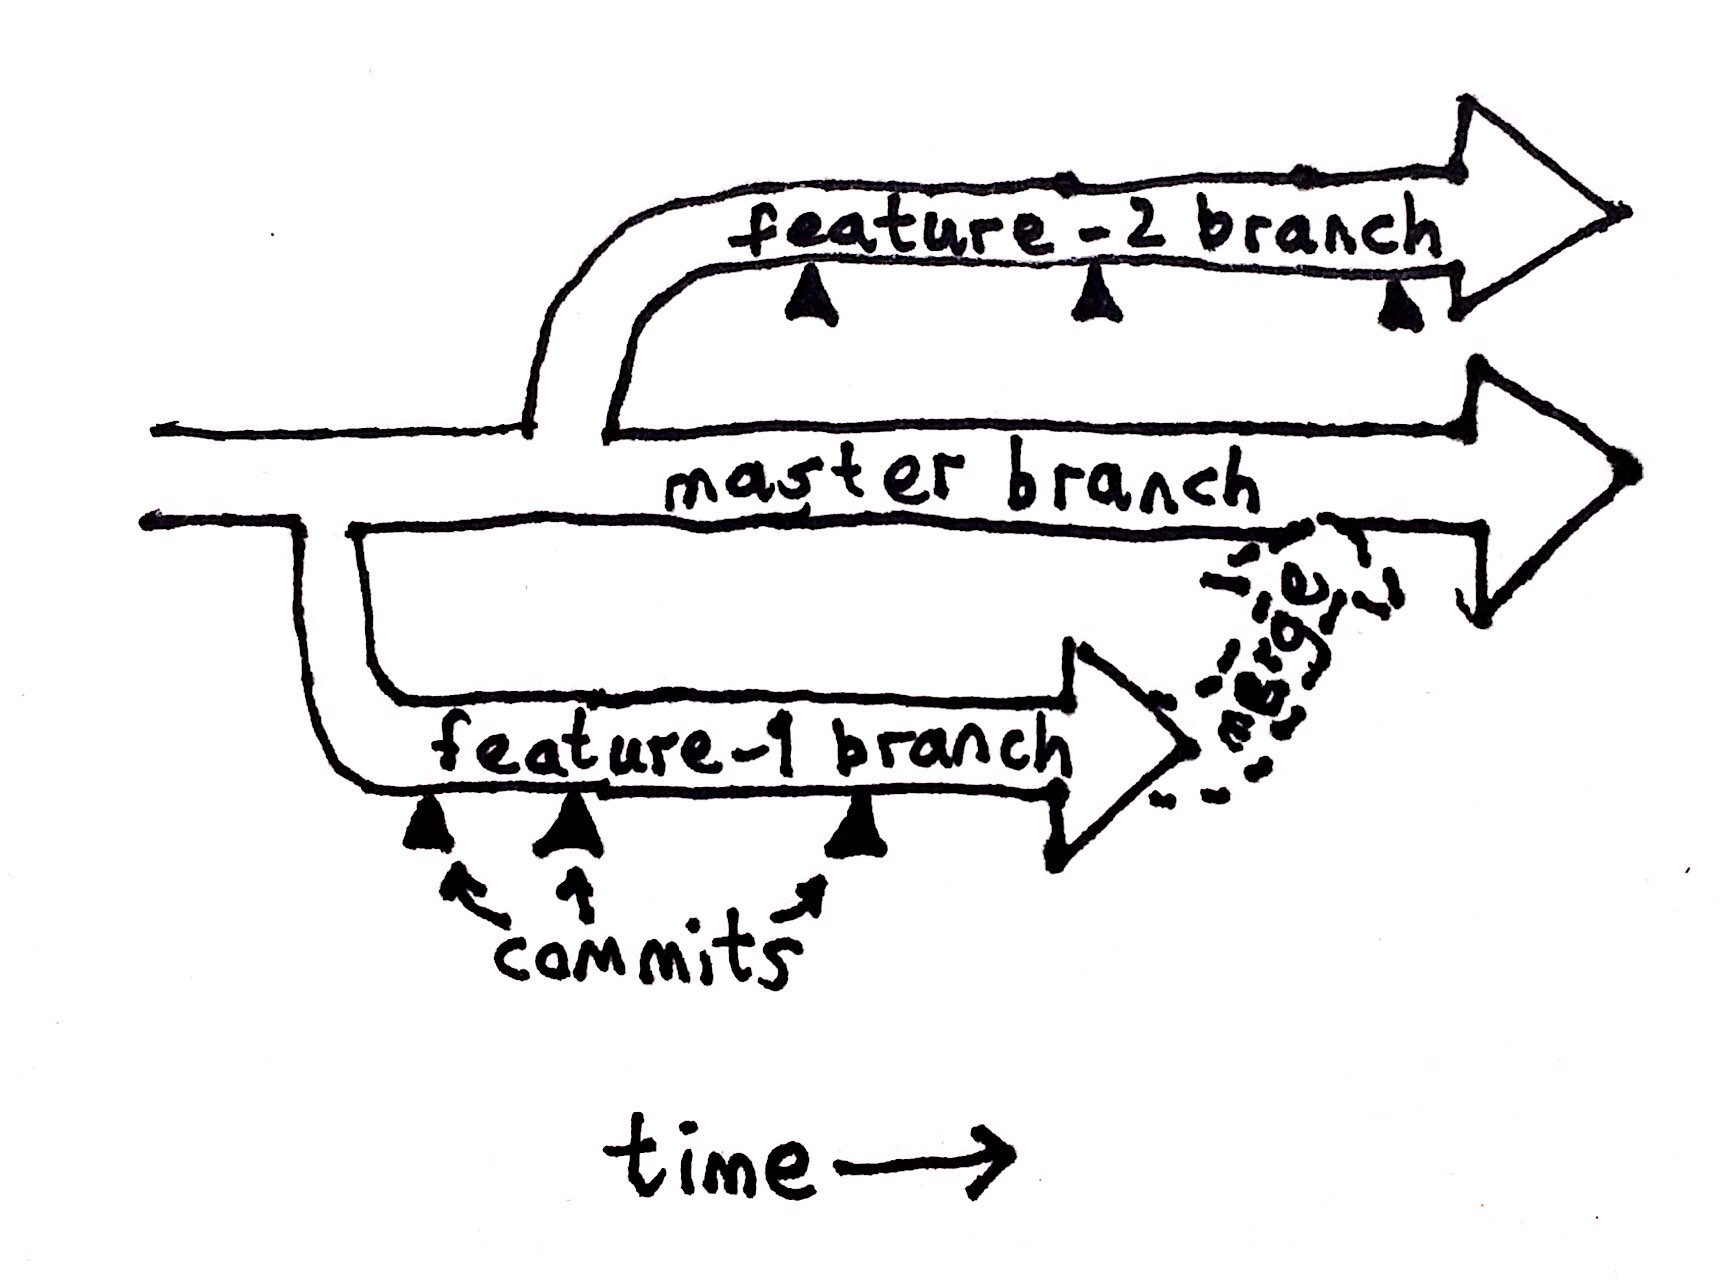
There are several possible fates of a branch. A common fate for a branch is for it to be merged back into the master. This can happen when the revision is complete, or if the new feature has been debugged and is ready to be deployed. You might also decide that development of the branch is hopeless, and just delete it and return to the master. In some cases, a branch may remain as a separate entity from the master with no intention of ever merging it. This is common when using GitHub Pages to manage a website.
Creating a new branch
In this example, my friend has created a repository called feline-cuisine and has invited me to be a collaborator. I have accepted and have cloned the repository to my local computer as shown previously.
When I click on the Current Branch tab of the desktop client, here’s what I see:
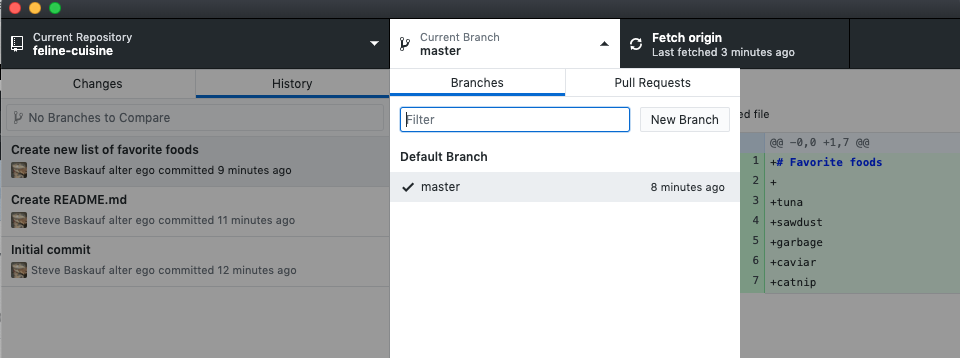
Currently, there is only one branch (master) in the repo.
I want to work on the project, but would prefer to develop my changes on a separate branch. So I click on the New Branch button. In the resulting popup, I give the branch a descriptive name.
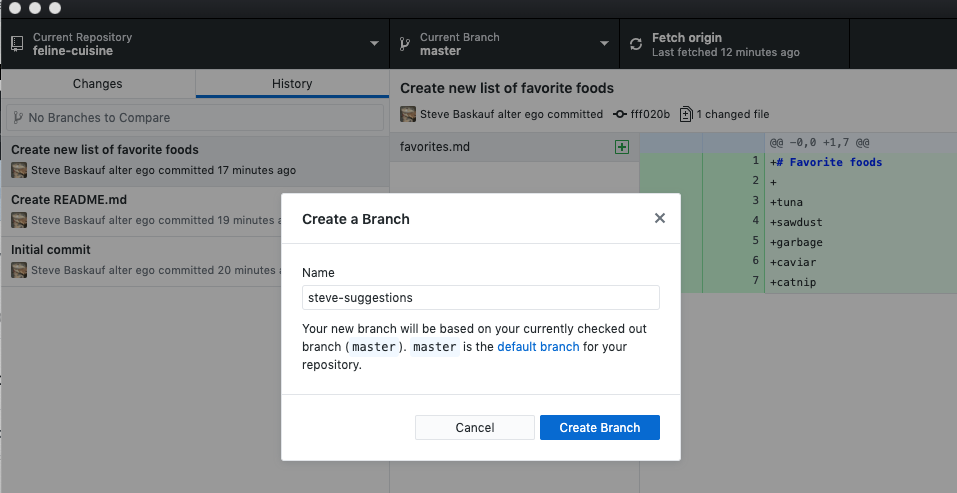
Then I click on the Create Branch button. The desktop client automatically checks out the new branch and lists it as the current branch.
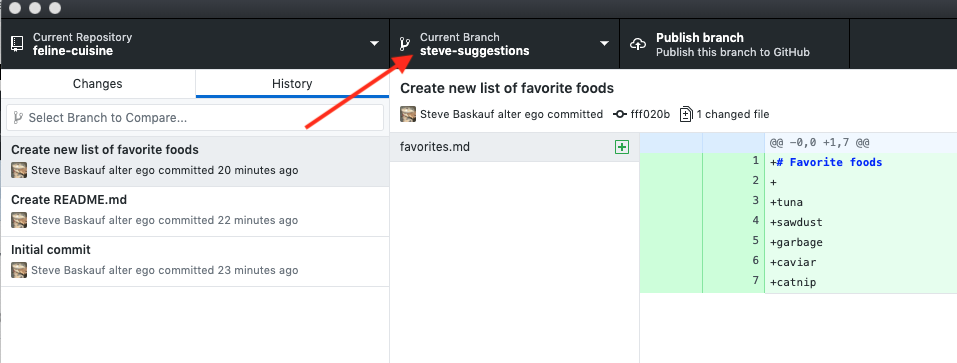
Note that at this point the branch only exists on my local copy of the repository. If I want, I can click Publish branch and the new branch will be created in GitHub. Alternatively, I can edit and make commits before pushing the branch.
Command line comparison
To create a new branch called newbranchname, enter
git branch newbranchname
To switch to the newly created branch, enter
git checkout newbranchname
Changing to a preexisting branch
By default, the desktop client checks out the master branch of a newly cloned repo. However, if that repo has more than one branch, you can change from the master branch to another branch by dropping down the middle “Current Branch” menu at the top of the window.
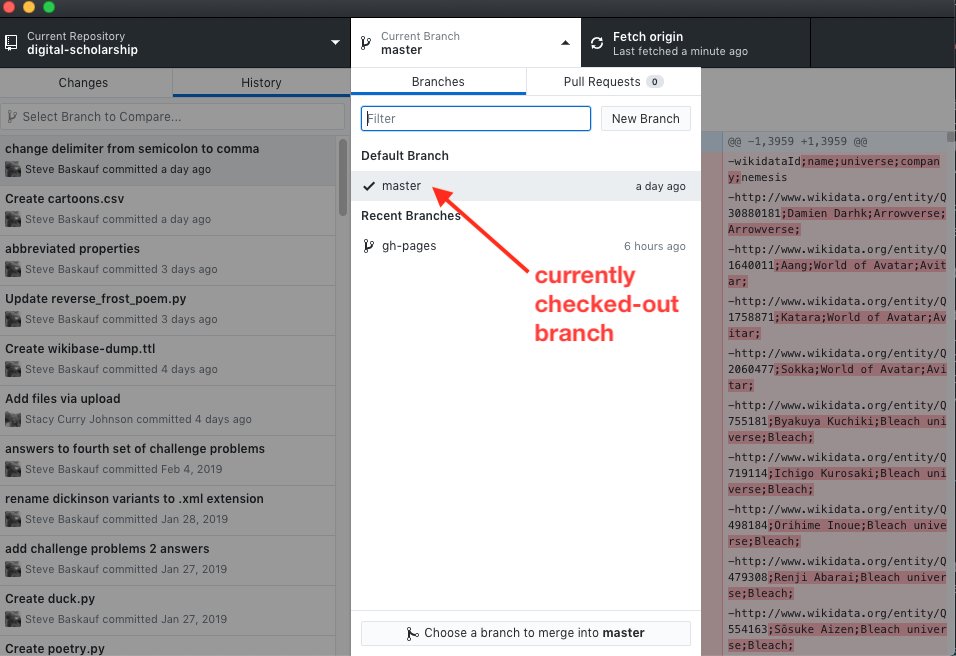
When you select a different branch in this dialog, the desktop client will check out that branch.
Checking out a branch literally changes the files that are present on your local computer. For example, when I selected the master branch as my current branch, here’s what several directories looked like:
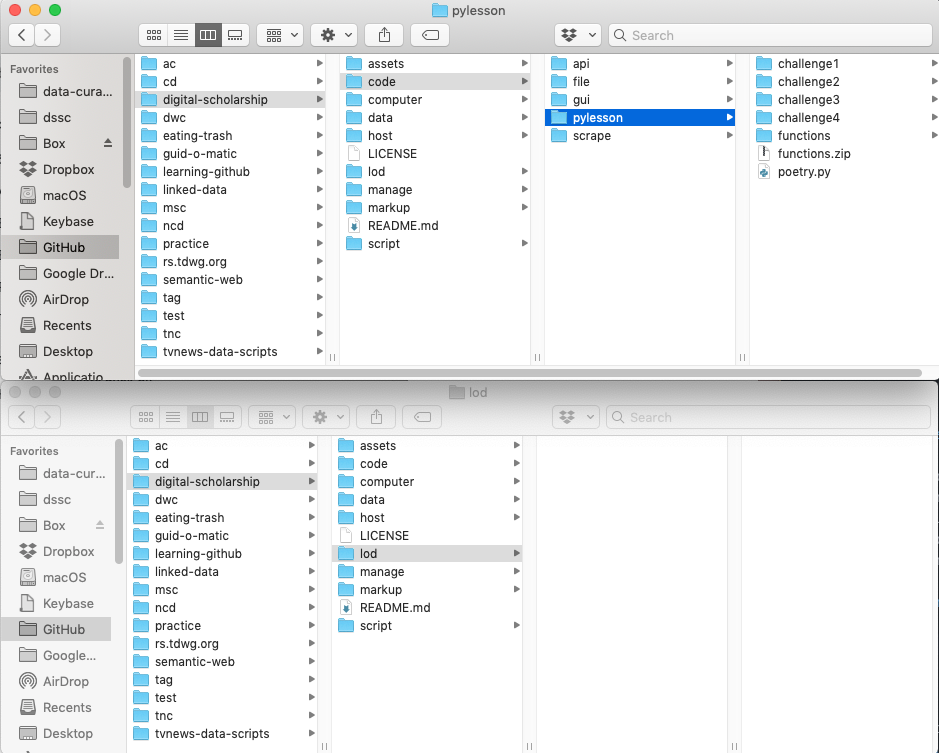
You can see that the pylesson directory has a lot of files in it and the lod directory doesn’t. If I change to the “gh-pages” branch:
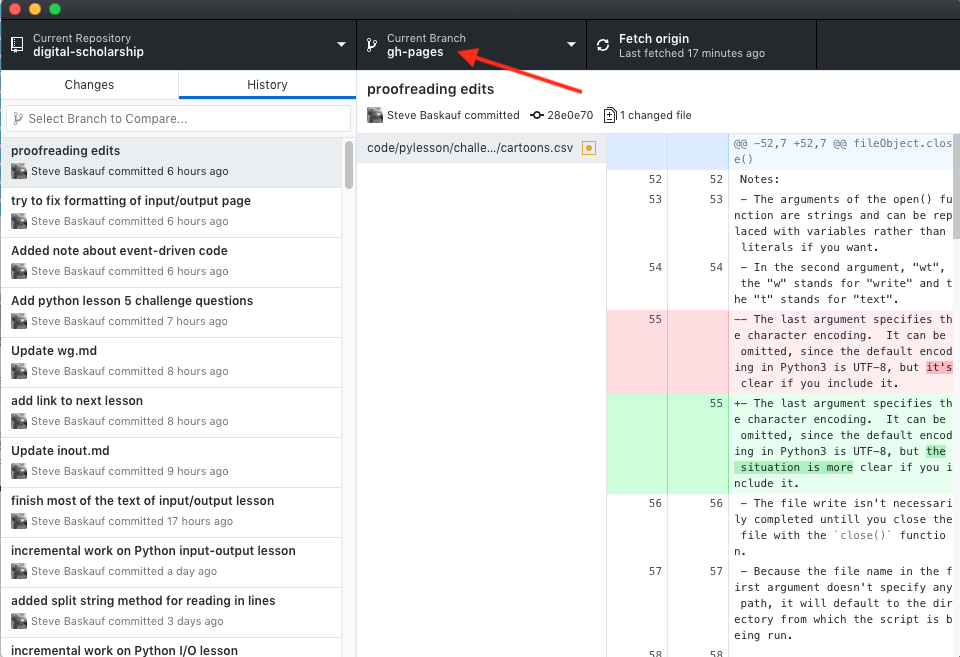
then I’m checking out a different set of files. Here’s what the directories look like now:
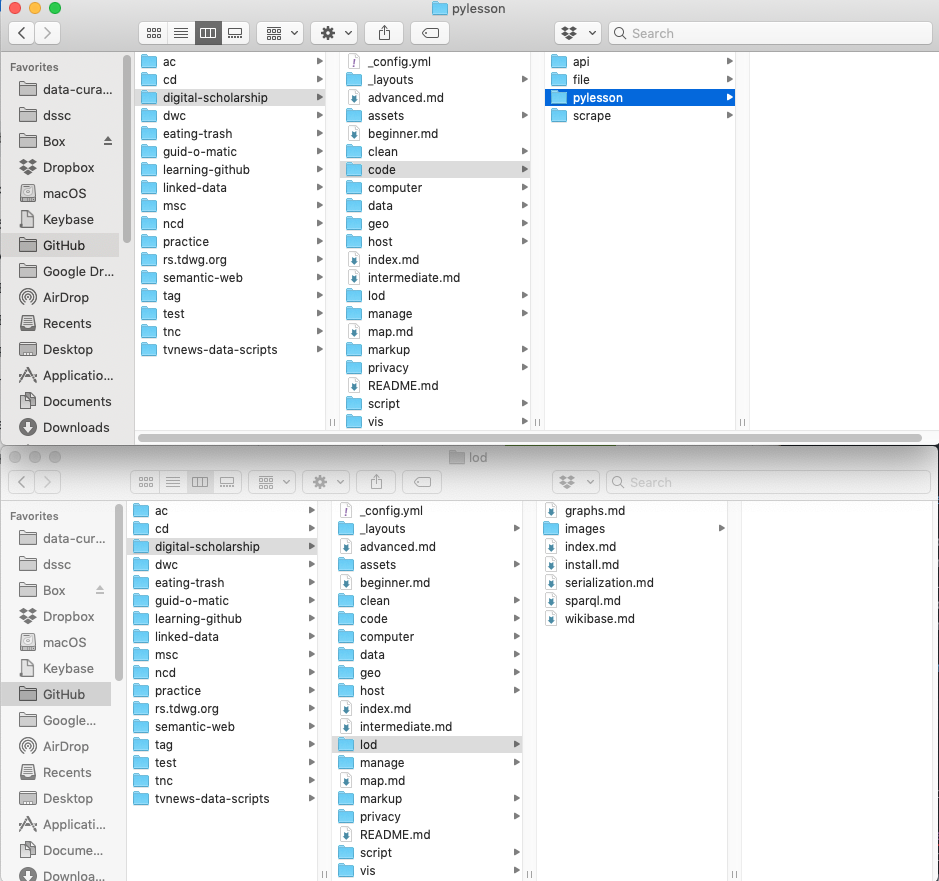
Some files have disappeared, like the ones in the pylesson directory, and other files have appeared in the lod directory. The content of the files themselves may also change if the state of the files is different in the two branches. Note: Git only manages files, not directories. When Git checks out a different branch, it doesn’t delete directories, even if they don’t contain any files in that branch.
So it’s important before you start working on files that you are clear what branch you currently have checked out. It is also important to make sure that you’ve saved the files that you were working on before you check out a different branch in the same repository. It is possible to lose unsaved changes if you don’t, although usually the desktop client is smart enough to give you some kind of warning first.
If you switch the desktop client to another repo, it will remember what branch you were working on the next time you switch back to that repository.
Command line comparison
Switching to a preexisting branch uses the same command as above:
git checkout existingbranchname
The Shared Repository model
The Shared Repository model is one of the two major ways that development is coordinated in large projects that involve more than a few collaborators.
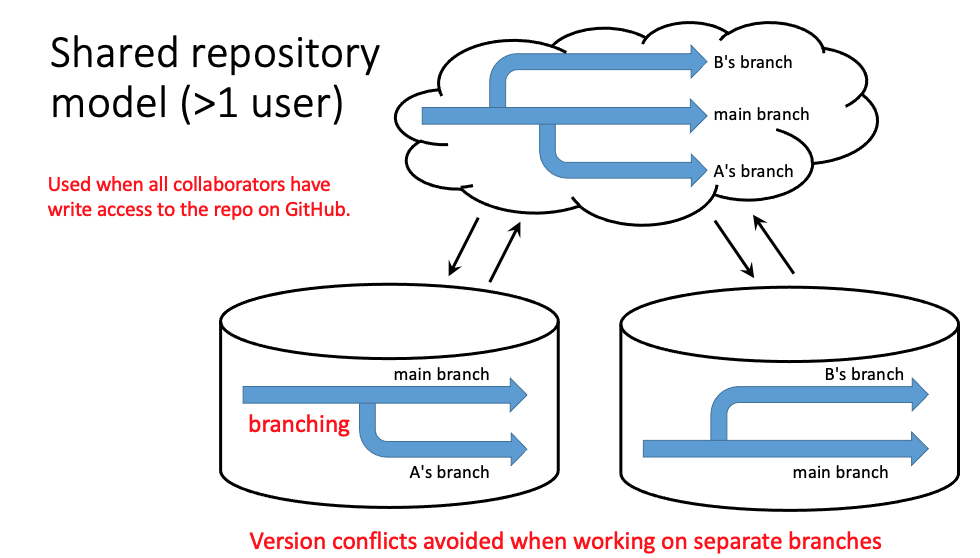
In the shared repository model, all collaborators have write access to the repo. This model is common when teams are relatively small, and especially when development is not open to the public. The other model, Fork and Pull, is common in large, open source projects where features may be created by contributors who aren’t on the core team, and therefore don’t have write access to the repository. That model will be discussed in more detail later.
Workflow options
If you are working by yourself creating a new document, or if you are making trivial changes, you may opt to edit the master branch directly. However, if you are on a team and making substantial changes, or if you are working by yourself and are concerned that the changes you are making may not work out, it’s better to create a separate branch and work on that.
The number of branches also can influence the probability of creating merge conflicts when edits are made to a version that isn’t the most recent one. When there are few branches with many people working on them, merge conflicts are more likely. If there are more branches with fewer people working on each one, merge conflicts of this sort are less likely to arise.
If changes are extensive and it will take a while to finish them, you will probably want to leave the master branch in a stable state until you’ve finished the changes in another branch. You can then merge the other branch into the master branch all at once to create a new version of the master. This approach is critical in a situation where the master branch is the source material for something in current operation. For example, if the master is serving as a codebase from which an application is being built, you obviously would not want to leave it in a state where modifications are only partly finished, resulting in the application being broken. Similarly, if a document is serving as a public record of some sort (documentation for example), you would also want to complete the entire set of modifications before releasing the new version of the document. The point at which a coordinated set of edits are completed is called a milestone. Later we’ll see how milestones are formally integrated into the collaborative tools of GitHub.
Tracking issues
One way to model the workflow on a project is to associate each commit with the solution of a particular problem. In that model, work begins by identifying each discrete problem that needs to be solved before achieving some particular milestone in the project (e.g. a release). The GitHub web interface has a formal mechanism for tracking such problems – its issues tracker. For now we will use the issues tracker minimally, but later we will see how to integrate it more fully with the GitHub’s other collaborative tools.
In looking at my alter ego Tomy the Cat’s “Favorite foods” document, I can immediately see two problems:
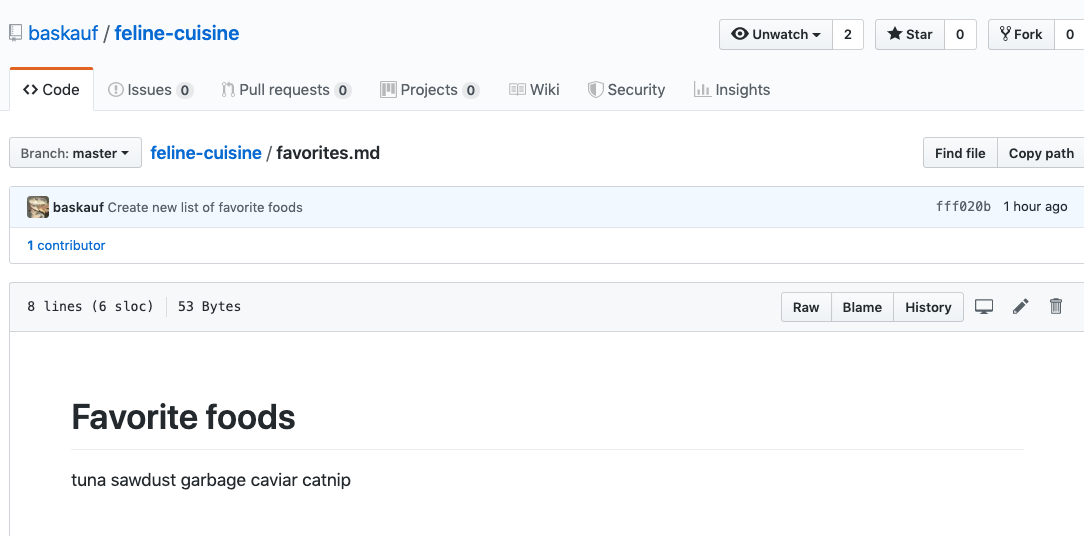
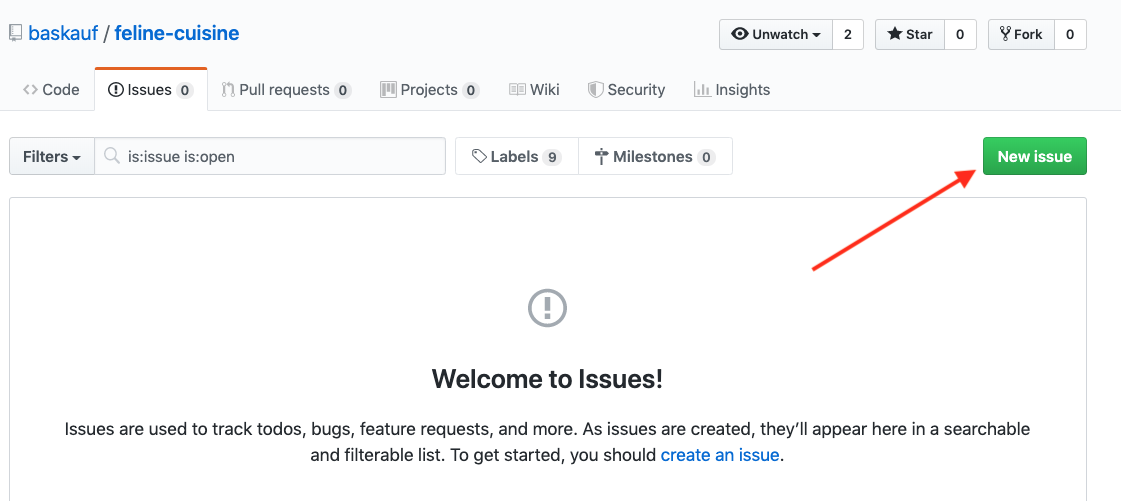
So I go to the issues tracker and create issues to document them. Click on the Issues tab, then the New issue button.
I create a short, descriptive issue title, then describe the issue in more detail below.
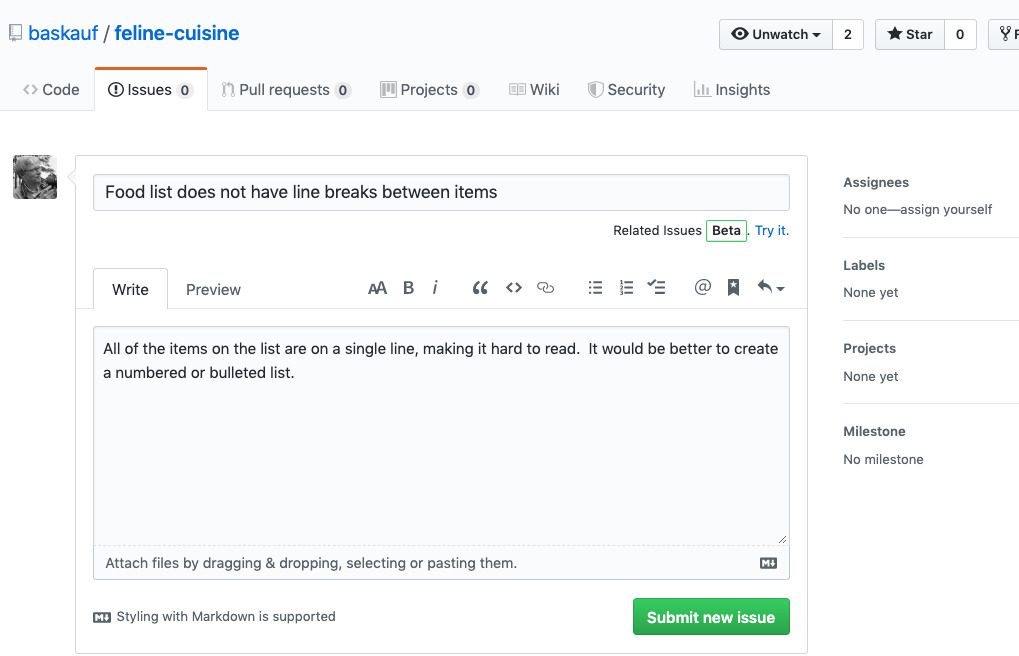
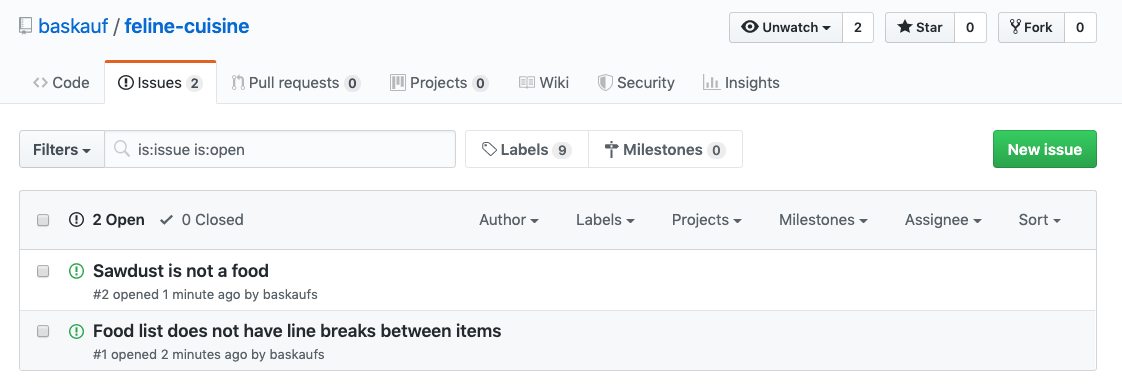
I click the Submit new issue button, then create the another issue. When I click on the Issues tab again, by default I see a list of the open issues.
Fixing issues and making commits
Since I know what needs to be done and have already created a working branch, I’m ready to address the issues. I open the favorites.md Markdown file and start editing using my favorite text editor. I decide to fix the sawdust problem first by deleting it from the list. After deleting the word and saving, I return to the desktop client and see that the sawdust line is in red and has a minus sign to the left, indicating that the line has been deleted since the last edit.
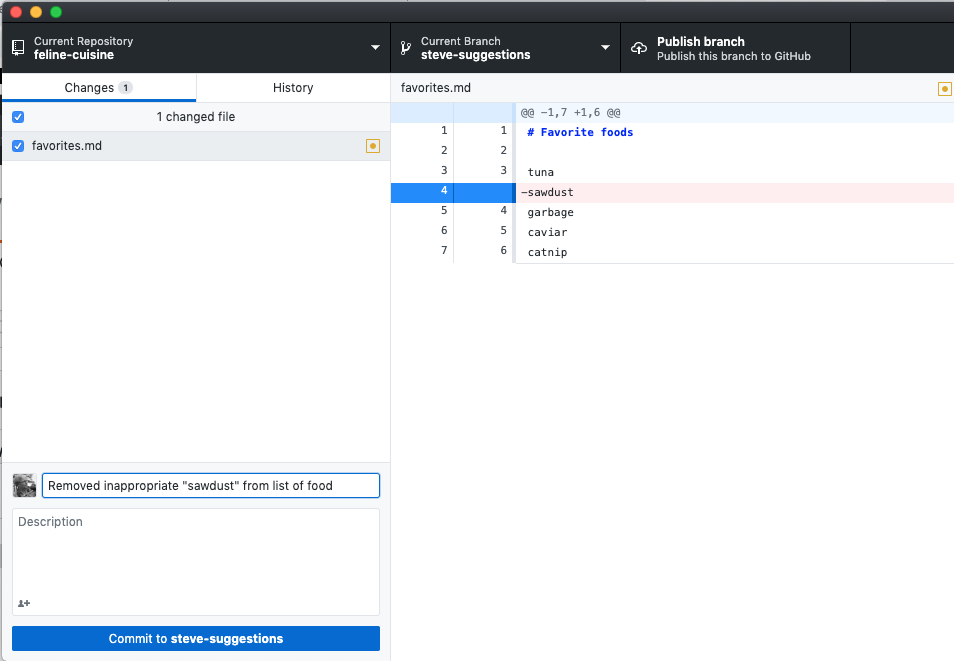
That completely solves the problem, so I’m ready to make a commit. I create a brief commit message that summarizes what I’ve accomplished, then click the blue commit button at the bottom. The change disappears from the Changes tab.
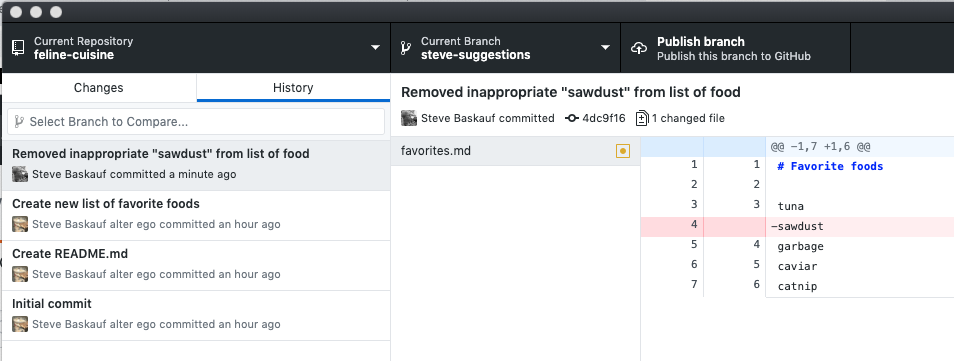
If I click on the History tab, I now see the commit in the history list. That means that my changes have been saved in the local repository. However, since the branch has not ever been pushed to GitHub, the changes are not in the cloud yet. This would probably be a good time to push the changes by clicking on the Publish branch tab at the upper right. Once I’ve done that, I can click on the Code tab of the GitHub web interface, then select the steve-suggestions branch. If I look at the favorites.md document on that branch, “sawdust” will be missing. It will still be there on the master branch.
Since this commit fixes one of the issues I raised, I need to close it in the tracker.
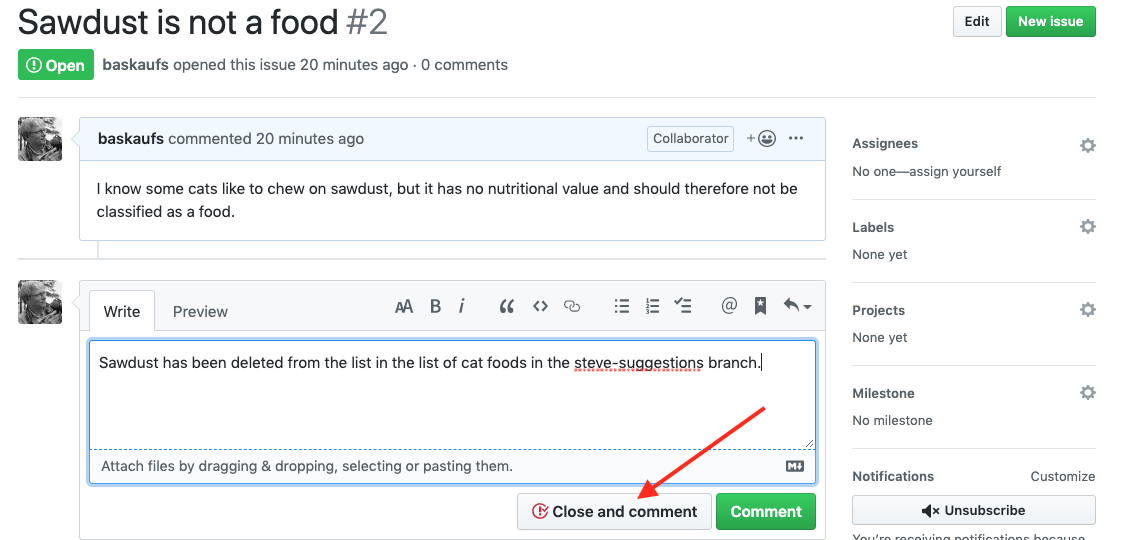
I open Issue #2 and write a discriptive comment. Then I click the Close and comment button. That issue will disappear from the list of open issues in the tracker.
To close the other issue, I need to do something about all of the items being on the same line. I decide to make it a bulleted list and edit the document accordingly. After saving, the changes show up under the changes tab of the desktop client.
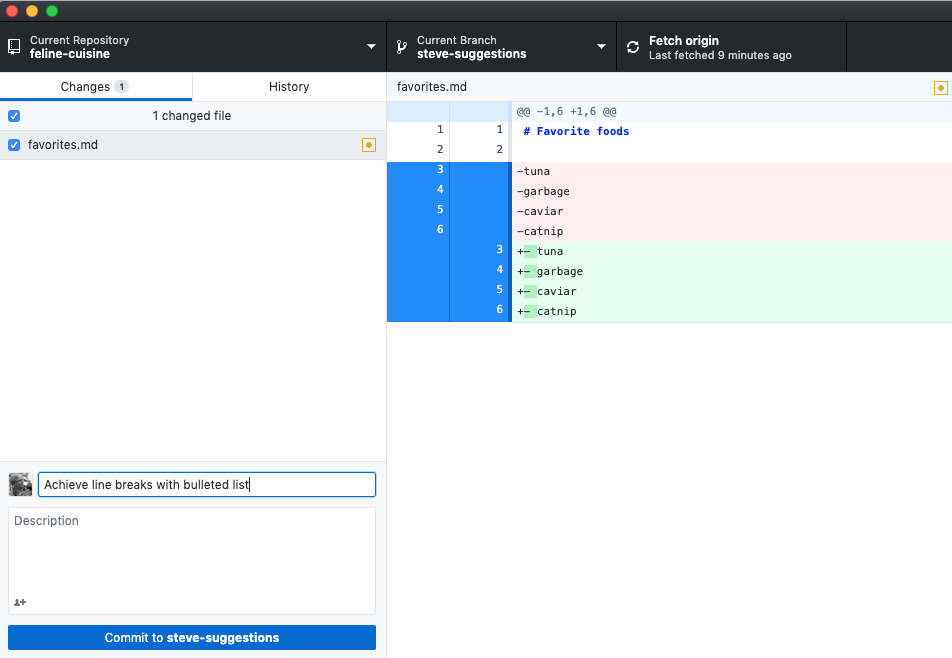
Again I write a descriptive commit message and make the commit. Since I’m done working for now, I push the new commit to GitHub (Push origin tab at upper right), and close the corresponding issue in the online tracker.
Creating a pull request
Since I’ve solved all of the problems I noticed, my changes need to be merged into the master branch. To start that process, I need to create a pull request to initiate discussion about my changes.
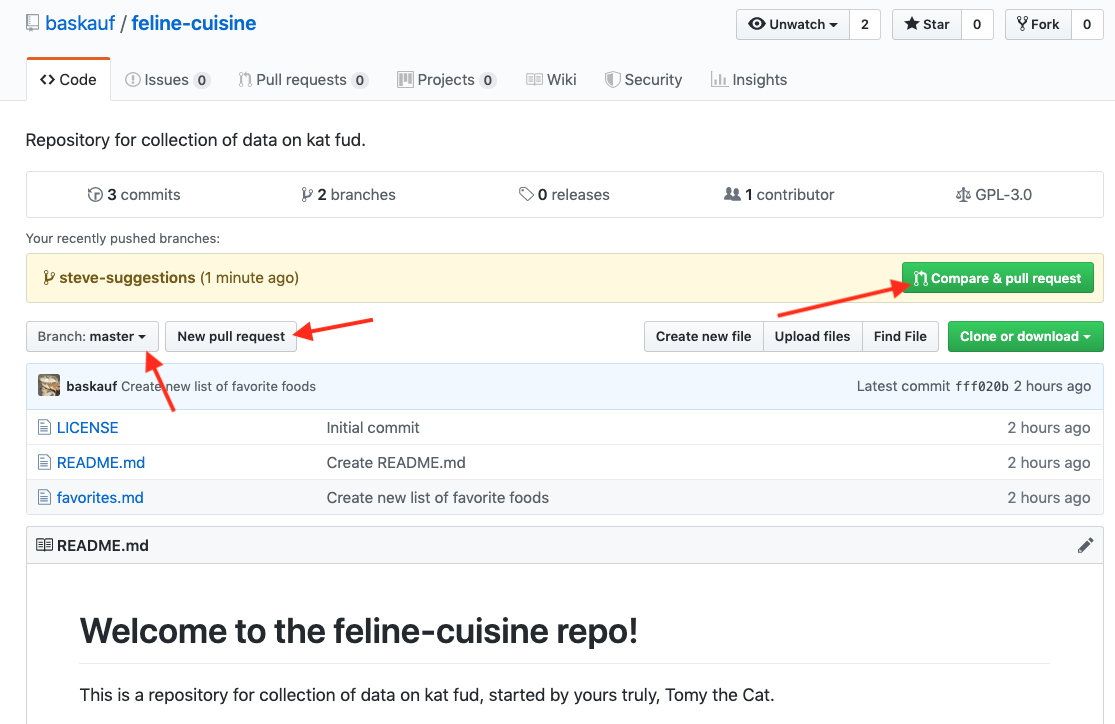
If I click on the Code tab in the online repo. I see a notification of my recently pushed branch, with an option to open a pull request. If I don’t see that notification, I can use the Branch: dropdown to change to my steve-suggestions branch, then click the New pull request button next to it.
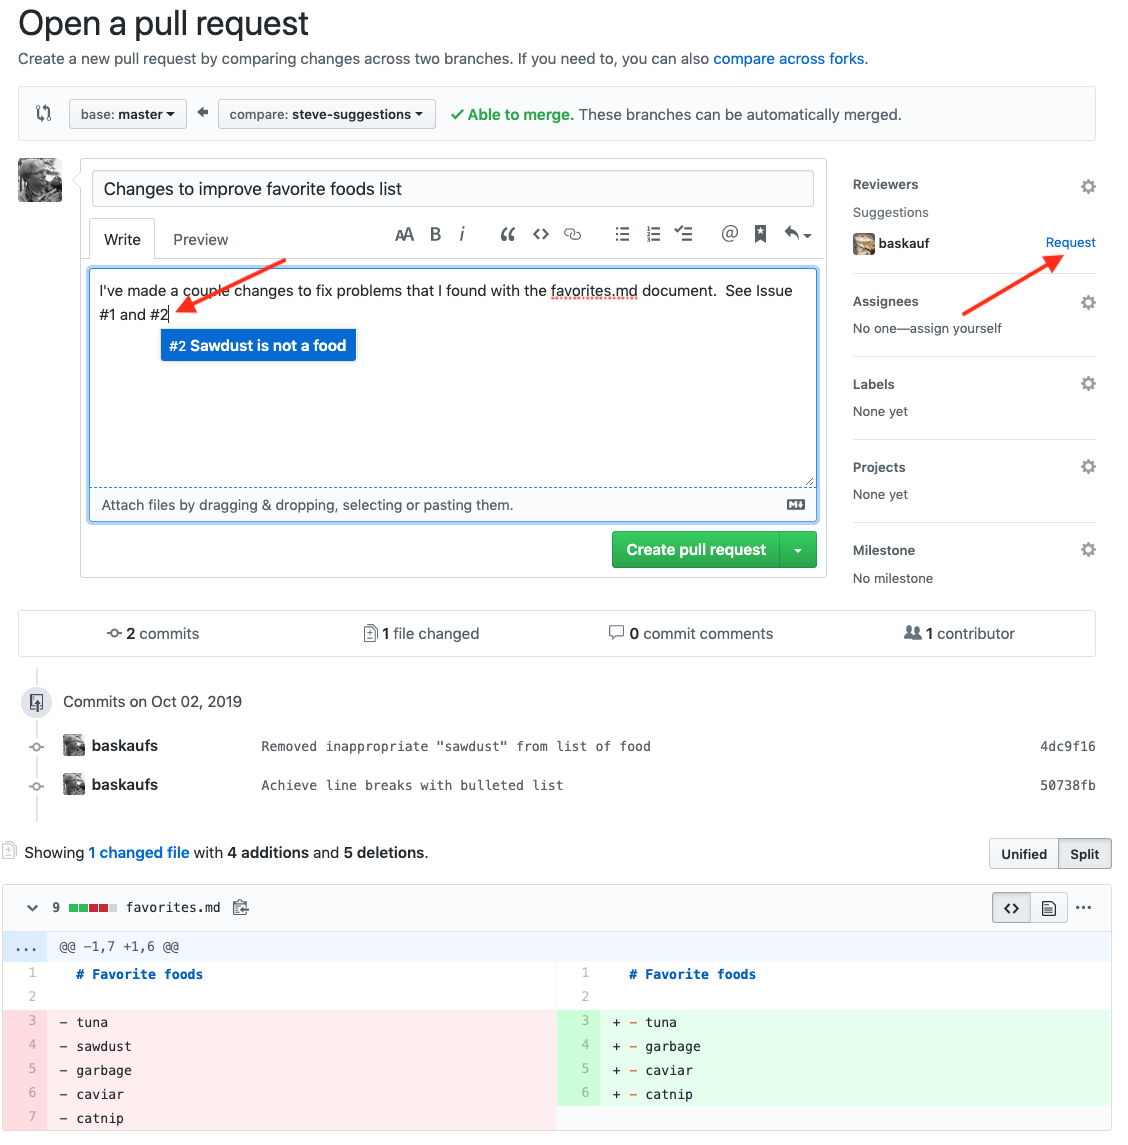
The resulting page has a lot of useful information. Importantly, there is a list of commits with their corresponding messages. You can see why it’s important to create commit messages that succinctly state what was accomplised with each commit. Since I’ve edited Tomy’s document, it would be appropriate for me to request that he review the pull request (see the Reviewers option in the upper right). The full set of changes to the file are shown at the bottom of the page – if I want to see what was done in each commit, I can click on the commit message in the list. Notice that in the text of my comment, I can refer to an issue by putting its number after a hash mark. After I click on the Create pull request button, Tomy will receive a notification about the review (by email, if his settings allow).
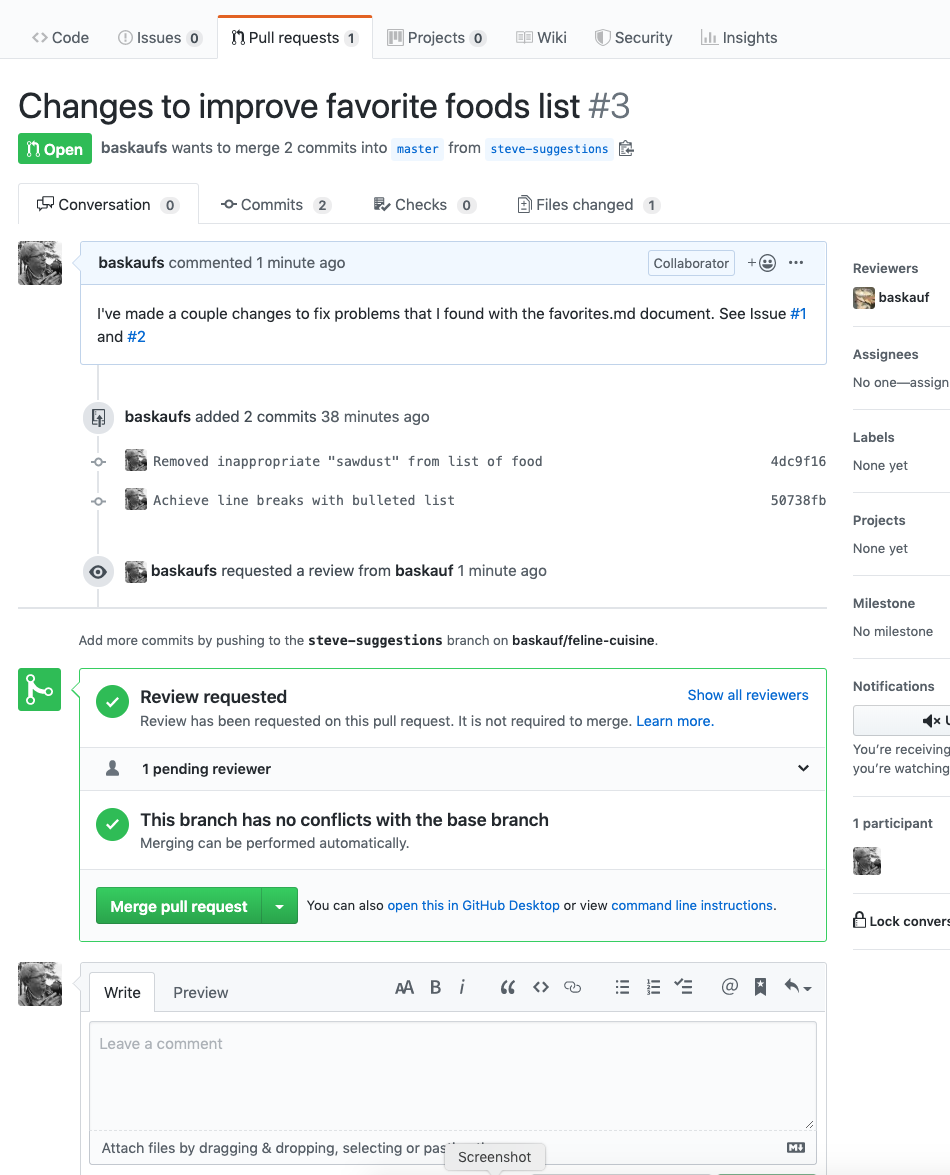
I could merge the pull request myself, but our team has established a policy that merges should always be done by someone other than the creator of the pull request.
Review and merge
Since my collaborator has his notifications settings set to receive notification emails, he receives two emails. One notifies him that he has been requested to review and the other is a general summary notification of the pull request:
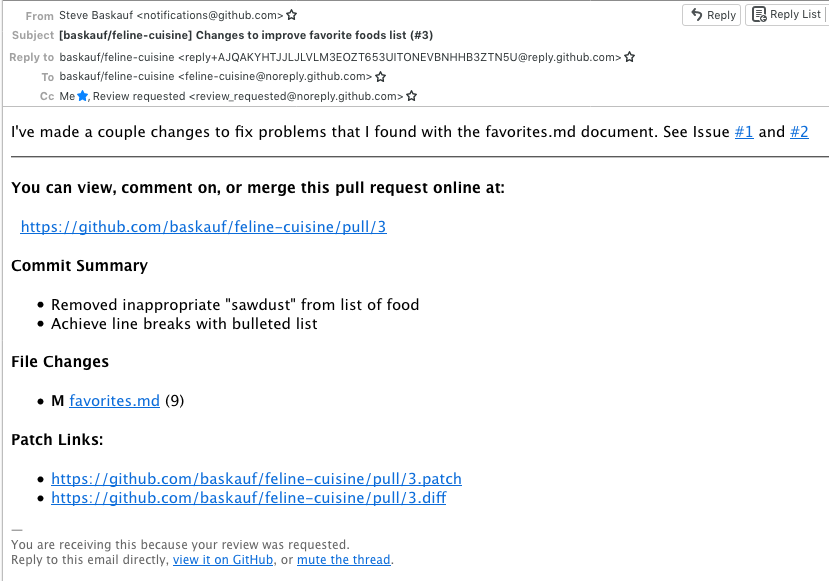
When he clicks on the link in his email to go to the pull request, he sees the review request:
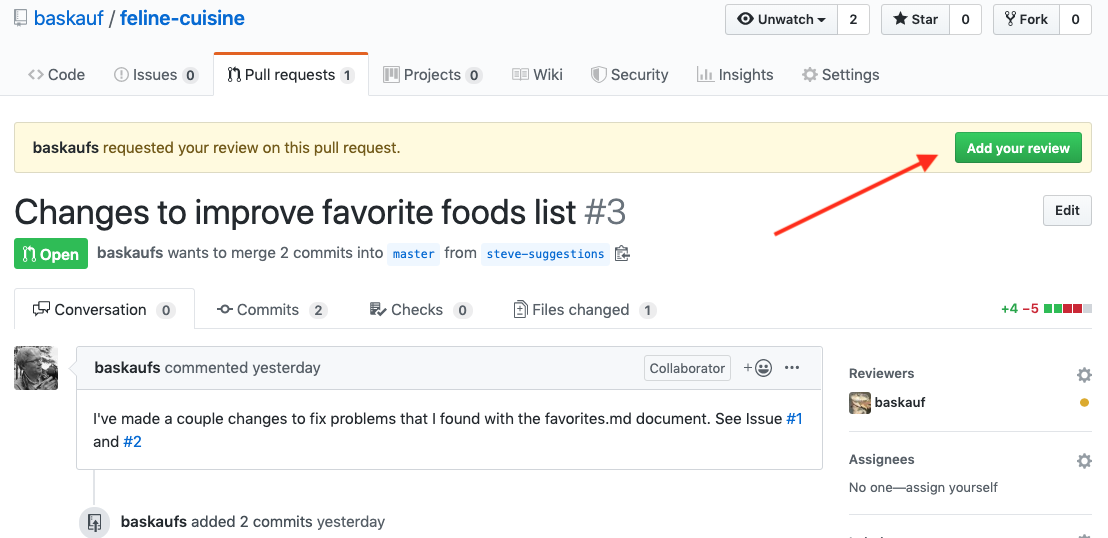
After he clicks the Add your review button, he’s taken to the review screen where he writes his review and indicates his approval.
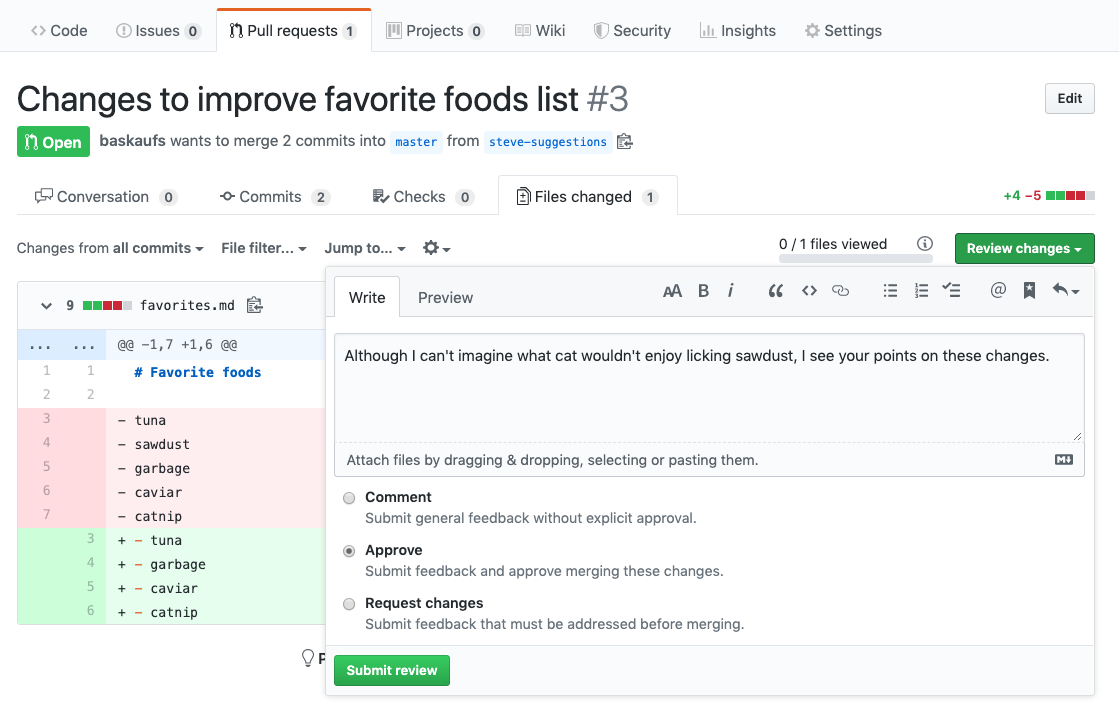
Clicking on the Submit review button generates a notification to me that he’s reviewed the request and agrees. After submitting his review, he’s taken back to the pull request screen where his review has been added to the history of the request.
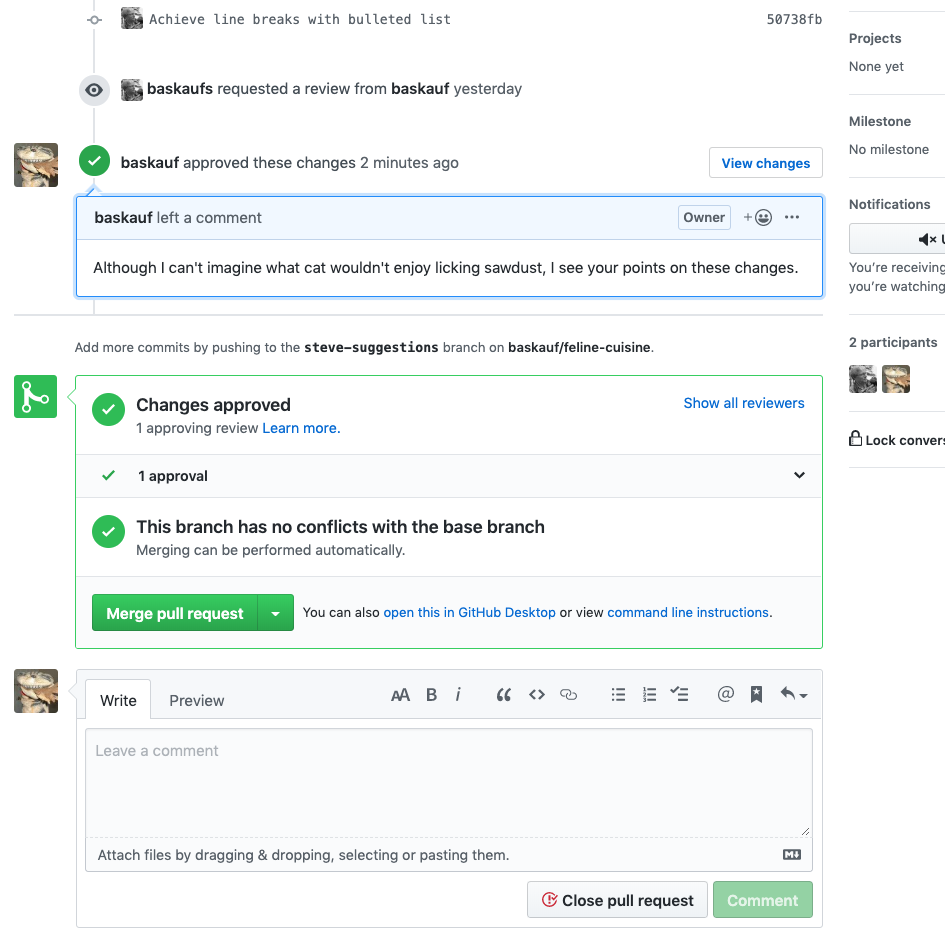
If he’d disallowed the merge, he could have closed the pull request without merging. But instead he clicks the Merge pull request button. Confirmation is requested, and after confirming, the steve-suggestion branch is merged into the master branch.
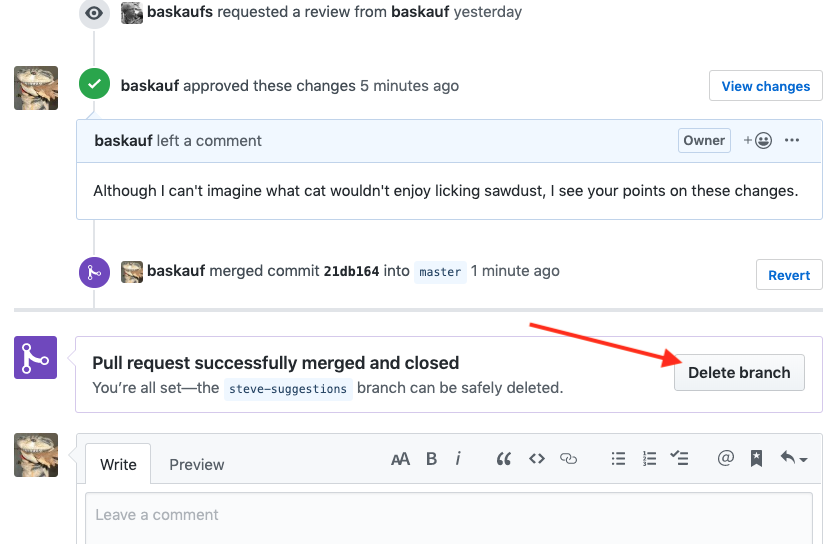
The commits that were made in the steve-suggestion branch are now part of the master branch and will appear in its history. The working branch is no longer needed and can be deleted from the online GitHub repo by clicking the Delete branch button. However, that does NOT delete the branch from any local repositories on the desktop computer. To delete the unneeded repo from it, go to the Branch menu on the desktop client and select Delete....
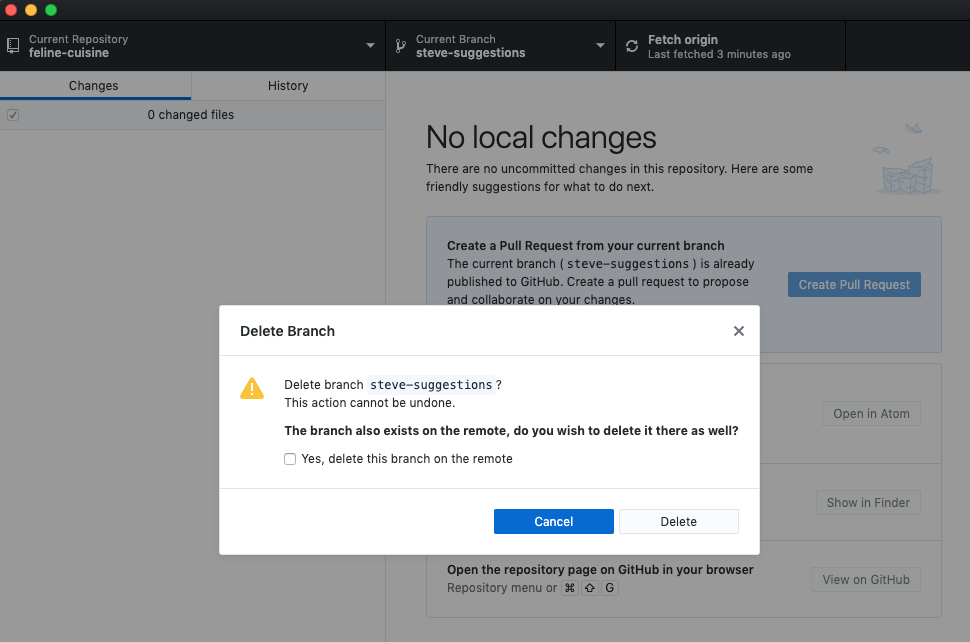
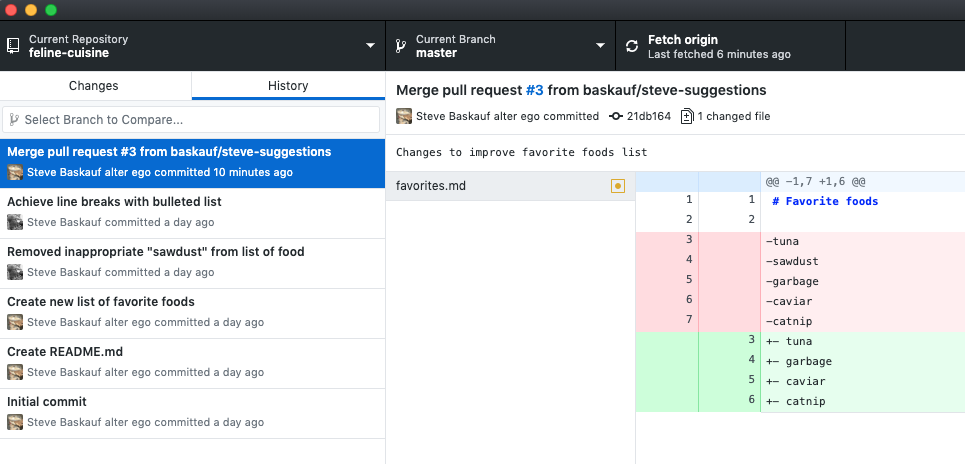
If you hadn’t already deleted the branch on GitHub, you could check the box to delete it at the same time. After deleting, the desktop client will automatically switch back to the master branch. Checking the history tab, we see the commits from the working branch now incorporated into the history of the master.
Here’s how the finished product looks:
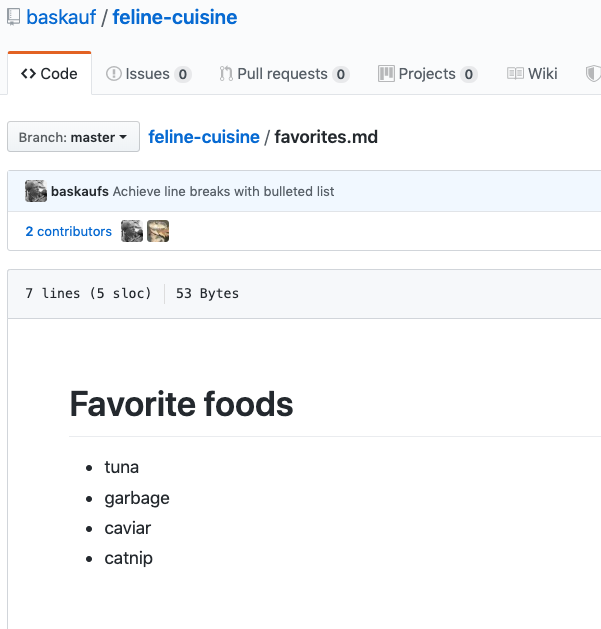
Notice that both of us are now shown as contributors to the doc.
Creating a patch branch and resolving a merge conflict online
Usually, one would develop a document using a working branch on a local computer and manage commits using the desktop client. However, it’s possible to make minor edits using the online editor through a patch branch. The process is similar to what was described above - to see details, go to this page. That page also shows how to resolve a merge conflict using the online editor.
Protected branches
The instructions above assume that all collaborators have unrestricted push access to the repository. In order to add a degree of protection to the main branch (or any other branch), it can be protected by adding additional requirements that make it more difficult to change.
There are a number of rules that can be put into place to protect a branch. One of the simplest and easiest to implement is requiring a review before merging.
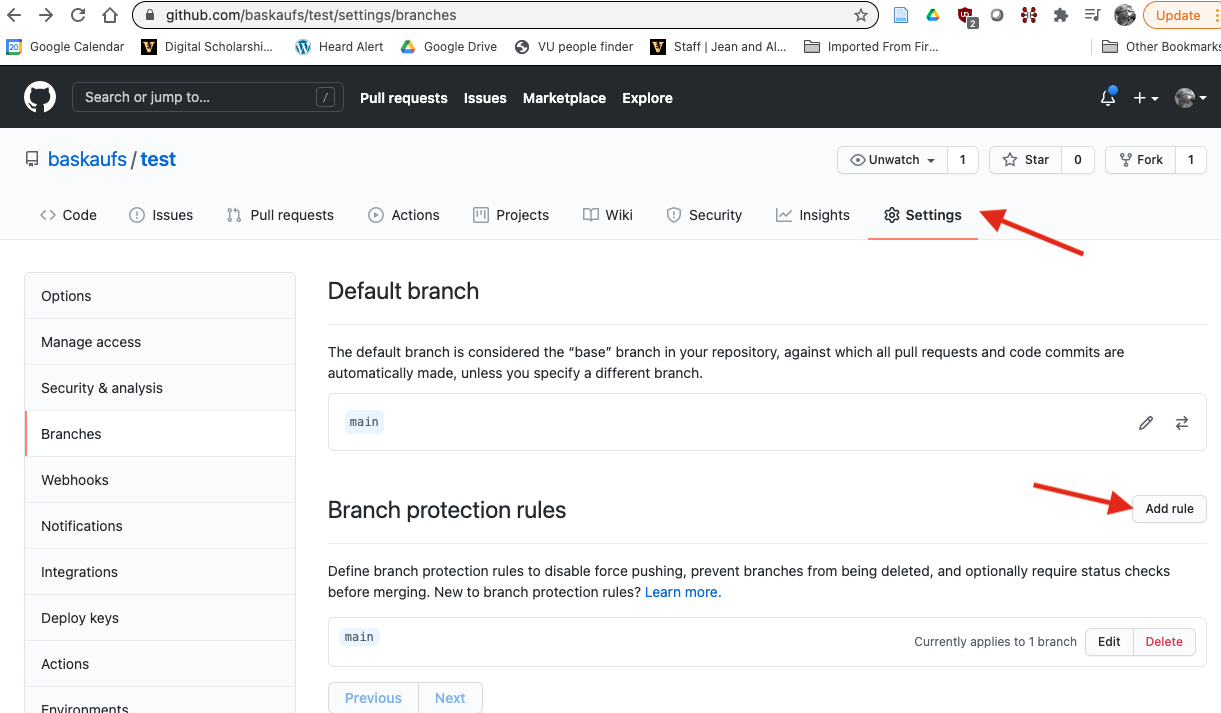
To set up a branch protection rule, click the settings tab, then the Add rule button.
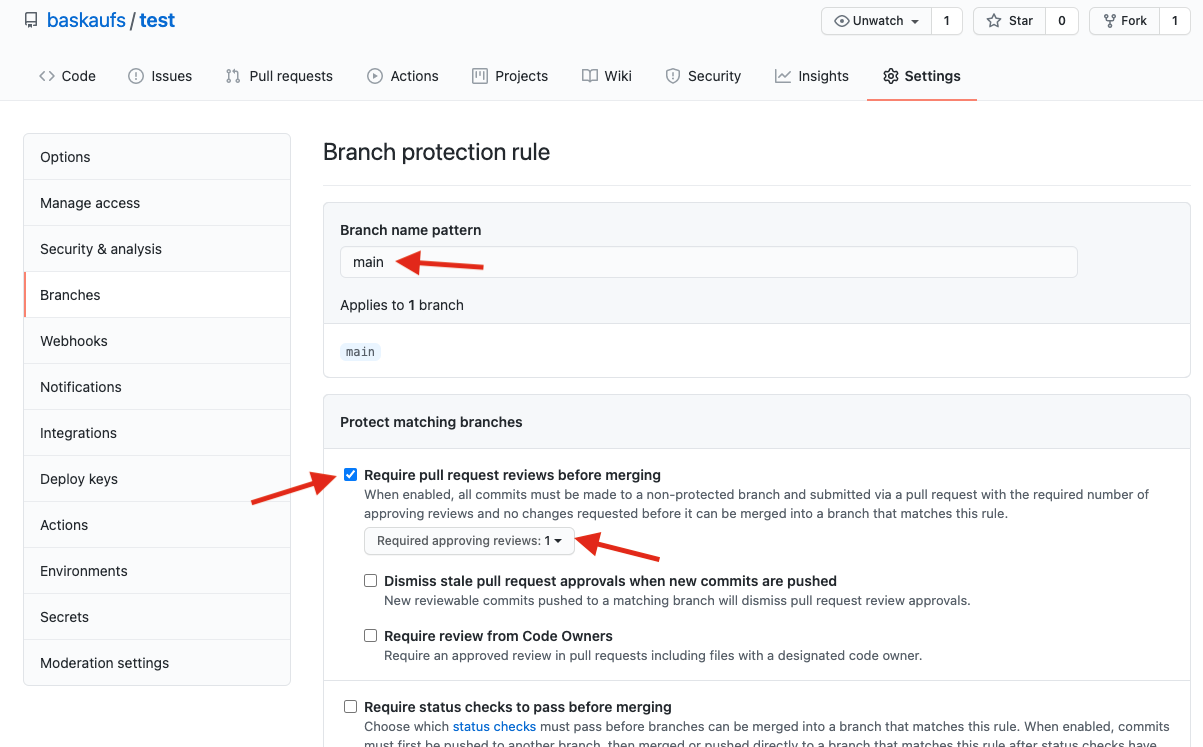
To require a review to merge a pull request into the main branch, enter main as the Branch name pattern. (Other more complicated patterns are possible to require reviews on multiple branches.) Check the Require pull request reviews before merging checkbox and select a number of required reviews using the dropdown.
The review requirement does not apply to users with administrative privileges. For repositories in accounts owned by individuals, the individual owner is the only user with admin privileges and they cannot assign administrative privileges to other users. Organizational accounts allow designation of collaborators as Owners with full administrative access to the organziation. (See the next lesson for more information about organizations and teams.) However, as of 2021-01-26, only paid organizational accounts can set up protected branches. So individual account owners and paid organizational account collaborators who have been granted admin status can commit directly to main or merge their own branches without review. Other collaborators must request a review.
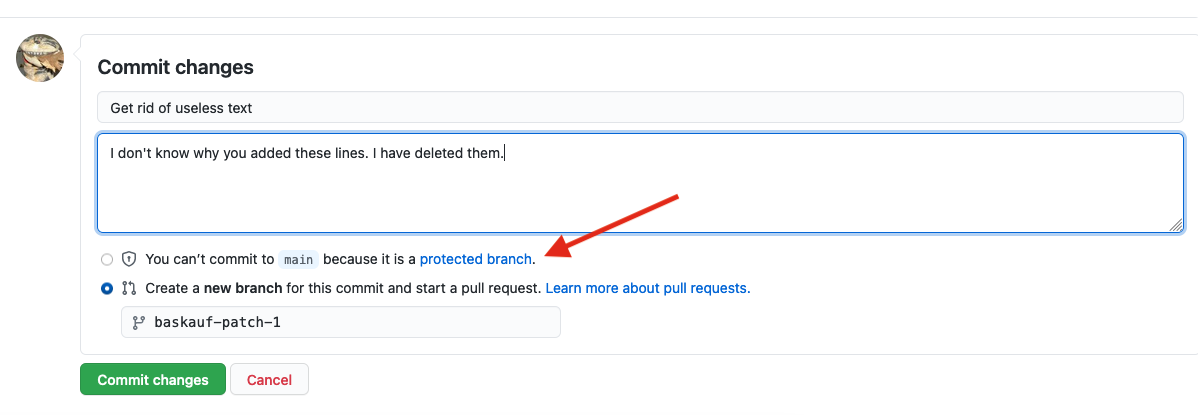
When non-administrator users want to commit to the main branch, they are required to use a branch with a reviewed pull request.
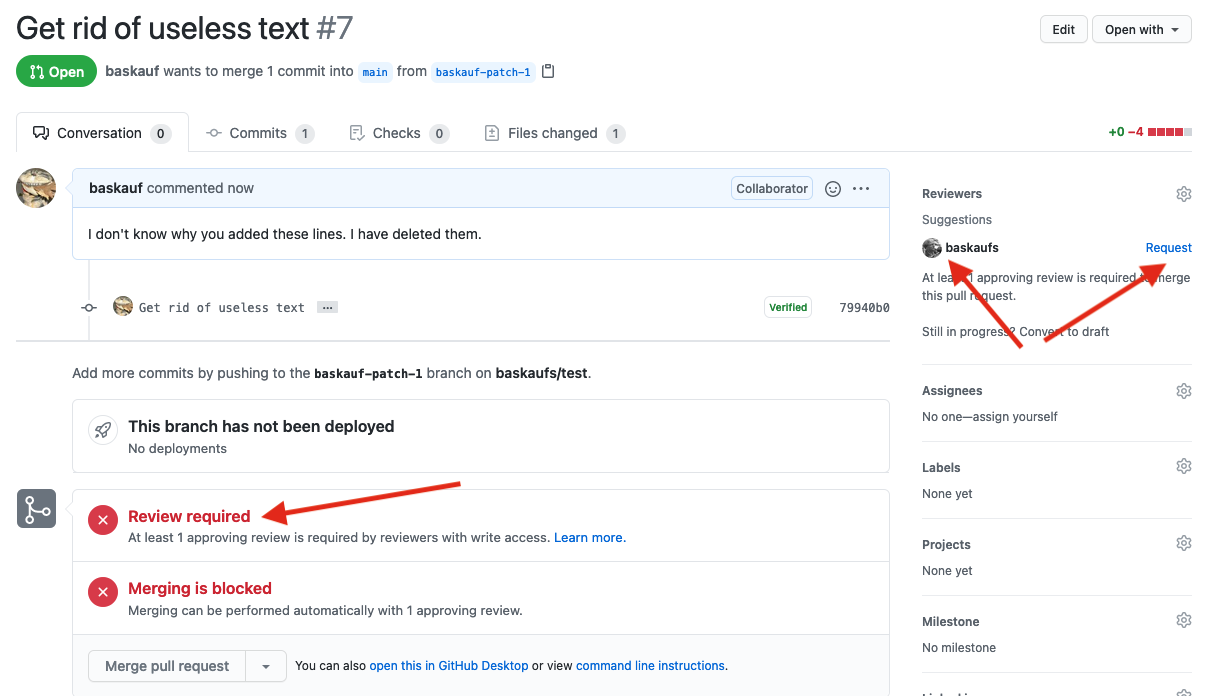
When they create the pull request, it will be flagged as requiring a review. In the example above, the account owner was suggested as a reviewer, although any collaborator with write access can be the reviewer.
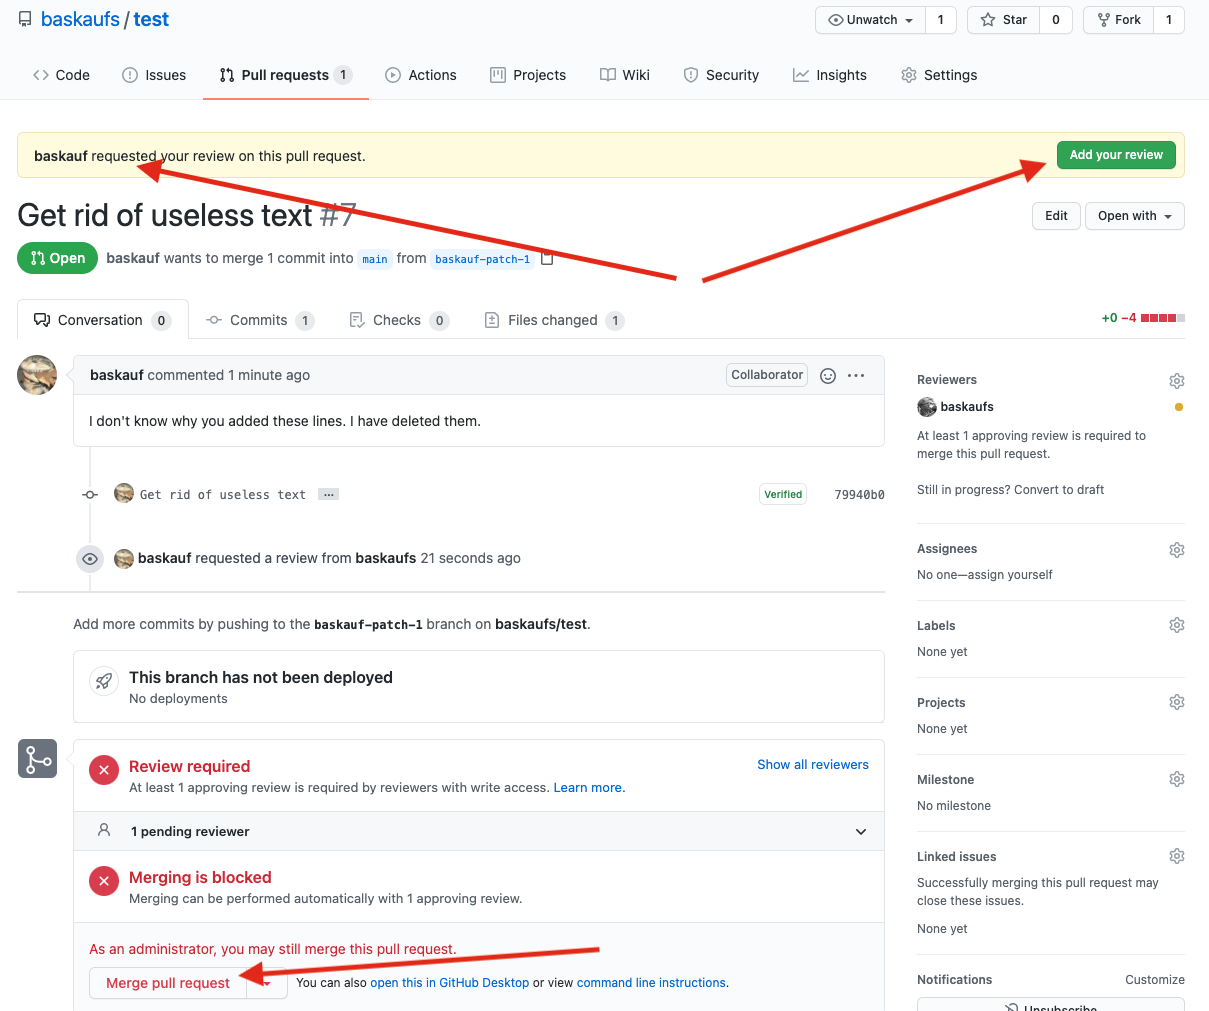
The person from whom the review has been requested will receive a notification. When they go to the pull request, they will see an Add your review button that will allow them to generate a review. Alternatively, if they are an administrator they can simply merge the pull request directly without reviewing.
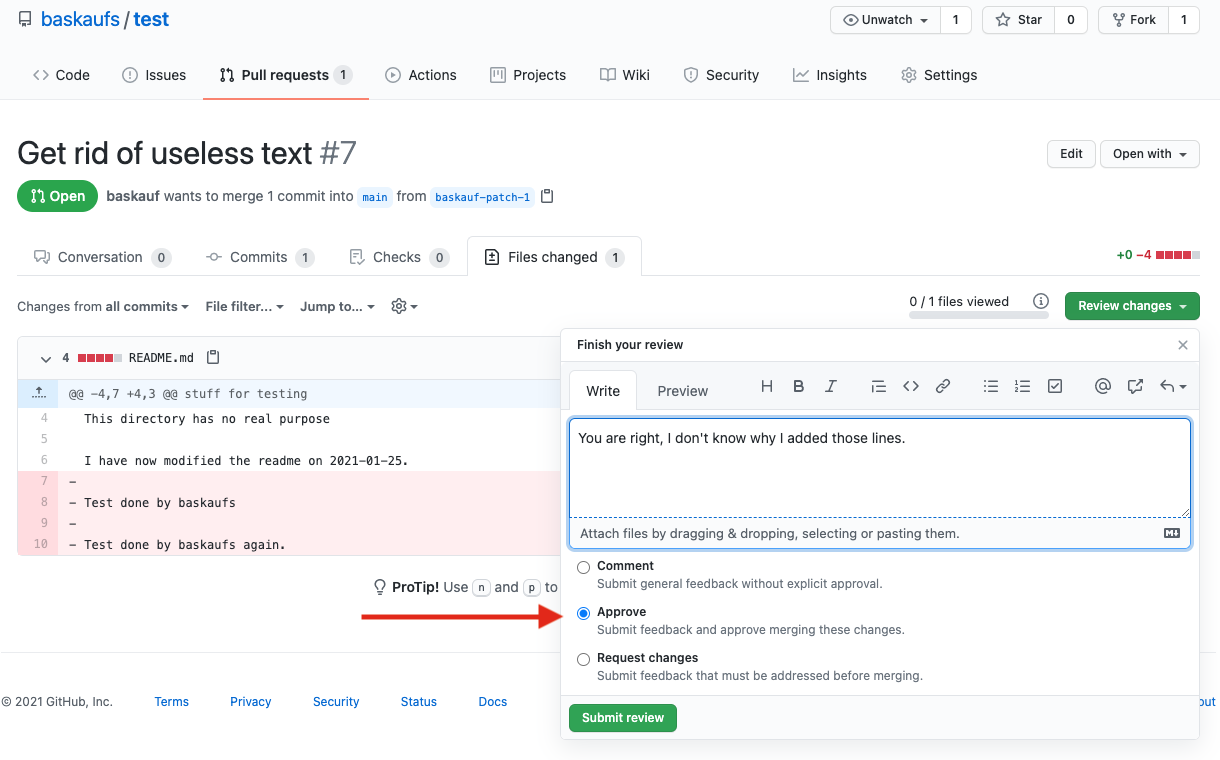
When they write their review, they will have three options. If they approve the review, either they or anyone else with write access (including the person requesting the review) can do the merge. If they comment or request changes, the merge cannot take place without another review or the merge being done by an adminstrator.
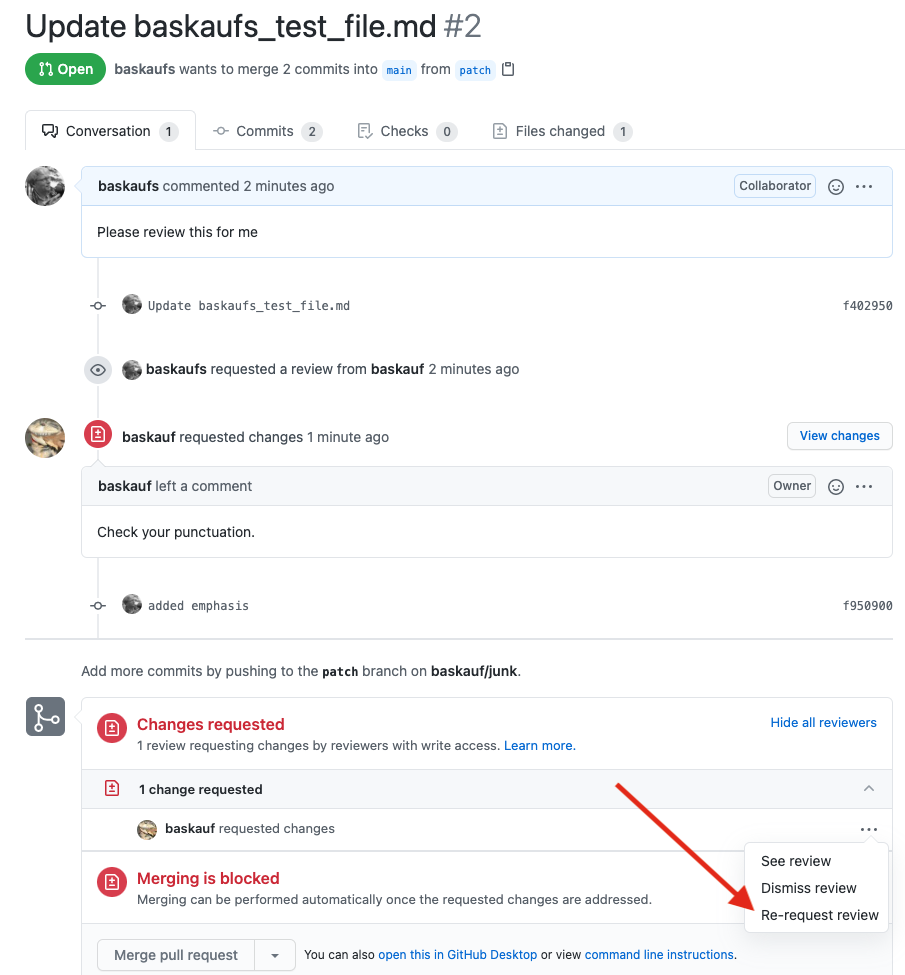
If the reviewer requested revisions, the creator of the pull request can re-request a review using the ... dropdown by the change request notification.
Protected branches and the Desktop client
In the previous examples, editing was done using the web editor. If editing is done locally on a protected branch by a non-administrator, the user will be informed that the branch is protected.
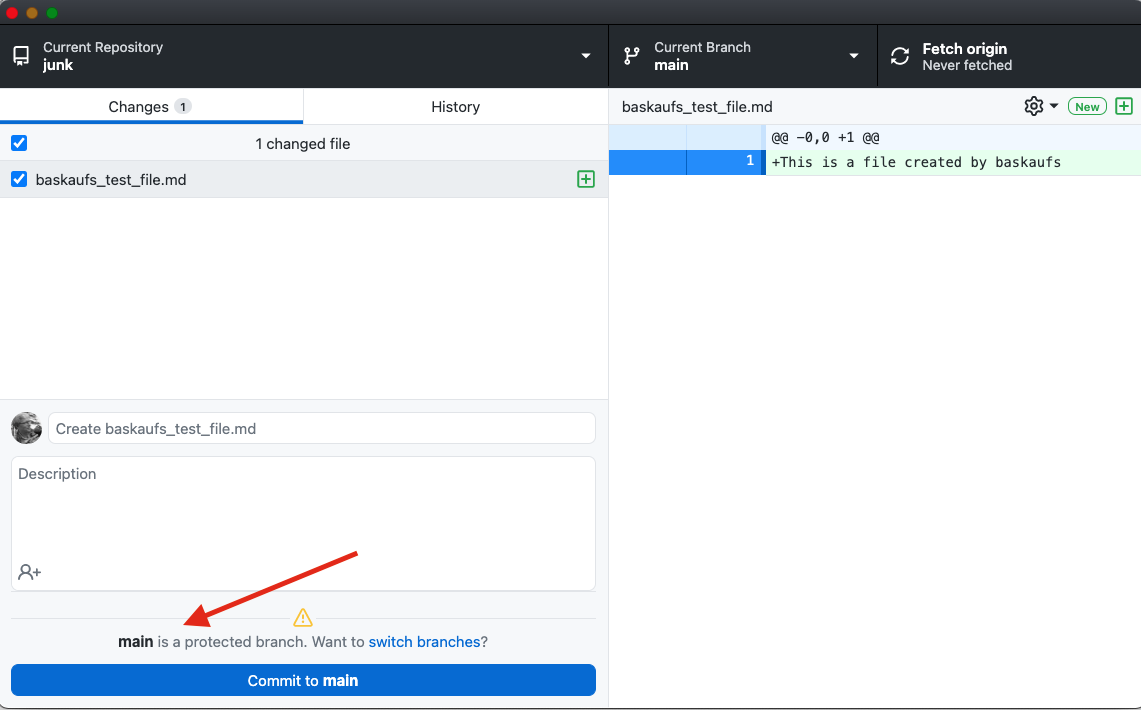
This does not prevent the user from trying to make commits to the protected branch (main in this example).
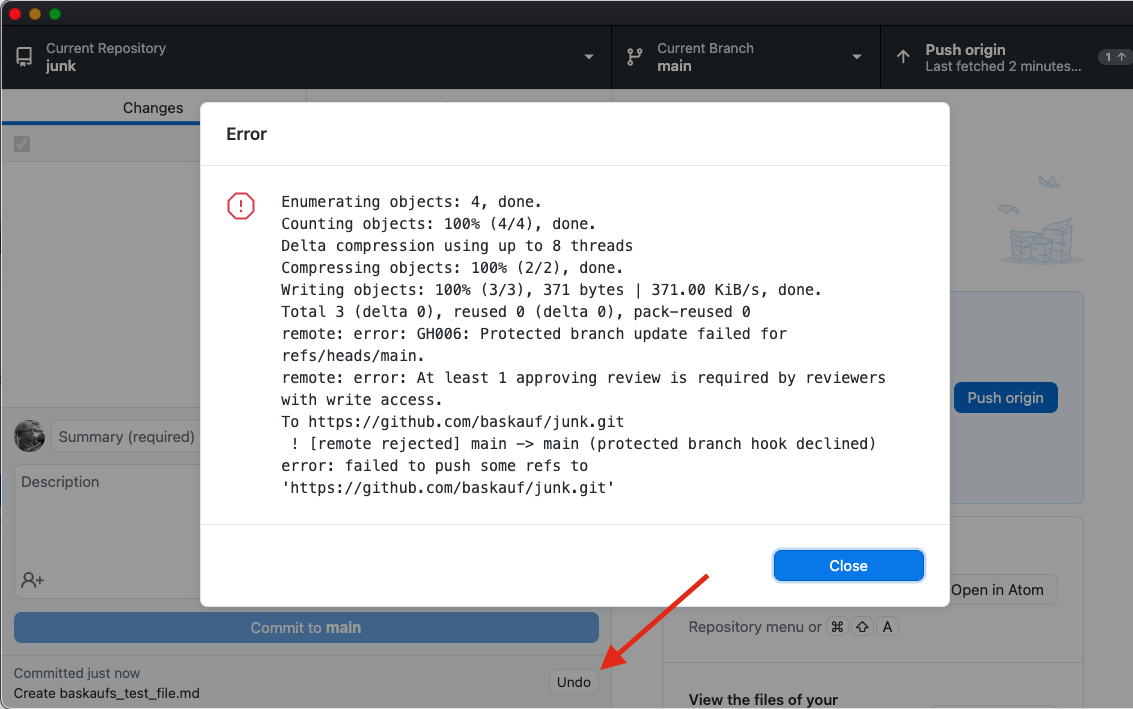
However, if the user tries to push, an error will be generated. In that case, the best option is to undo the commit.
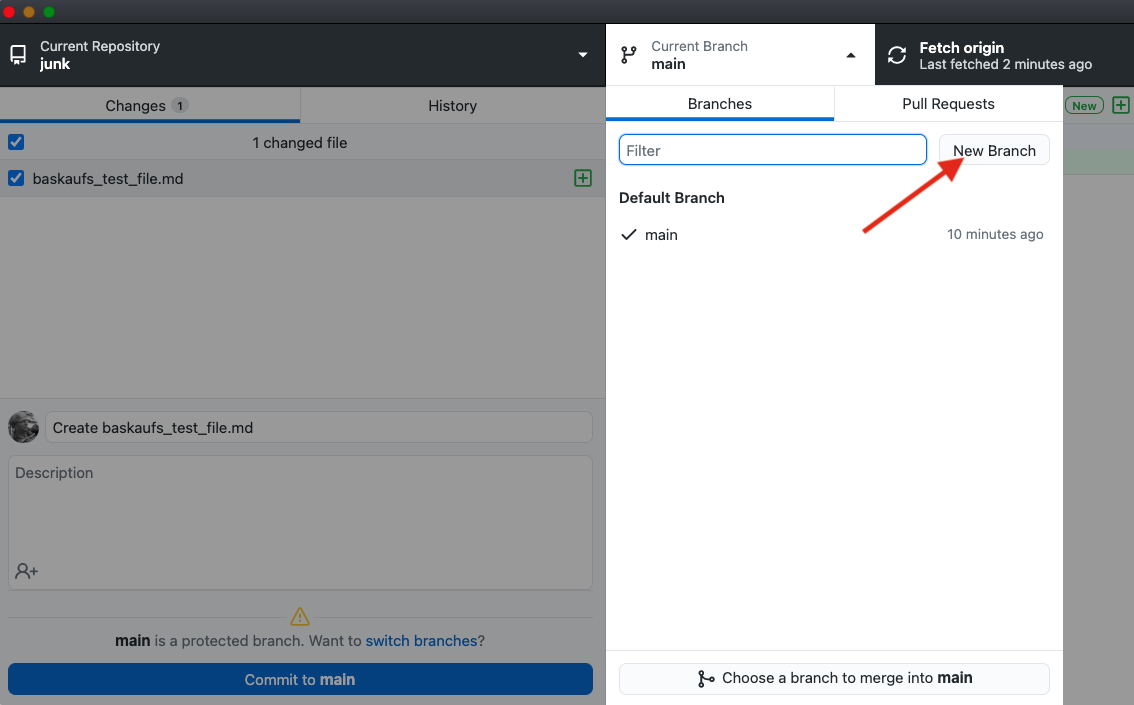
Instead of pushing to the main branch, create a new branch.
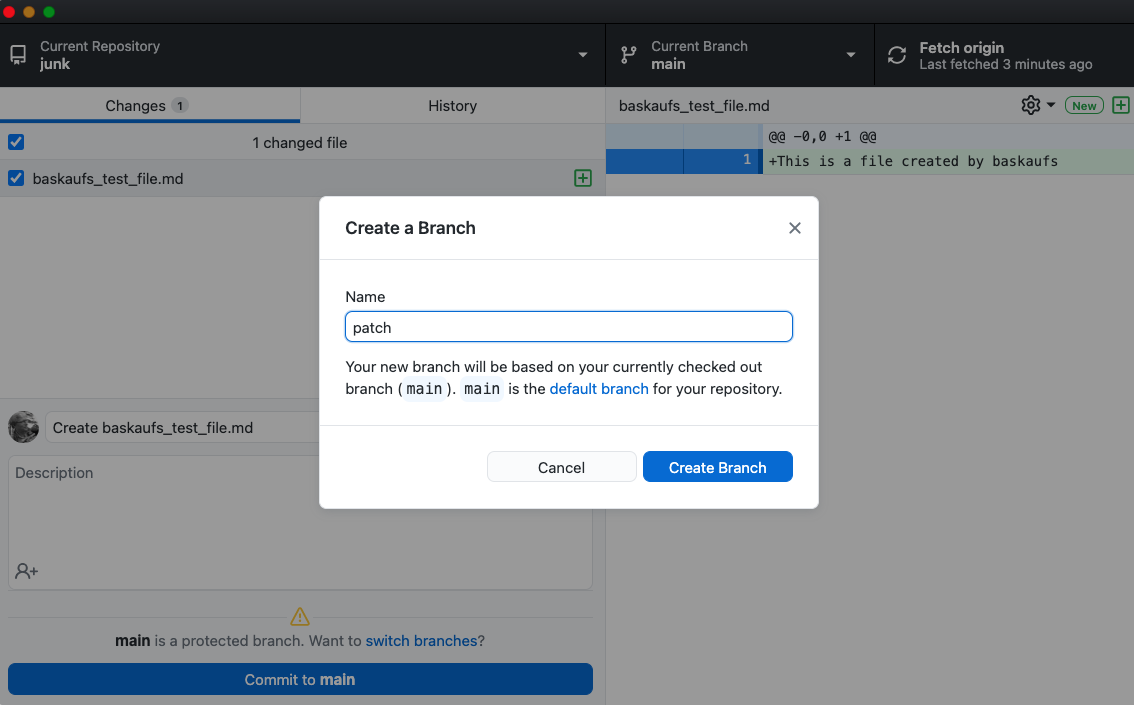
Enter a name, then click Create Branch.
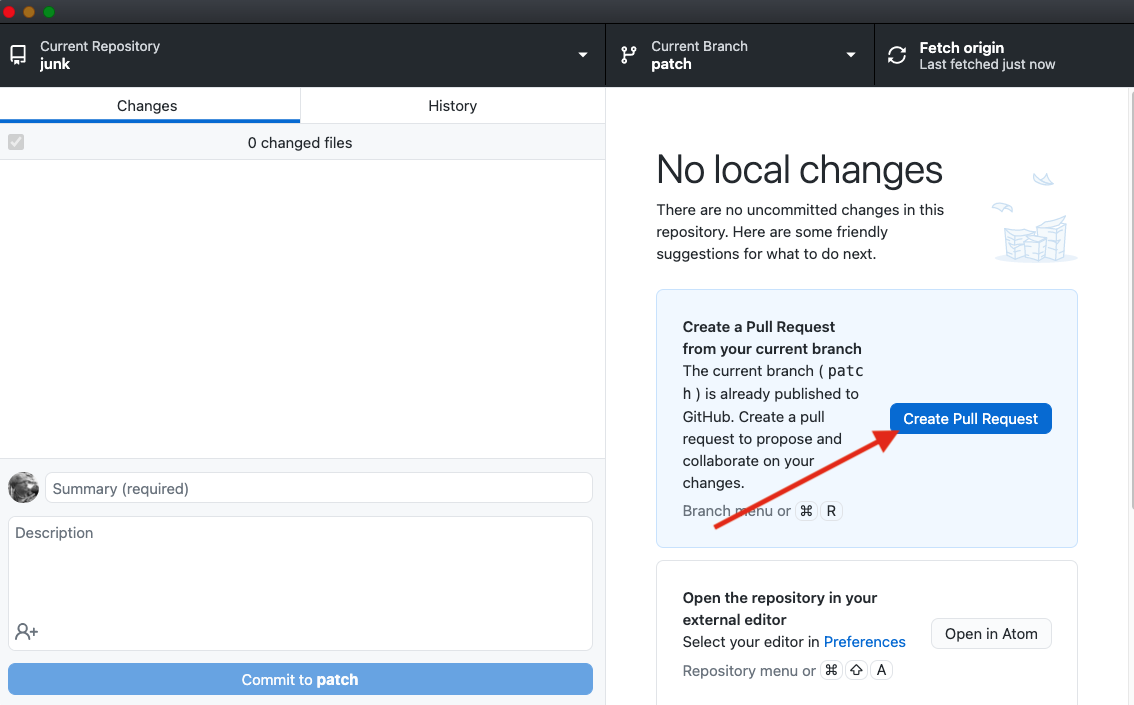
Now the user can create a pull request for the new branch. Clicking the Create Pull Request button will go to the GitHub website, where the pull request will proceed as in the examples above.
Protected branches and code owners
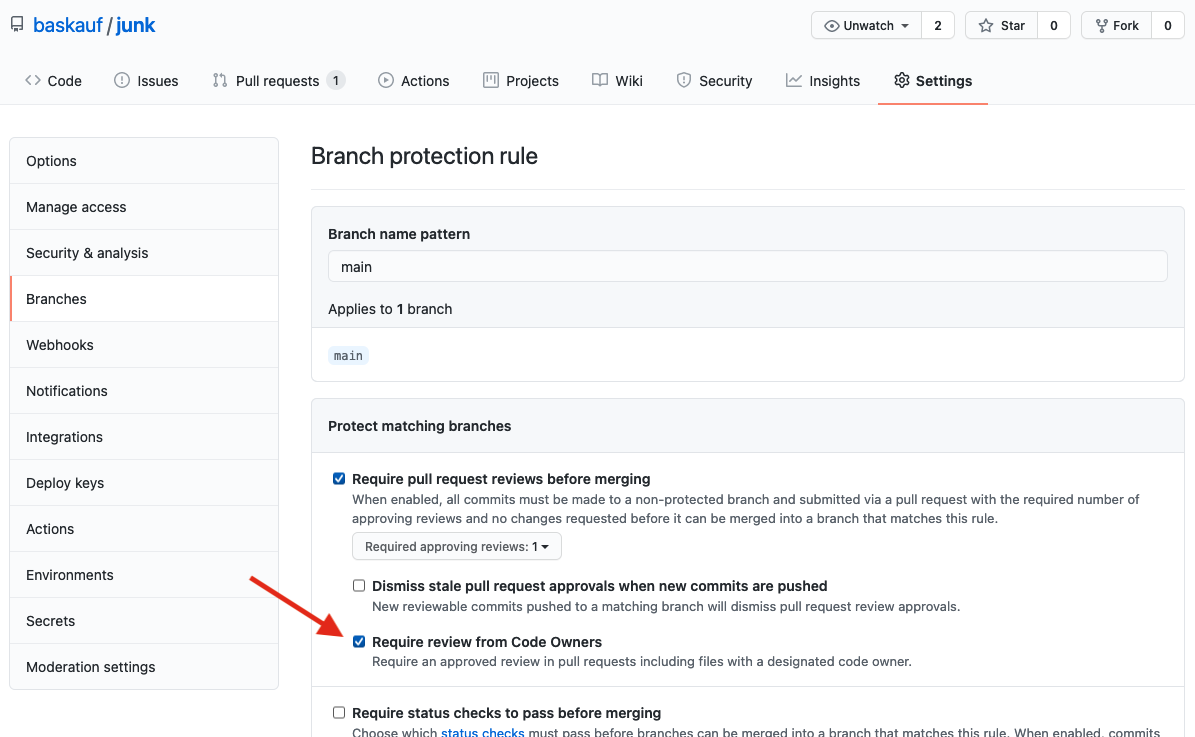
To make the review process more restrictive, the branch protection rule review requirement can be made more restrictive by designating a code owner review requirement.
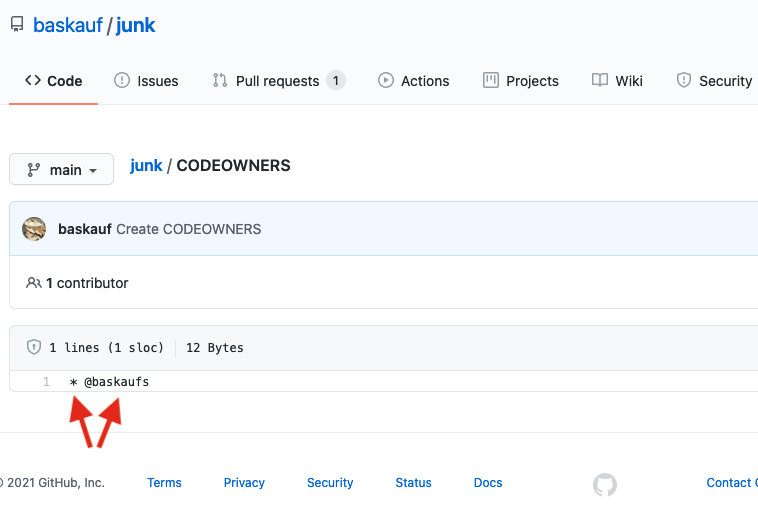
The code owner is designated in a file called CODEOWNERS that can be placed in the root directory of the repository or several other places. File ownership can be designated by name or by pattern matching. In the example above, user baskaufs (who is not the repository owner), has been designated as the owner of all files in the repository (using the * wildcard). See this page for more details on setting up a CODEOWNERS file.
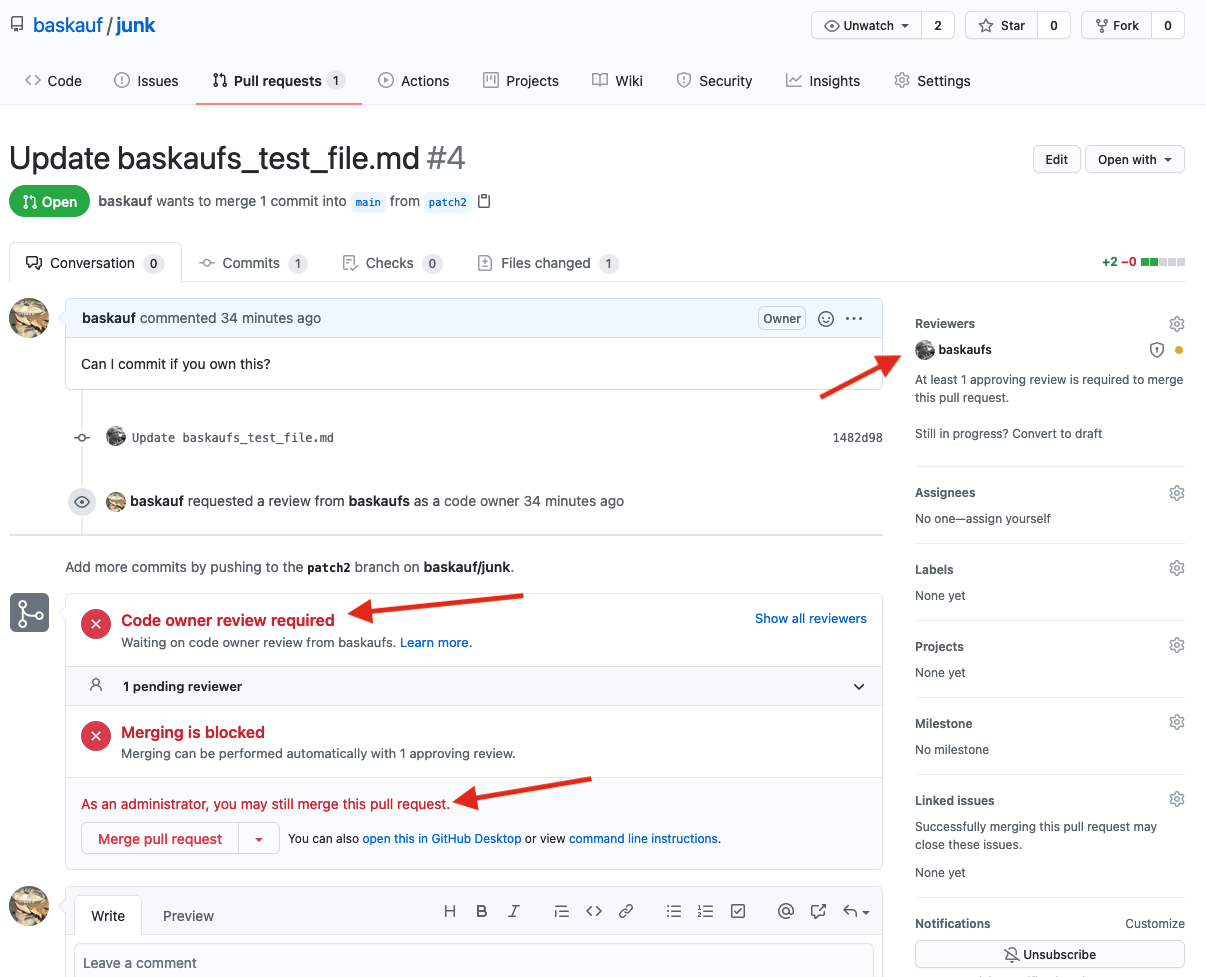
When code owner reviews are required, pull requests are flagged as requiring code owner review. The code owner is automatically selected as the reviewer. However, administrators can bypass the code owner review requirement (other users cannot).
Revised 2021-01-26

Questions? Contact us
License: CC BY 4.0.
Credit: "Vanderbilt Libraries Digital Lab - www.library.vanderbilt.edu"