previous page: branching and the shared repository model
Note: as of 2021-01-26, teams can now have private repositories. However, there are still other restrictions on teams in unpaid accounts, such as inability to protect branches.
Managing Projects with GitHub
In addition to the tools that allow GitHub to carry out its core functions (commits, branching, pull requests, forking), GitHub has a number of other tools that make it possible for organizations to plan and track the work that they are doing on document-based projects. On this page we’ll introduce several important ones.
Collaboration infrastructure: organizations and teams
Once you embark on collaborative work, you will probably need to set up infrastructure that is not dependent on your personal GitHub account. One key is to set up an organization. Creating an organization allows repositories to be jointly owned by several people, so if an organizer leaves the organization, that person can be disentangled from the repositories without having to remove material from their personal repository.
Anyone can create an organization for free. As of February 2021, free accounts can have unlimited public and private repositories, and unlimited colaborators. There doesn’t seem to be a hard limit of size, but less than 5 GB per repository is recommended.
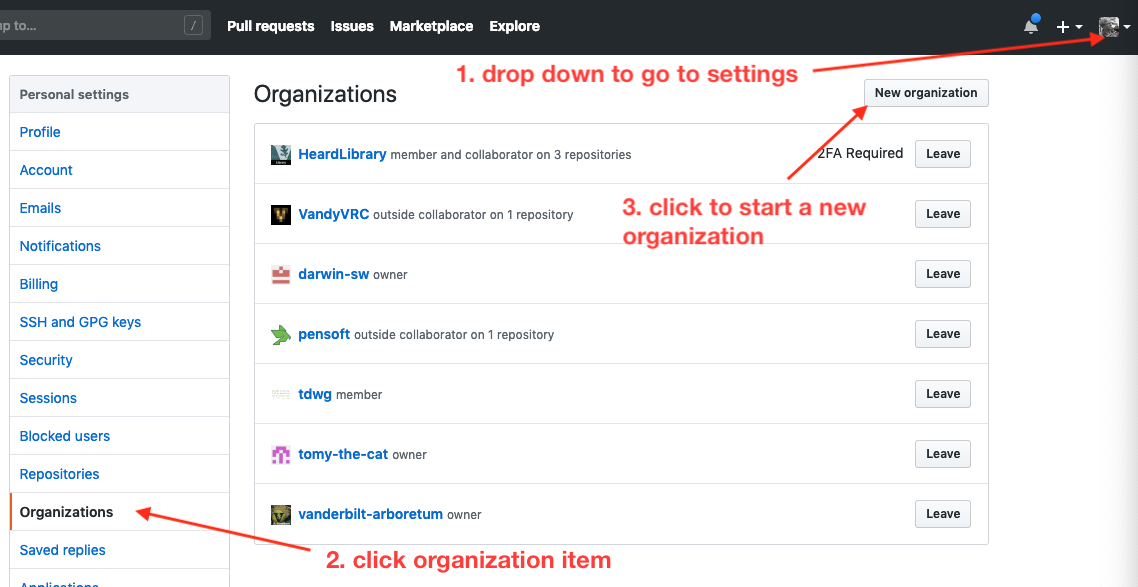
Once you’ve set up the organization, you can add members, change their status (owner, member, outside collaborator), grant administrative privileges to repos, and establish teams. The ownership of the repository can be granted to other members in the event that the person who created the organization leaves it.
An advantage of teams is that they can be notified (@mention’ed) as a team rather than individuals, and team members can have conversations that aren’t limited to an issue, pull request, project, or repository. Teams also are a way to control levels of access to particular repositories. Members of the organization can request to join teams, and their requests can be approved by a team owner or maintainer. So teams may be a good option for large projects.
Tools for tracking progress
There are three tools that allow you to track your progress on a project at three levels of granularity. The finest-scale tool is the integrated issues tracker that we can use for keeping track of work on tasks and general communication. At the medium-scale there are milestones, and for the large scale there is the projects tool.
Using the issues tracker
The issues tracker is a way to keep up with very particular problems associated with a project. They may be associated with a particular document or may be a general, overarching problem.
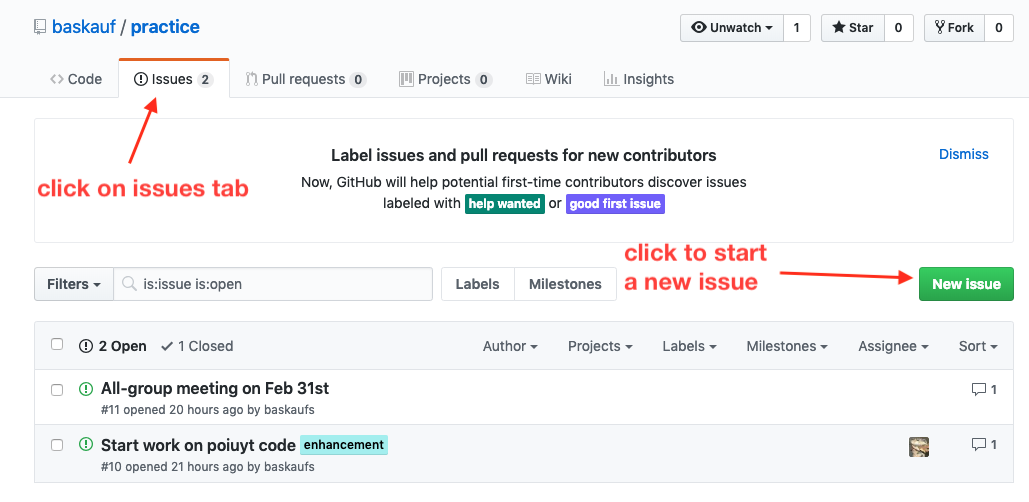
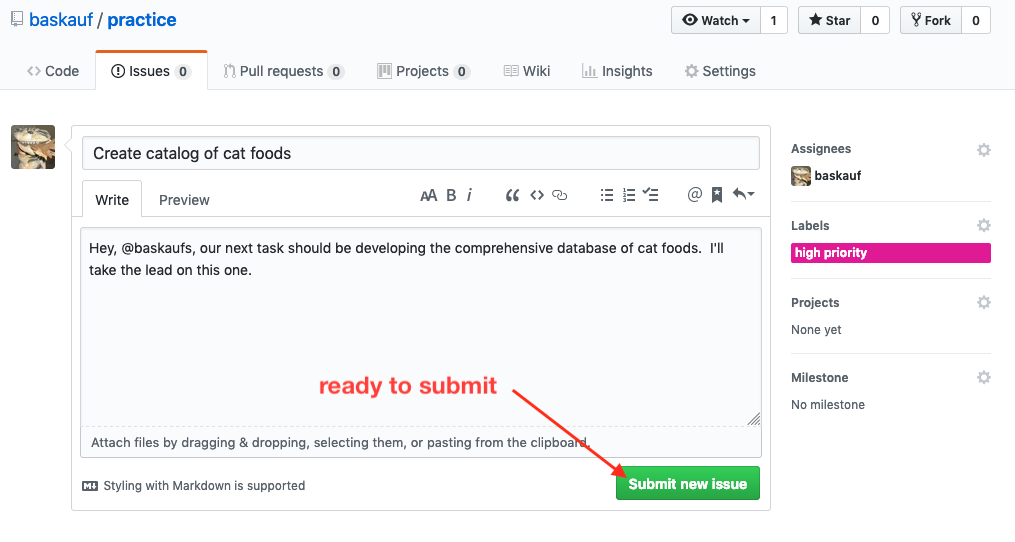
To create a new issue within a particular repo, click the issues tab. You’ll see the list of existing open issues (if any). To create a new issue, click on the New issue button.
Enter a title for the issue and write text explaining the issue in the box. You can use the @mention system to make sure that relevant people are informed about the issue. In a comment on an issue or pull request, if you type the @ symbol followed immediately by a user or team’s GitHub username, a notification will be generated addressed to that user. If the user has enabled email notifications, he or she will get an email containing the text of the comment and a link that will jump the user directly to the comment or pull request page.
If you want to assign the issue to some particular collaborator, clicking on the Assignees item will give a dropdown list of possibilities.
It’s also a good thing to assign a label to the project. Labels are like tags in other systems. Assigning a label categorizes the issues so they can be searched. It’s also a very visual way to know the status and category of an issue and shows up in the issues list.

When you click on the Label item and a dropdown of possible labels appears. You can select one of the labels or click on the Edit icon to create a new label.
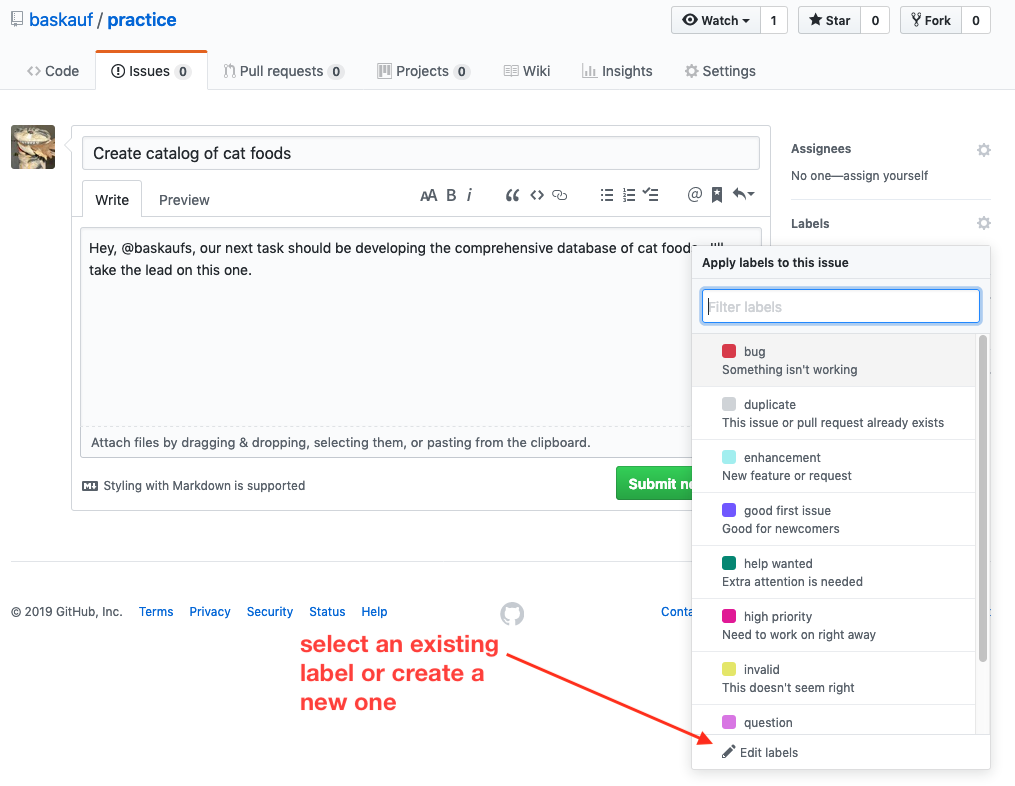
We don’t see the label we need, so click on the New label button. You can select the name, description, and color you want, then click on the Create label button.
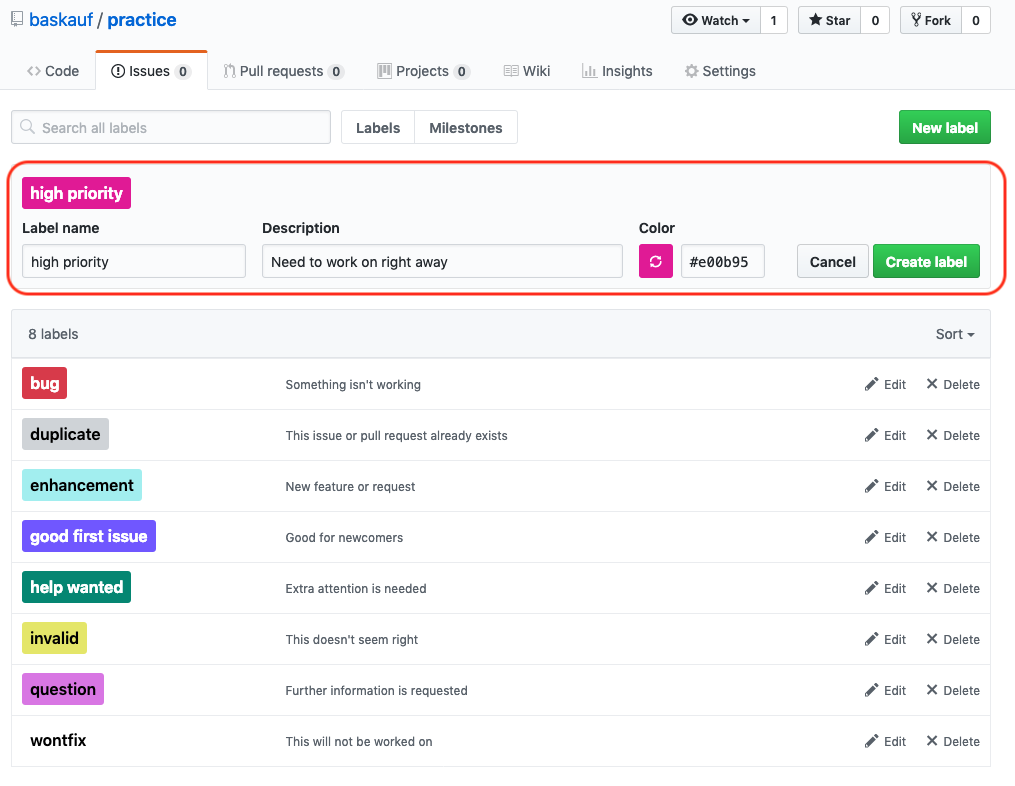
Once the label is created, you can select it and any other labels you want to apply. Back at the issue editing screen, you can click the button to submit the new issue.
Anyone on the team can reply to the issue and GitHub tracks all of the actions taken related to the issue. You can also cross-reference other issues by typing the issue number after a hash (#) character.
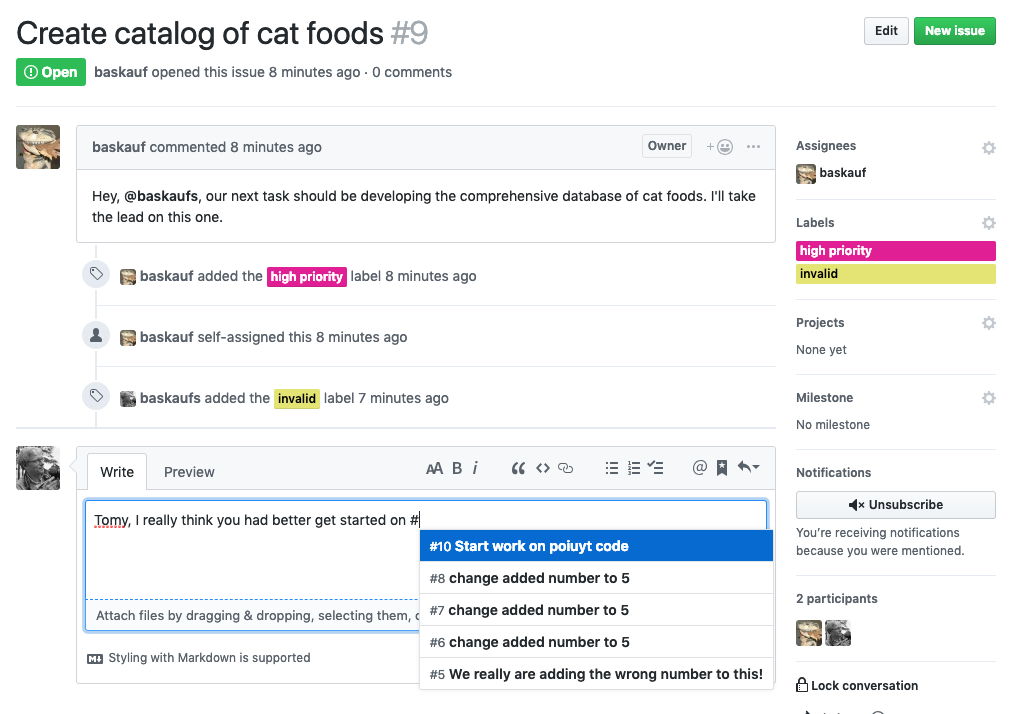
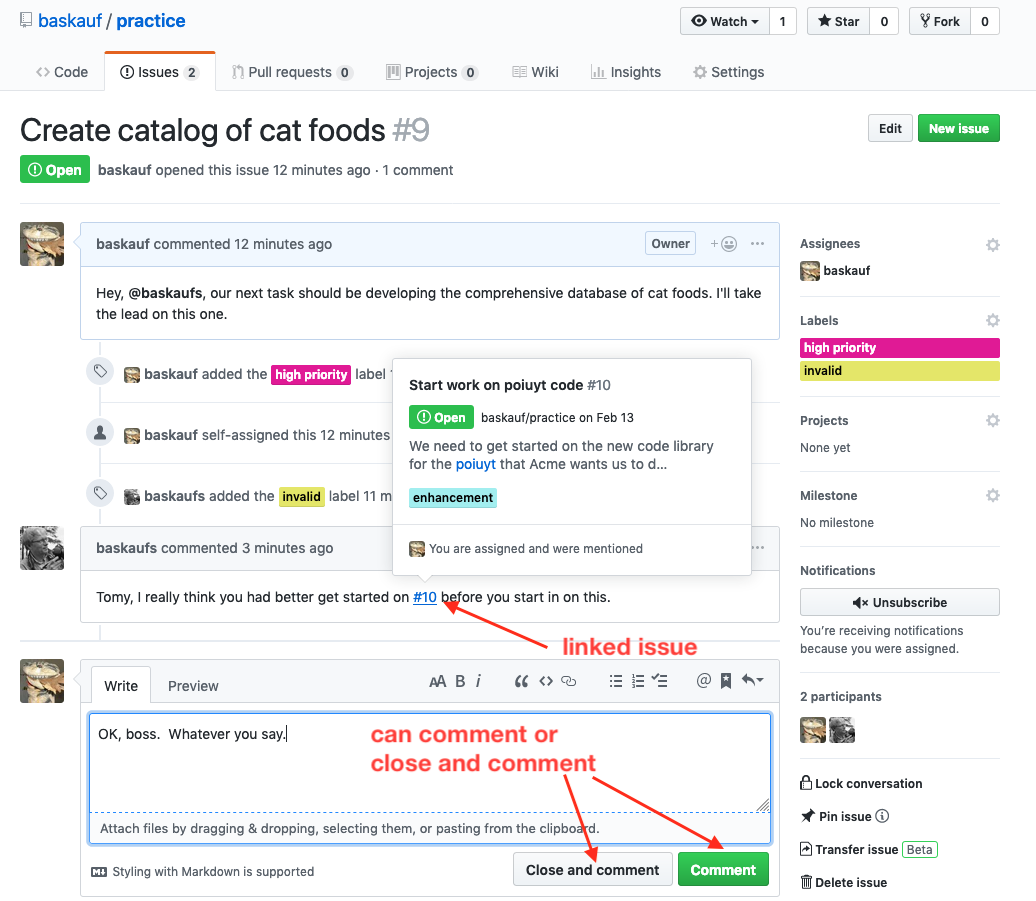
In the rendered comment, you can mouse over the linked issue to see the details.
When the issue is resolved, you can close it with a comment.
The reference to the issue also shows up in the record of the referenced issue.
In writing comments, you can use any of the normal Markdown formatting features as well as to add hyperlinks to anywhere within or outside of Github.
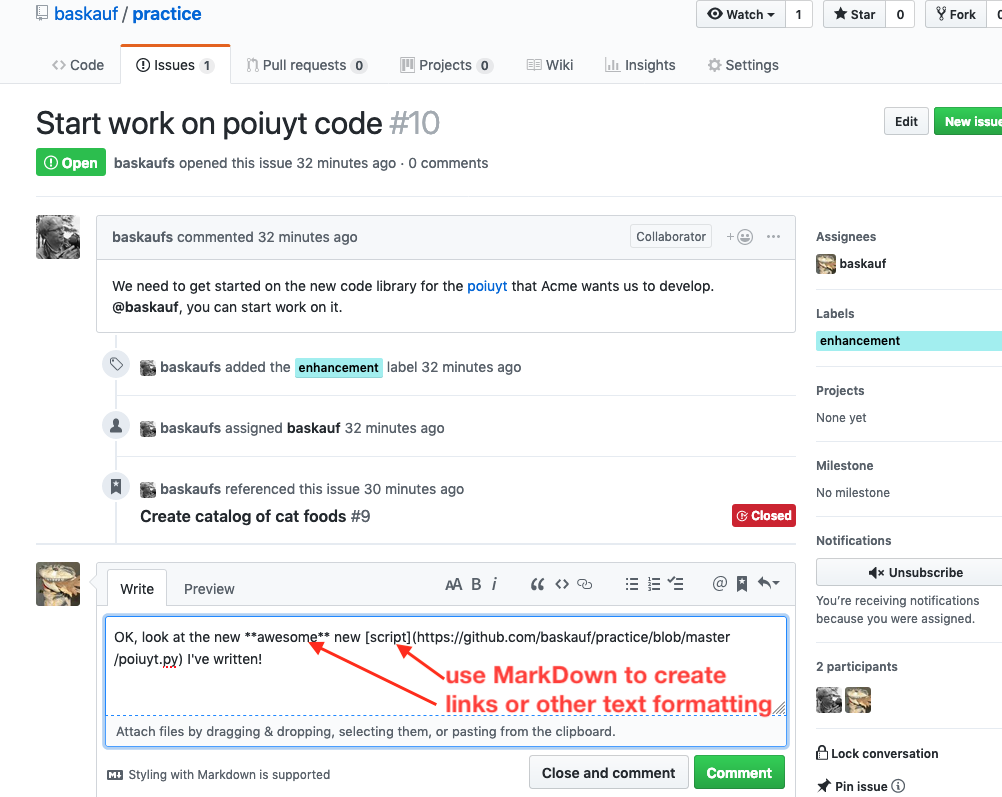
You can use the preview tab to see how it will look. Here’s how the final rendered version looks.

Using the issues tracker as a mailing list
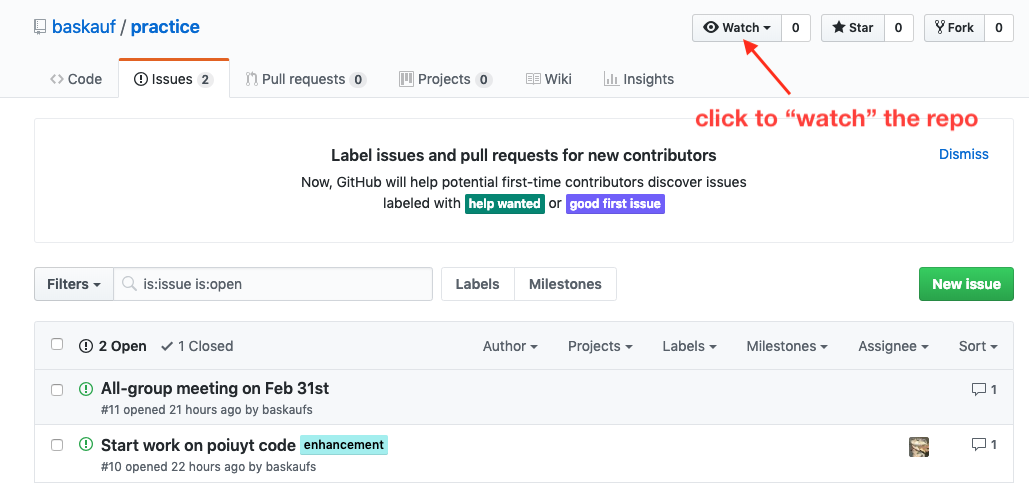
You can “watch” a repo by clicking on the Watch button at the upper right of the screen. Watching a repo notifies you of all conversations related to the repo, so depending on your settings, you can get an email whenever someone creates an issue or comments.
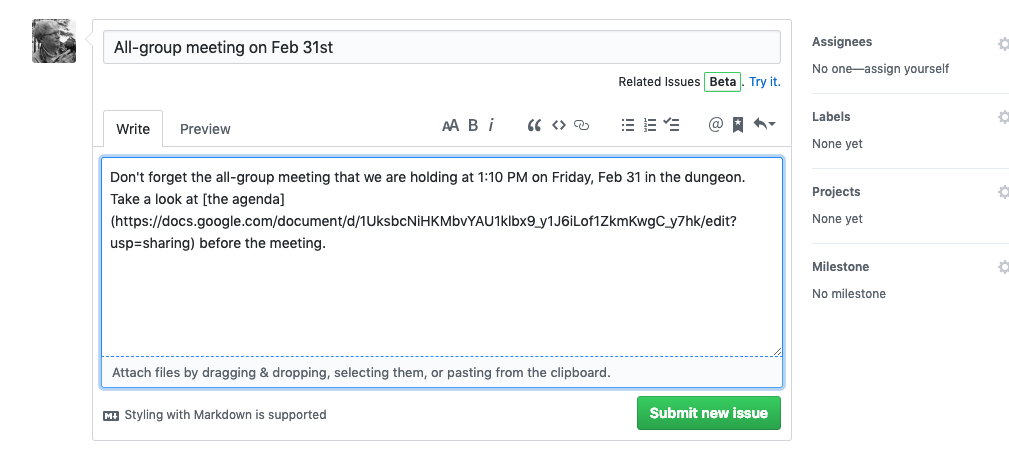
This provides a convenient way to manage an organizational email “listserv”. An “issue” can actually be something like a meeting announcement, with links to agendas, Google Hangout links, etc.
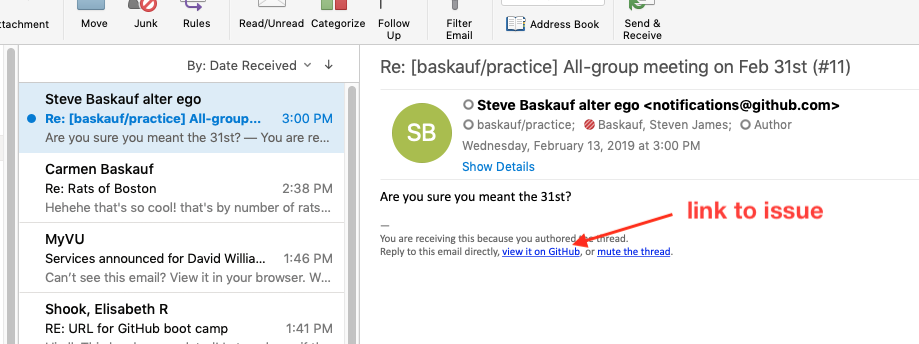
Because responses to the issue are tracked on the same page, this effectively keeps the “thread” organized sequentially. If any collaborator loses the email, they can always find the message by looking at the issue.
Here’s what the email looks like that was generated by a response to the original meeting announcement issue. The response is in the body of the email text. There is also a link that will take the reader directly to the issue page on GitHub for additional responses. Responding to the email automatically adds the response as a comment to the issue thread.
When the issue is closed (in this case after the meeting has occurred), the issue disappears from the open issues list, although it remains in the closed issues list as a permanent record of the conversation.
Using the issue tracker in this way makes it possible for project participants who are less involved in the activities to see at a glance what’s currently going on with the project, simply by looking at the open issues on the tracker.
It is also extremely easy for anyone who is annoyed with the amount of message traffic to simply unwatch the repository temporarily or permanently.
A model of issues and milestones
When GitHub is used to manage a project, there is a conceptual connnection between milestones (such as a new release of a codebase or document) and merges (preceded by pull requests) that move changes from a development branch to the master. Similarly, there can be a conceptual connection between issues that need to be resolved to reach the milestone and commits that represent concrete steps taken to resolve each issue.
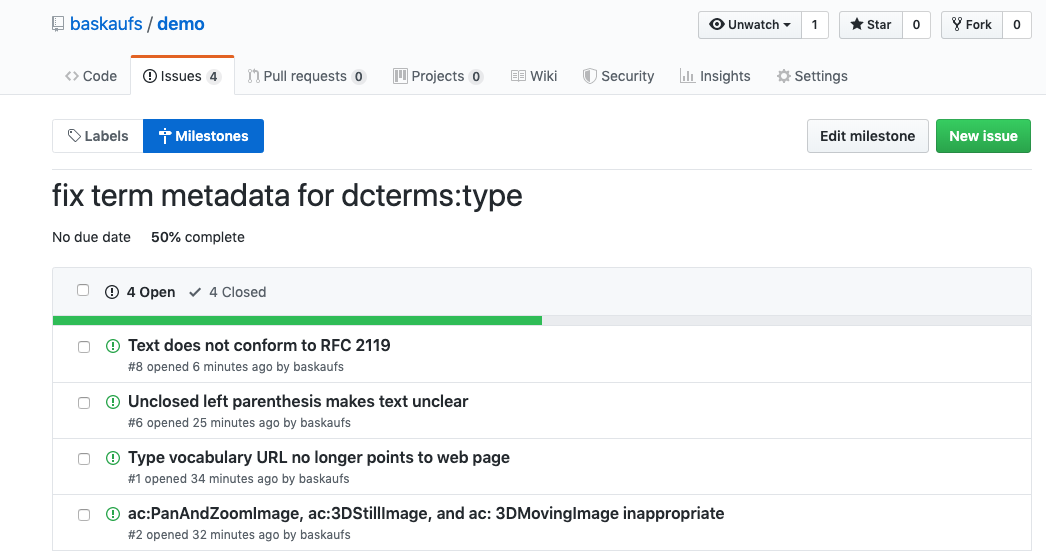
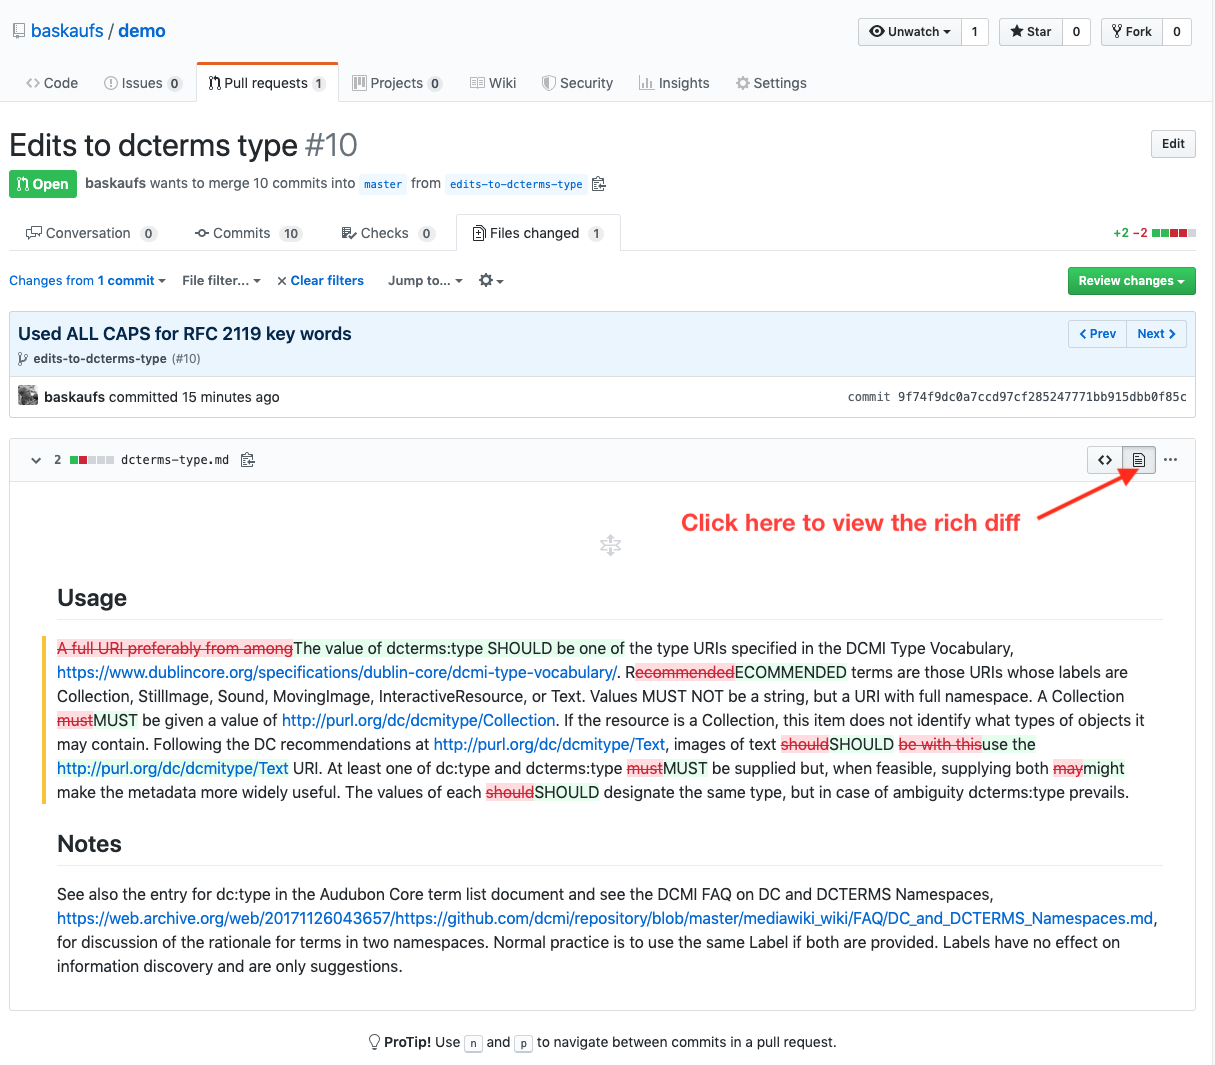
These connections can be illustrated with an editing example. In this example, recommendations for how to use a metadata term were outdated, unclear, and need revision (see original text). A review of the text identified a number of problems and an issue were created for each problem. The issues were grouped under a milestone that represented completing the necessary revisions.

(See this page to see the actual milestone for this example and its issues.) Each time an issue was resolved, a corresponding commit was made for the edits necessary to fix the problem.
| Planning | Action |
|---|---|
| Issue: Dublin Core wiki doesn’t exist any more, so URL is broken | Commit: Changed bad DCMI wiki URL to Internet Archive URL |
| Issue: Recommendation for text as image is in both Usage and Notes | Commit: Removed redundant text recommendation from notes |
| Issue: Unclosed left parenthesis makes text unclear | Commit: Removed orphaned text with left parenthesis |
| Milestone: Fix term metadata for dcterms:type | Pull request: Edits to dcterms:type |
As the issues were closed, they disappeared from the list of open issues in the milestone and the “fraction completed” bar for the milestone moved closer to the right side of the screen. When additional problems were discovered, they were added to the partially completed milestone.
After all of the issues were closed, a pull request was created for the branch in which the edits were being made.

During discussion of the pull request, the clear commit messages for each commit in the working branch makes it easy to review all of the changes that were included in the revision. Clicking on any commit takes the reviewer to a summary of the changes made in that commit and the rich diff viewer makes it very easy for a reviwer to see what the changes were.
Having a clear description of the sequence of changes made on the branch allows a team member who was not involved in making the revisions to assess whether the changes should be merged or if further work needs to be done. (View the final revised text.)
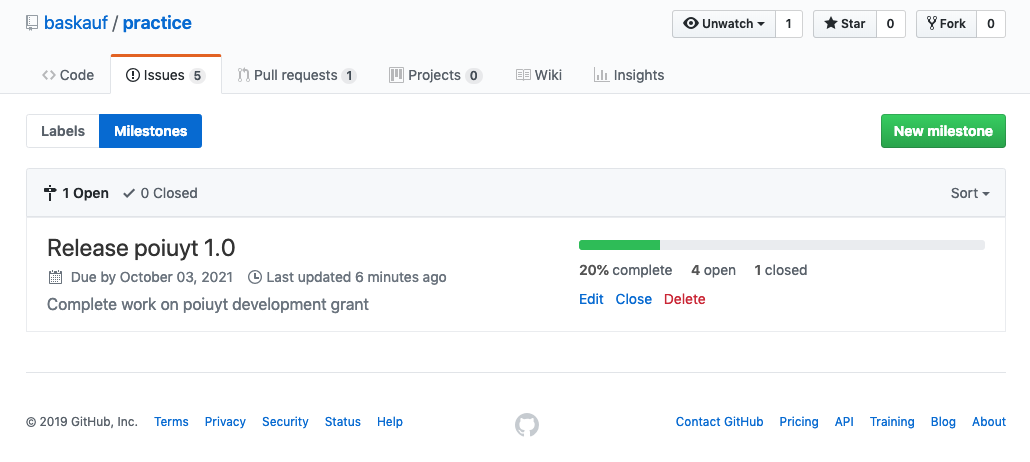
Working with milestones
To see milestones or create a new one, click the Milestones tab on either the issues or pull requests page. If you have any existing milestones, you’ll see them listed with an indication of the progress towards completing them. Progress is measured by the fraction of issues or pull requests that have been closed.
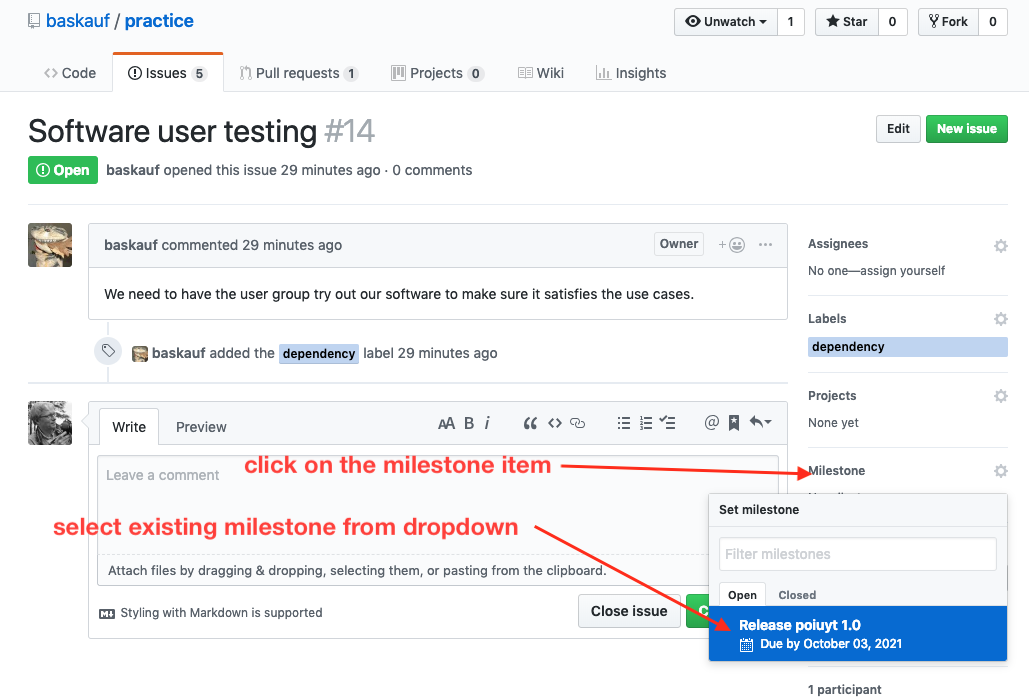
If you have created a new milestone, or want to add to an existing one, open the issue or pull request that you want to add (or add the issue to a milestone as you create it). Click on the milestone item. That will open a dropdown with lists of possible milestones. Select the one to which you want to add the issue.
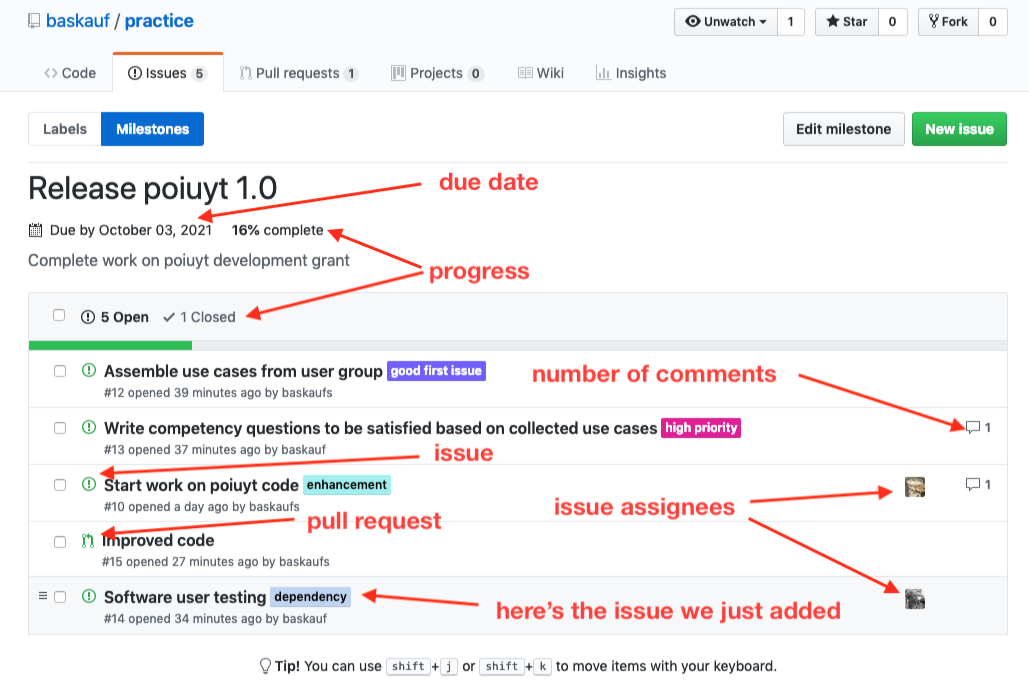
On the milestone summary page (reached from the Milestone tab on the issues or pull request page), there are all kinds of information about the issues in the milestone. If you click and drag the left side of a selected issue, you can order the issues. As issues are resolved, they disappear from the open list and the progress goes towards 100%. Closed issues can still be viewed from the Closed tab. Clicking on an issue or pull request in the list will take you to its page. If a new issue is created from the milestone page, it will automatically be associated with that milestone.
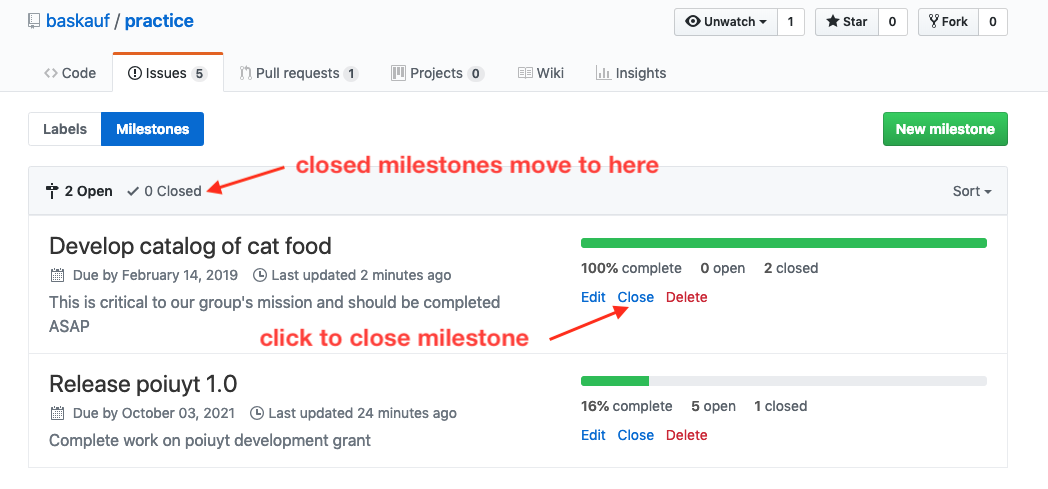
When all issues in a milestone have been completed, the milestone itself can be closed. It does not disappear, it simply moves to the list of closed milestones.
Projects
An even more powerful tool is available for managing entire projects. It can be used in place of milestones, or together with milestones to manage individual parts of the project. When creating a new project, you can select a template for the project. I recommend “Automated kanban”. It is pre-configured with “to do”, “in progress”, and “done” columns and uses triggers to automatically move issues and pull requests through the system.
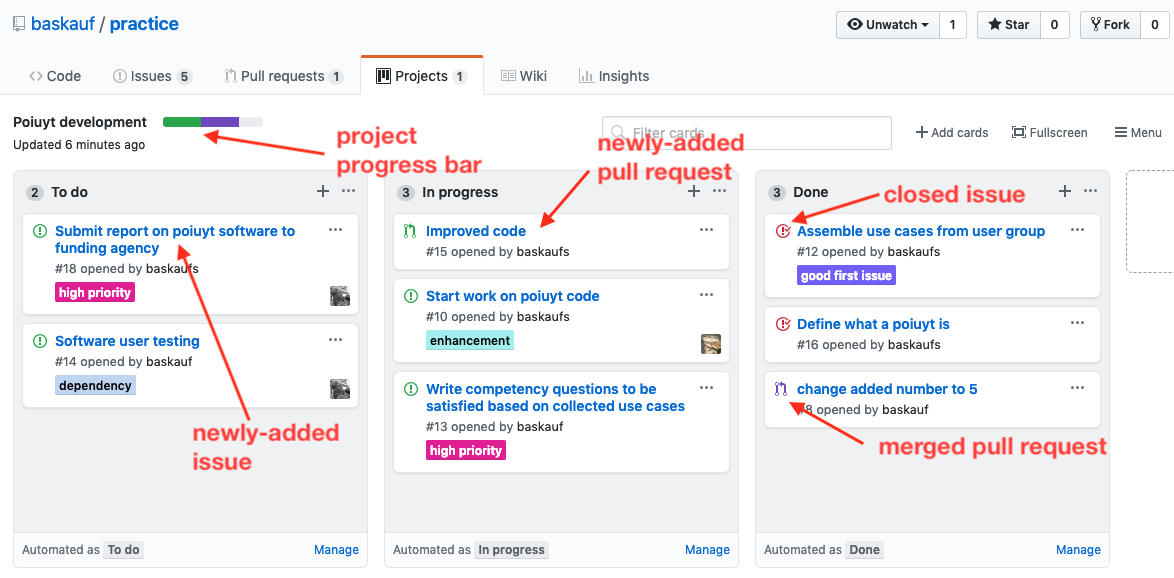
The main component of a GitHub project is a “card”. Cards can be added manually using “Add cards” on the board. However, they are more often generated automatically by assigning an issue or pull request to the project.
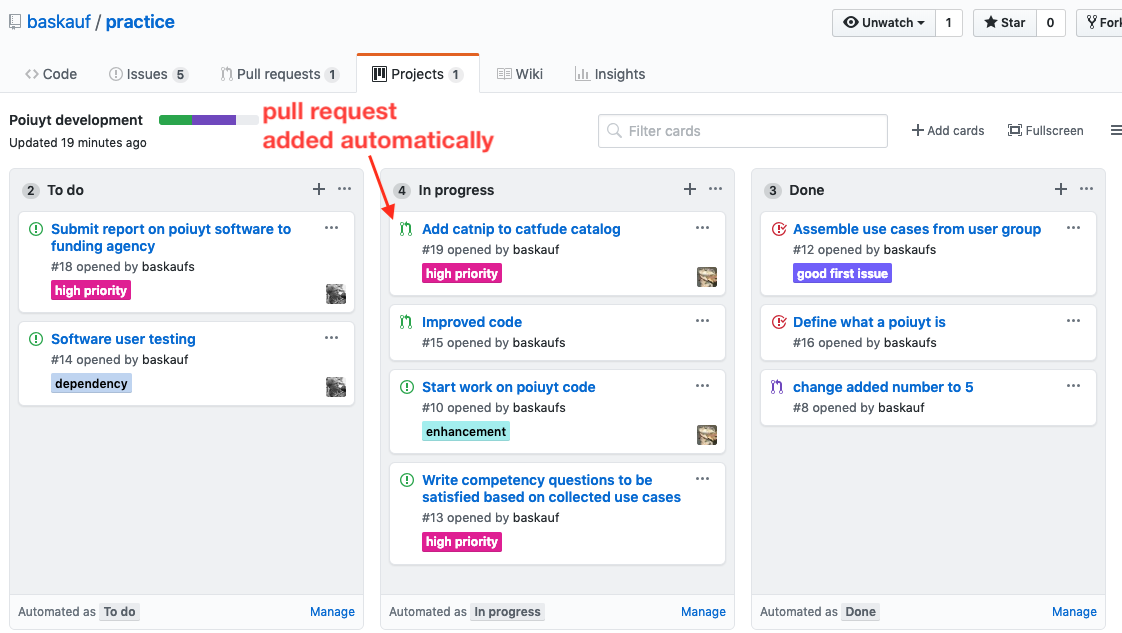
When the pull request or issue is created, it automatically gets added to the correct column in the project board (to do for issues and in progress for pull requests).
When a pull request is merged or an issue is closed, its card automatically moves to the “done” column.
Cards can also be manually moved from one column to another and additional columns can be added.
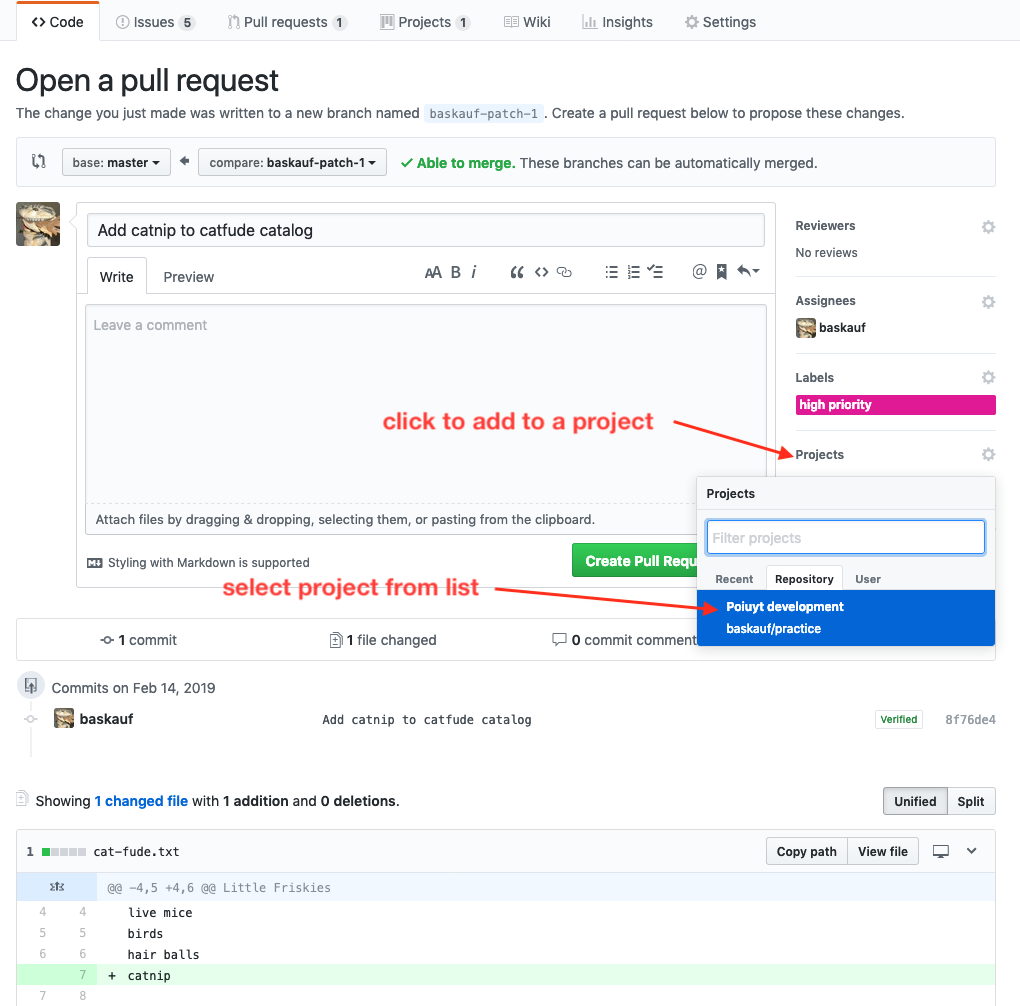
An additional feature is reviews. One can request a review of a pull request. A reviewer can make comments, approve a merge, or request changes. A repository can also be set up with rules about the conditions under which a branch can be merged, including a requirement for approval of a reviewer before the pull request can be merged. This can provide extra protection for master branches that serve a critical purposes, such as providing the source code for an application or web pages for a website. See this page for an example of a review request.
next page: forking and the Open Source model
Revised 2021-02-05

Questions? Contact us
License: CC BY 4.0.
Credit: "Vanderbilt Libraries Digital Lab - www.library.vanderbilt.edu"