previous page: Introduction to GitHub
The GitHub desktop client
Although every Git operation can be carried out using the command line, many users prefer to use GitHub Desktop, a graphical interface for interacting with GitHub. GitHub desktop is available for every major operating system at https://desktop.github.com/.
Cloning
The cloning process involves creating a complete copy of a repository on your local computer. That includes all of the branches in the repository and all of the commit histories of every branch.
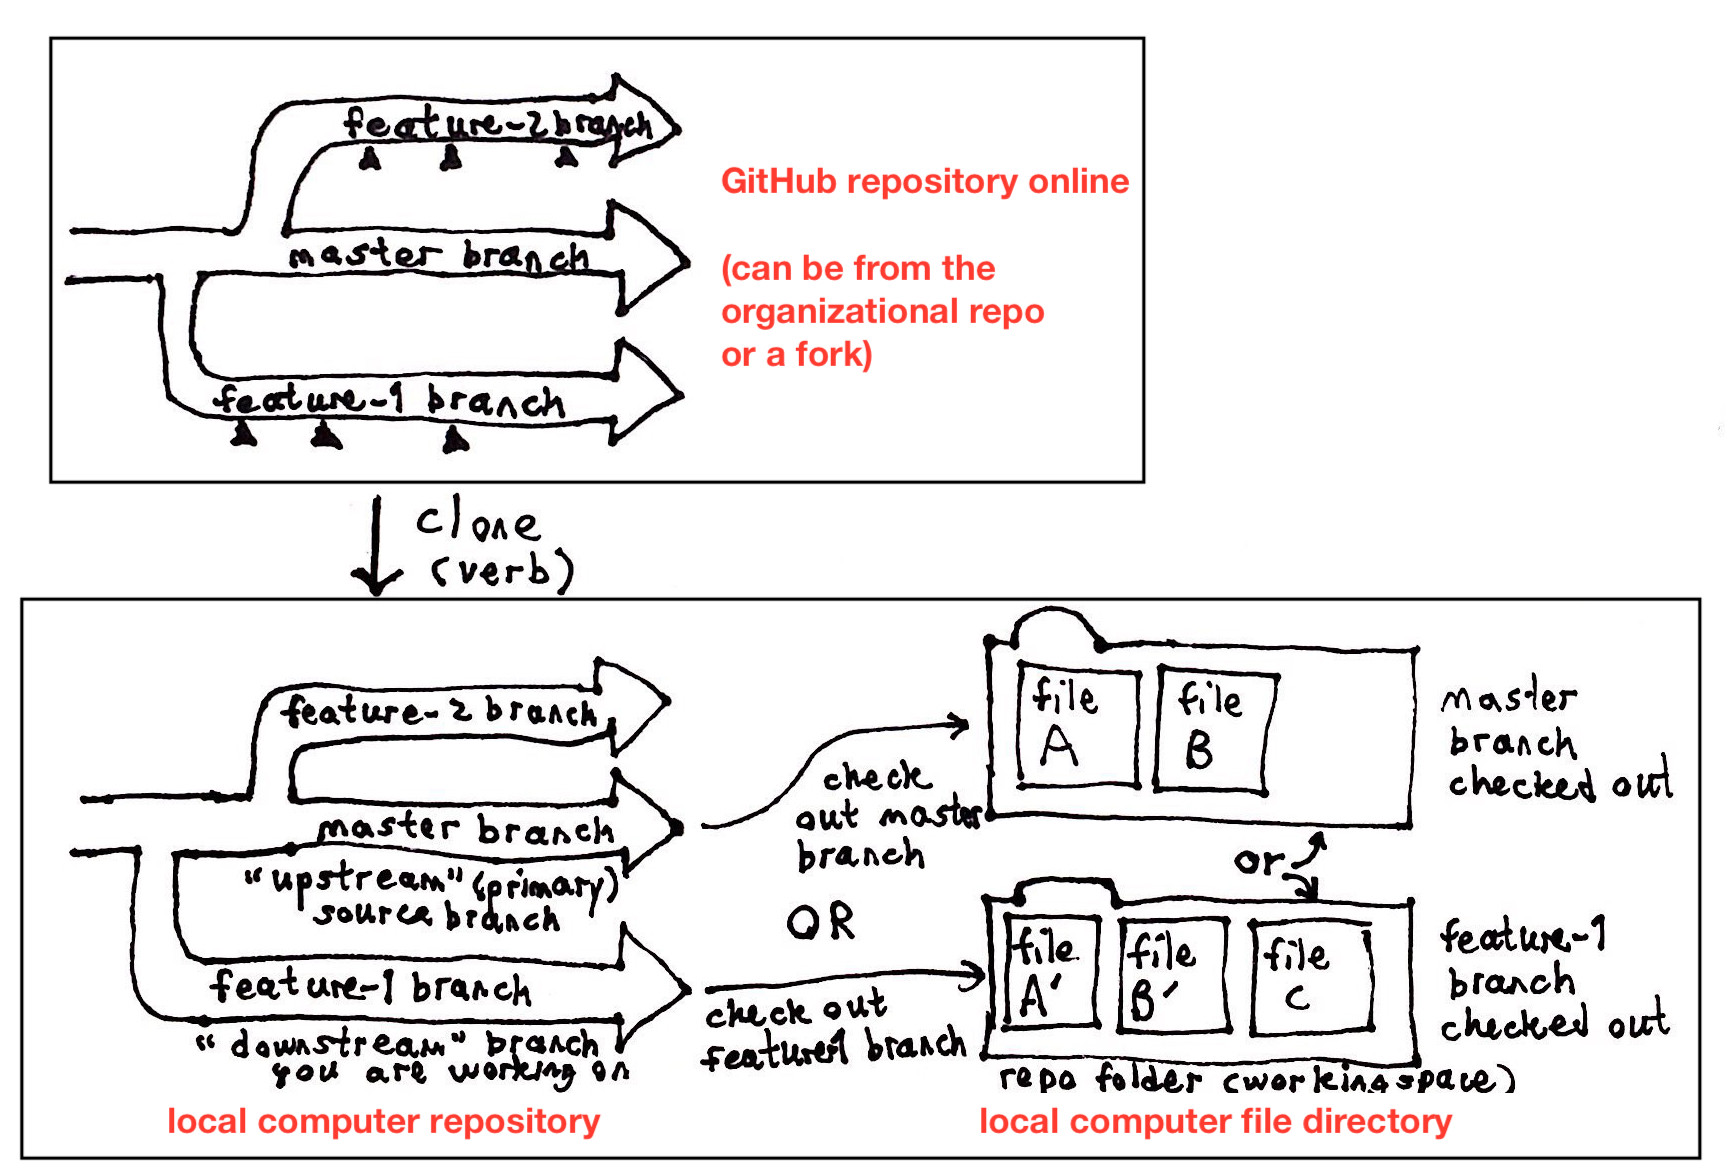
Since your local copy of the repository contains every branch in the repository, how do you determine which branch you will actually be working with on your hard drive? In Git, the process of switching branches is called “checking out” a branch. When you check out one branch, you obtain a copy of it and you stop using another copy. You can only have one copy checked out at a time.
Cloning a GitHub Repository to Your Local Computer
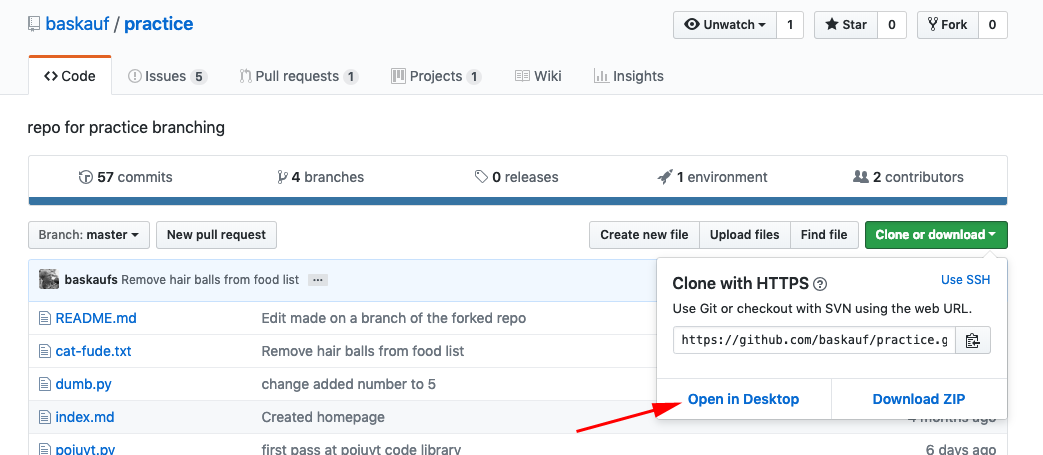
You can initiate cloning of a repository from the website by clicking on the Clone or download button in the upper right of the repo page on the GitHub website. If you choose Open in Desktop, the repository will open in the GitHub Desktop software after it downloads.
You can also initiate the cloning process from your local computer from within the GitHub Desktop application. The process described here will work for cloning one of your own repositories, a repository that you’ve forked to your account from elsewhere, or another repository that you don’t own, but to which you have been given write access.
Drop down the Current Repository menu in the upper left of the window. Click on the Add dropdown and select “Clone Repository…”.

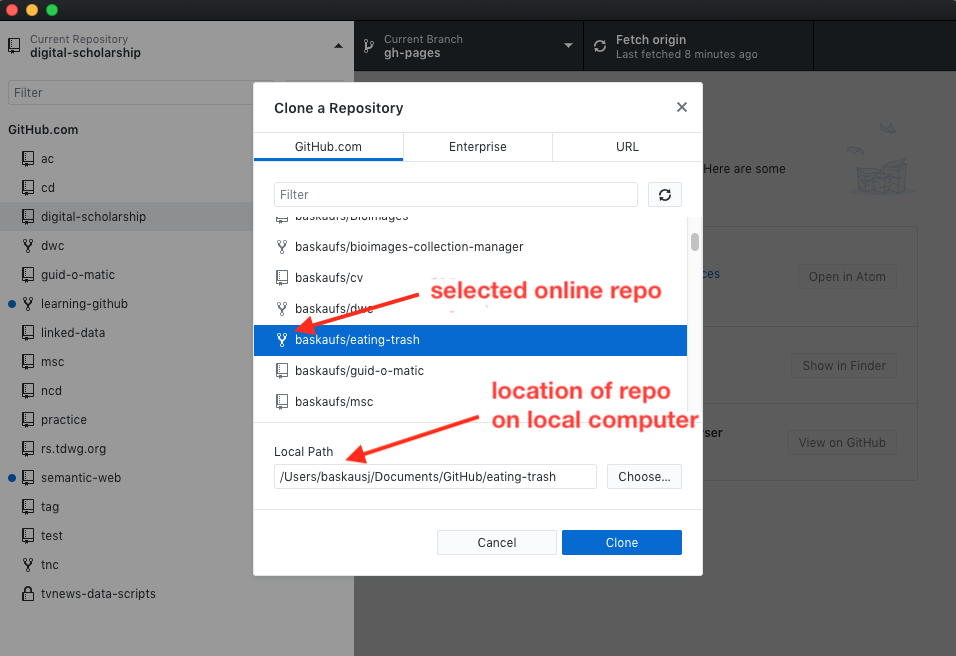
You’ll be presented with a list of repositories at Github.com to which you have access. Repos that you own or to which you have write access will show up with little book icons. Repos that are forks you’ve made of some other user’s repo will have a little “fork” symbol. Click on the name of the repo you want to clone and you’ll have an opportunity to select the directory where you want the local copy of the repo to live on your computer. Once you’ve selected a location, the desktop client will default to that location the next time you clone.
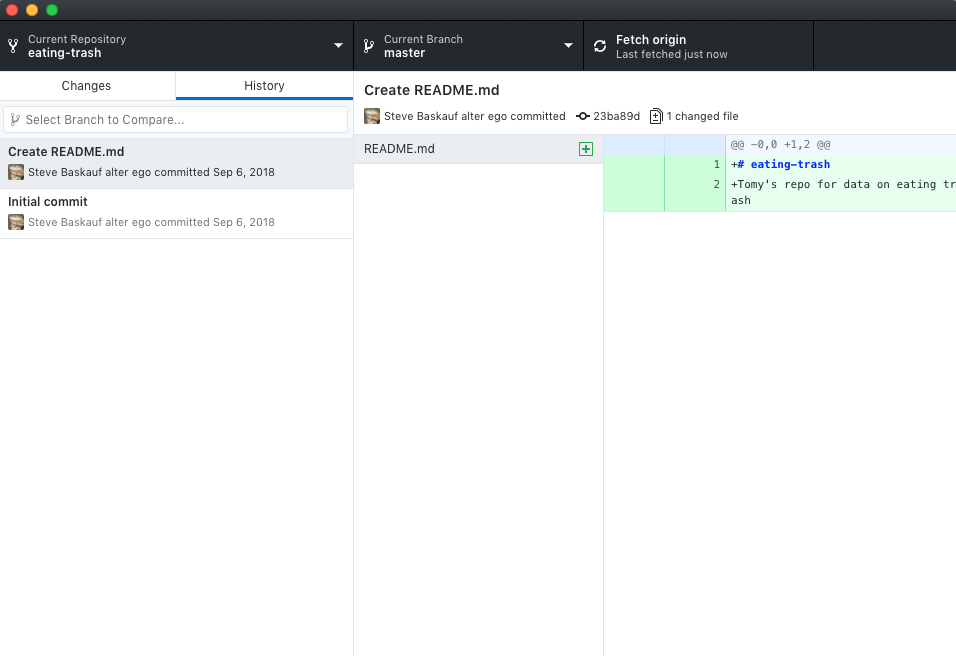
After you’ve finished the cloning process, in the left column of the client, you’ll see either changed files or the commit history, depending on which tab you’ve selected. The second column (“Current Branch”) will normally be set at “master” unless you have created another branch. More on this in the next lesson…
Command line comparison Remember that you can skip this section if you don’t care about the command line.
The comparable procedure on the command line requires acquiring the URL to the GitHub repository.
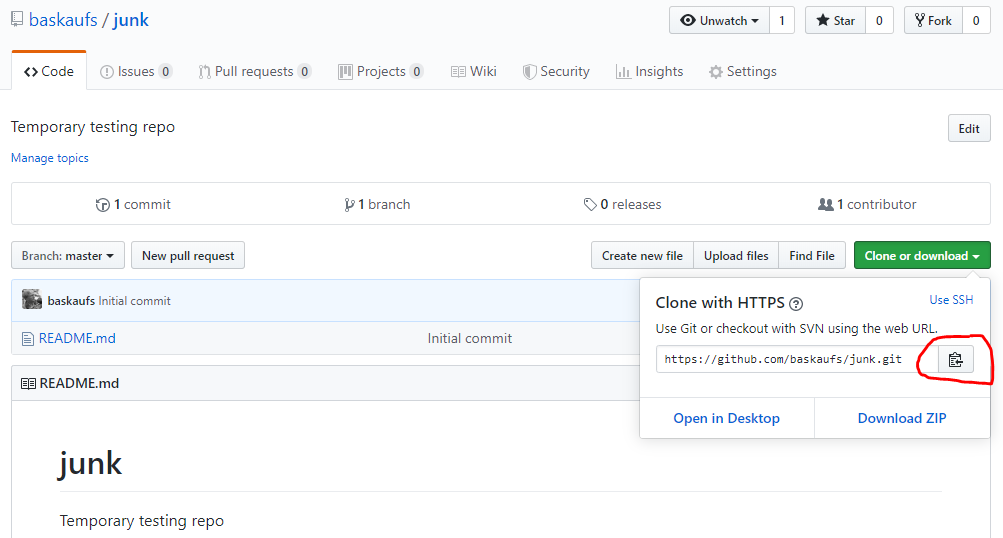
After clicking the Clone or download button, copy the https:// URL by clicking on the clipboard icon. In the console, navigate to the directory that you want to be the parent directory of the directory for the local repository. Type git clone followed by the URL you copied, then press Enter. In the example above:
git clone https://github.com/baskaufs/junk.git
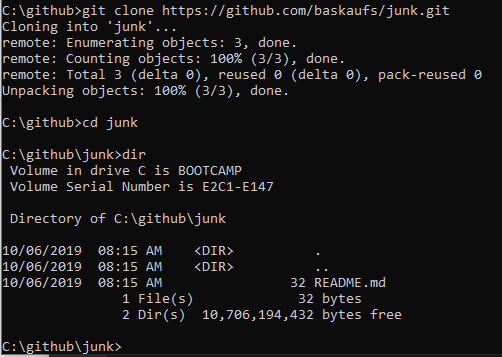
As a result, the subdirectory will be created along with the hidden .git directory and any files and directories that were in the cloned repository (in this example, only the README.md document). Here’s how it looks on a Windows system:
During the cloning process, the local repository is associated with the particulary GitHub repository that was cloned, which is referred to as origin.
To see the commit history of the newly cloned repository, from within the repository’s local directory, enter
git log
Simple models for using GitHub
The simplest way to use GitHub is simply as a way to archive the history of your own work on files in a project.
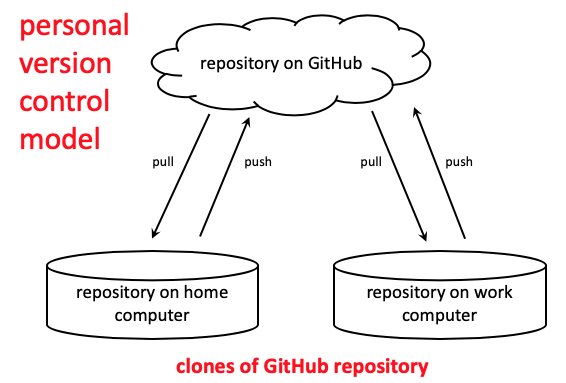
In this model, you just simply work as usual on your local computer using your preferred text or code editor. Create commits after each stage in the work, then push the changes to GitHub.
If you are only working on one computer, the changes will generally only flow in one direction. However, if you are working on more than one computer, or if you are working with a collaborator, it’s important to pull changes from GitHub each time you start working in order to avoid missing changes that were made on another computer or by a collaborator.
Work cycle
When you are editing files using GitHub desktop, it is important to have a disciplined work cycle to make sure that your work gets saved to the hub without merge conflicts.
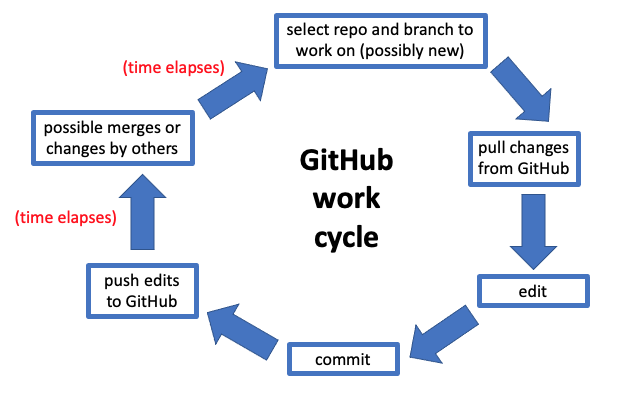
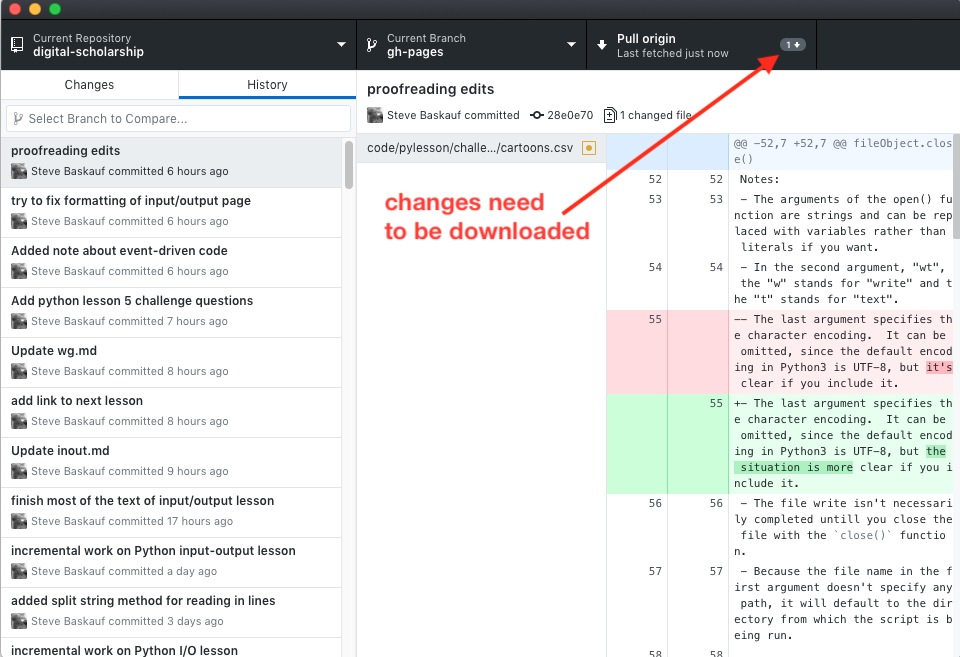
After you’ve decided what branch you need to work on, it’s very important to make sure at the start that you are working on the most recent version of it by pulling any changes from Github. Click on the Fetch origin button at the upper right of the window. If there are changes that need to be downloaded, you’ll see a small number by a downward pointing arrow. Click the button (now labeled “Pull origin”) again to download those changes.
If you forget to update your local copy of the branch, you risk creating a conflict, since you may be working on a copy that isn’t the most recent one.
Although you can use GitHub for version control on any type of file, the features of GitHub were designed with maintenance of text files in mind. If you are editing a simple text file, there is no particularly compelling reason why you can’t just do the editing in the browser using the built-in GitHub editor. However, if you are editing a file that contains markup, such as Markdown or XML, or if you are editing code, it is probably easier to do the editing on your desktop using dedicated editing software. Examples are Oxygen for XML and Visual Studio Code (not actually part of Microsoft Visual Studio) for editing many kinds of code. For working with GitHub, there are some advantages to using the Atom editor https://atom.io/. Atom was developed by the GitHub team and has some useful features for working directly with GitHub. There are a lot of plugins available for Atom that do syntax highlighting for different coding languages, and Atom also has a useful Markdown preview feature (available from the Packages menu).
GitHub works reasonably well for some other types of files like CSV spreadsheets and Jupyter notebooks. When editing these files, you’ll want to use an editor designed specifically for them, such as Open Office or Libre Office for CSV, or Anaconda/Jupyter for Jupyter notebooks. When you look at the raw text of these files, they will be a bit difficult to comprehend, but when they are pushed to GitHub, it is pretty good at displaying them so that they look the way they did in your software (i.e. as a table or notebook).
GitHub does NOT work well for managing documents written with proprietary software like Microsoft Word or Excel, at least when files created in those applications are saved in their native file formats (.docx and .xlsx). You can commit and upload the files, but GitHub can’t display them and they will be impossible to comprehend in the desktop client preview or on GitHub itself.
Command line comparison Remember that you can skip this section if you don’t care about the command line.
Updating a local repository from GitHub can be done in two steps.
git fetch
updates information about the remote (GitHub) on your local computer. That includes the histories of all branches in the repositories and any objects necessary to reconstruct them at any point in the past. It essentially downloads data about the state of the repo on GitHub, but does NOT actually affect any of the files in the current local working branch.
After doing the fetch, to see what differences there are between the state of the master branch on GitHub and the local repository, enter
git diff master origin/master
Recall that origin represents the remote repository on GitHub. So we are comparing the difference between the master branch in the local repository (master) with the master branch in the corresponding repository on GitHub (origin/master).
If you are OK with the changes that have been made on GitHub, you can merge them into your local repository by entering
git pull
If you are confident that you just need to update your local repository and don’t need to compare it with what’s on GitHub (for example if you were working in a different location and just want to update your copy at your current location), you can just pull without fetching first.
Editing and committing
To make an edit, navigate to the directory where you checked out the repo. Open a file, make some edits, then save the file.
If you click on the Changes tab at the upper left of the GitHub Desktop window, you should see the files that changed since the last update and clicking on a filename will show the kind of changes at the right of the screen (additions in red, deletions in green).
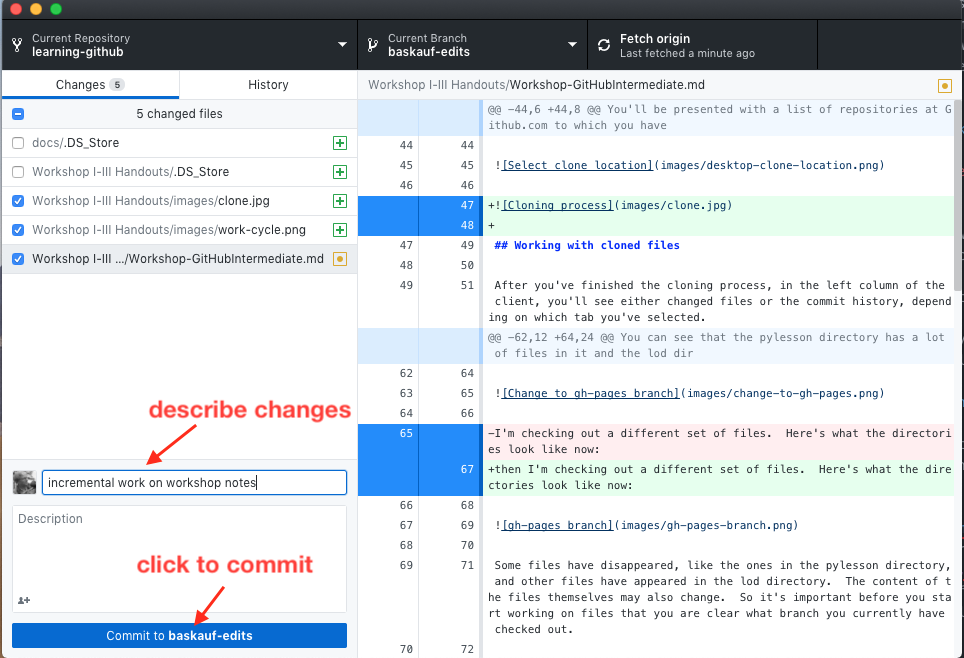
The blue checkboxes in the Changes list indicate which files you want Git to track. If they are checked, their changes will be incorporated in the next commit. If they are unchanged, their changes will be ignored until a future time when you check them.

Referring to our initial diagram of the GitHub world, checking a checkbox adds the file to the staging area.
Commit your changes. You’ll then see the new commit in the history and as a change that’s ready to push up to GitHub.
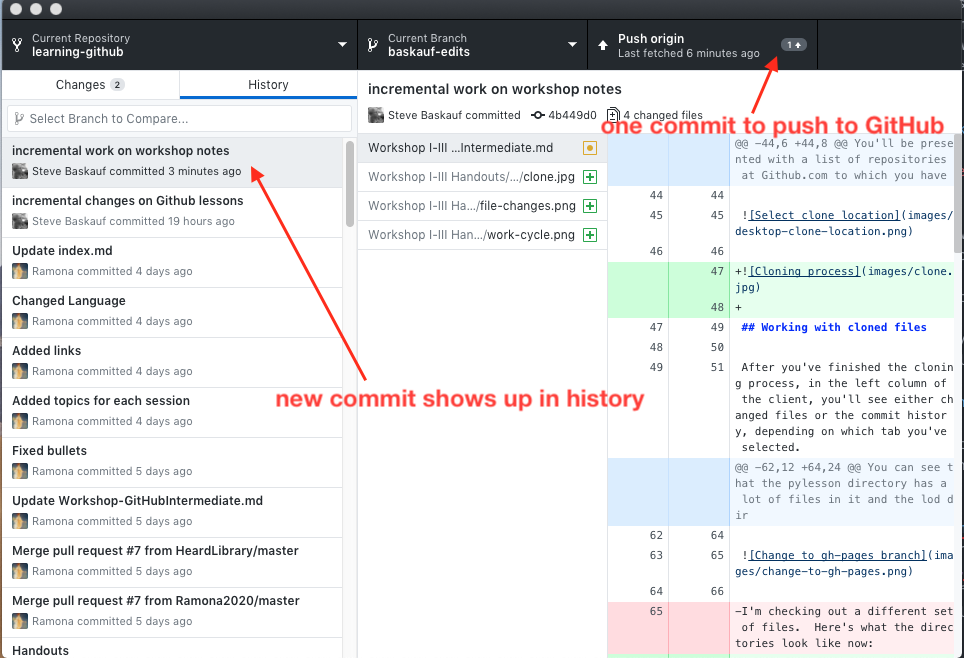
Click on the Push origin button to push your changes from the desktop client to GitHub.
Command line comparison Remember that you can skip this section if you don’t care about the command line.
With command line Git, files don’t automatically get added to the staging area. You add them explicitly using
git add filename
where filename is the name of the file to be staged. To see the changes that are staged to commit, enter
git status
To make commit the changes that are staged, use
git commit -m "The commit message goes here"
The changes are now part of the master branch in the local repository, but are not yet on GitHub. To push the changes from the local repository to the master branch on GitHub (origin), issue the command
git push origin master
What happens next?
If you are the only one doing the work and you only work on a single local computer, then it doesn’t matter that much whether you pull from GitHub at the start of your next work session. However, if someone (including you) made changes elsewhere, it is critical that you pull changes as the very first action you take the next time you begin work. It is difficult at first to remember to do this, but it’s an important habit to develop to prevent merge conflicts.
If you do encounter merge conflicts because you forgot to pull before working, or if a collaborator changed something while you were working, see this page for information about how to resolve the conflict.
next page: inviting collaborators
Revised 2021-09-23

Questions? Contact us
License: CC BY 4.0.
Credit: "Vanderbilt Libraries Digital Lab - www.library.vanderbilt.edu"