Intro lesson on conditional execution
Loading data from and saving data to files
If we load data into a script using an input() function, those data are volatile – once the script executes, those data are gone. Unless we like re-entering information over and over, it’s good to use other mechanisms that make use of information that persists between computing sessions. A great way to save your work and be able to access it again is to use a file. In this lesson, we will focus on saving and loading text files (files whose bytes represent text characters). These are files that you can open, view, edit, and save in a text editor.
Background required To successfully complete this lesson, you should be familiar with the following Python concepts and terms:
- method
- argument
- newline
- modules
- list data structures
- iterable objects
forloops- use of indented code blocks
If you are using Colab notebooks, you should have a Google account and Google Drive.
Learning objectives At the end of this lesson, the learner will be able to:
- describe character encoding.
- explain why text for input to Python should be edited with a text editor rather than a word processor.
- launch a text editor on their computer.
- open a text file for output, write a string to the file using the
.write()method, and close the file. - open a text file for input, read a string from the file using the
.read()method, and close the file. - if necessary, connect their programming environment to a file system and locate the Python working directory.
- locate the home directory of their computer.
- write a string to a file using the
print()function and describe two ways that this differs from the.write()method. - using a
forloop, write a list of strings to a file as lines separated by newlines. - use a
forloop to iterate through an input file object. - use the
.splitlines()method to create a list from a single string read from a file. - place text in a file available via a URL using GitHub Gist.
- use the
requestsmodule to get the text of a file from a URL.
Total video time: 71 m 32 s for all videos (some videos won’t be necessary for your environment or operating system, so your actual time will be closer to 55 minutes)
Links
Lesson Jupyter notebook at GitHub
Unicode
In Python 3, all strings are composed of Unicode characters. Unicode is a mapping between characters we would like to display and numbers that represent them. Unicode allows us to display characters beyond the Latin alphabet and characters commonly found on a US keyboard. In earlier lessons, we saw that we could represent a Unicode character by writing the escape sequence \u (for Unicode), followed by the four character hexidecimal number for that character. For example, to write the character for the Euro symbol €, use \u20ac. We can insert the sequence for the escaped Unicode character in the middle of a string of ASCII characters. For example:
statement = "It costs $25.00, but that's \u20ac21.82 !"
print(statement)
UTF-8 character encoding
Character encoding is the way that Unicode numbers are stored in a text file. The most universally used character encoding for Unicode is called UTF-8. UTF-8 is a clever way to store over a million different characters and symbols using between one and four bytes. It is also backwardly compatible with one of the early character encoding systems, ASCII, which uses only a single byte to represent a character. So all files whose characters are encoded in ASCII are also encoded in UTF-8. UTF-8 has been around since 1993, but there are still some old files and applications that don’t use it. But you should always use UTF-8 as your character encoding whenever possible since it allows text in nearly any language to be represented.
Text editors and code editors (2m13s)
When creating, editing, and saving the text files described in this lesson, you should NOT use a word processor like Microsoft Word. It will create files that include a lot of unwanted information that tracks the format, font, color, etc. of the text. To create, edit, and save plain text files, use one of the text editors described below, or use a code editor if you have one.
TextEdit text editor for Mac (2m08s)
To launch the TextEdit program on a Mac, go to the Spotlight Search (magnifying glass in upper right corner of screen) and type TextEdit. When the name shows up in the entry box, press the Enter/Return key. In the file dialog box that opens, either navigate to the text file you want to open, or click the New Document button.
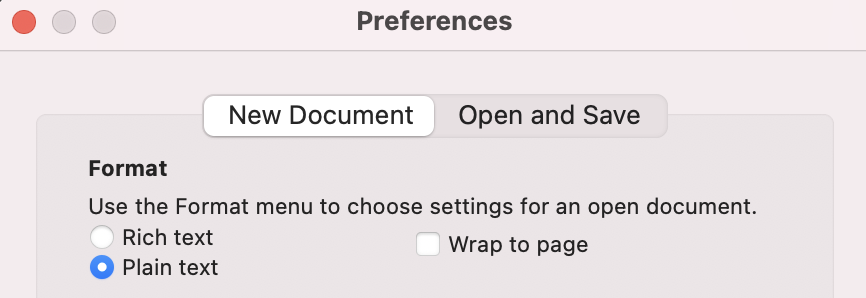
To use TextEdit as a plain text editor (no nasty hidden characters), go to the TextEdit menu at the upper left of your screen and select Preferences. On the New Document tab, select the Plain text radio button. Under options, uncheck everything. In the Open and Save tab, under Plain Text File Encoding, drop down Unicode (UTF-8) for both opening and saving files.
Notepad text editor for Windows (0m58s)
To launch the Notepad program on a Windows computer, go to the search box (next to the Start button on the lower left) and start typing Notepad. When the name shows up in the list, press Enter/Return.
Notepad should default to being a plain text editor. If you have problems with character encoding, when you open a file, pay attention to the Encoding dropdown. It should work properly if set to Auto-Detect, but if not, you can manually set it to UTF-8. Similarly, when using the Save As dialog, make sure that the Encoding dropdown is set on UTF-8.
Code editors (optional; Windows or Mac, 2m13s)
To do the exercises in this lesson, you don’t need to install a code editor. However, if you have one already, it’s fine to use it. For example, if you installed the Anaconda distribution to get Jupyter Notebooks, you can install and run Visual Studio Code (VS Code) from the navigator screen. If you want to know more about code editors, you can watch the following video, although that is not necessary in order to complete the lesson.
Installing the editors
To install Visual Studio Code, go to https://code.visualstudio.com/. You browser should detect your operating system and suggest the correct download for it.
To install Atom, go to https://atom.io/. You browser should detect your operating systme and suggest the correct download for it.
Moving text into and out of files
The following examples read or write a single string to a file. Note: If you do not know how to control what application is used to open files with various extensions (e.g. .txt), if the wrong application is opening a certain kind of file, or if you don’t know how to make file extensions visible on your computer, see this page for Windows or this page for Mac.
Writing text (4m12s)
This code will write the contents of the string variable some_text to a file:
file_object = open('datafile.txt', 'wt', encoding='utf-8')
file_object.write(some_text)
file_object.close()
Notes:
- The arguments of the
open()function are strings and can be replaced with variables rather than literals if you want. - In the second argument,
'wt', the “w” stands for “write” and the “t” stands for “text”. - The last argument specifies the character encoding. You can usually get away with omitting this argument, since the default encoding in Python 3 is UTF-8, but the situation is more clear if you include it and occasionally things break if you don’t specify UTF-8 when reading and writing.
- The file write isn’t necessarily completed untill you close the file with the
close()function. - Because the file name in the first argument doesn’t specify any path, it will default to the directory from which the script is being run.
A shorter way to accomplish the same thing is:
with open('datafile.txt', 'wt', encoding='utf-8') as file_object:
    file_object.write(some_text)
When the indented code block finishes executing, the .close() method is automatically executed.
Reading text (3m29s)
This code will read the entire contents of a file as a single string and assign it to the variable read_text.
file_object = open('datafile.txt', 'rt', encoding='utf-8')
read_text = file_object.read()
file_object.close()
Notes:
- As with opening a file to write, opening a file to read defaults in Python 3 to UTF-8, so including the encoding parameter is optional. But it’s safest and clearer to include it.
- In the second argument, “rt”, the “r” stands for “read” and the “t” stands for “text”.
- The
.read()method doesn’t take any arguments.
A shorter way to accomplish the same thing is:
with open('datafile.txt', 'rt', encoding='utf-8') as file_object:
    read_text = file_object.read()
As in the case of writing to a file, the .close() method is automatically performed when the indented code block is finished.
Determining file locations for your file system
If you are confused about navigating around in the file directories of your computer, or if you are unfamiliar with file paths, for more information see this page for Windows or this page for Mac.
Of the next four videos, you should watch only the one(s) that are appropriate for the environment in with you are running Jupyter notebooks. The examples illustrate using loading a Pandas DataFrame, but the process for accessing the files is the same for loading a data file into any Python data structure.
Mounting a Google Drive in Google Colab (5m08s)
Variation in the behavior of mounting Google Drive in Colab (3m05s)
Locating a data file when running a local Jupyter notebook under Mac OS (4m54s)
Locating a data file when running a local Jupyter notebook under Windows OS (5m54s)
Accessing files from your file system
Local file system (Mac and Windows) (4m40s)
The getcwd() function from the os module returns the current working directory. This is the directory to and from which files will be saved if only a filename is given without any path. Typically the current working directory is the directory from which the Python script was executed.
This function is useful when you want to allow Python to save files in a some location that is relative to the script (for example, in the same directory as the script, or in a directory that is a subdirectory of the directory containing the script).
import os
working_directory = os.getcwd()
print(working_directory)
The .home() method of the Path object in the pathlib module creates another path object representing the user’s home directory. The str() function can be used to generate a string representation of the home directory path. This function is extremely valuable because it is NOT operating system-specific. Thus you can write code to run on either Mac or Windows and instruct users to place files in either their home folder or some subfolder of their home folder.
This method is useful when you want to designate that a file is at some particular location relative to the user’s home directory regardless of where the Python script is located. Since special folders like Documents and Downloads are generally subdirectories of the home folder, that means the user can store the files in familiar places (like Documents) or in a convenient location such as the place where a file might have been dowloaded using a browser.
from pathlib import Path

# Configuration section of code
home = str(Path.home())
print(home)
# This variable can be prepended to the names of files downloaded using a browser
downloads_folder = home + '/Downloads/'

# Script section of code
filename = 'consoleText.txt'
print(downloads_folder + filename)
Cloud drive system (Colab) (4m55s)
Since a Colab notebook is operating in the cloud and not on your local computer, you cannot directly access files that your notebook interacts with. However, if you map your Google Drive as demonstrated in the lesson videos, you can upload and download data files to your Google Drive and access them in your script.
If you have intalled the Google Drive application on your computer, you can drop or open files directly on your Google Drive folder on your local computer since that folder is automatically synched with your Google Drive in the cloud.
Typically, when your Google Drive is mapped, its path will be /content/drive/My Drive/. So if that path is prepended to a file path relative to the root of your Google Drive, you can access any file in your Google drive using that full path.
google_drive_root = '/content/drive/My Drive/'

# My data are in a directory of my Google Drive called "data".
working_directory = google_drive_root + 'data/'

file_path = working_directory + 'test.txt'
with open(file_path, 'rt', encoding='utf-8') as file_object:
    read_text = file_object.read()
print(read_text)
Reading and writing lists
Newlines and writing using print() (5m31s)
In previous lessons, we learned about a special character called newline. A newline character is not a visible character - rather, it causes an action: moving to the next line on the screen when displaying text.
In word processing, the newline character is sometimes called a hard return. In Python, a newline character is generated by the sequence \n. The backslash indicates that the following character(s) should not be printed, but rather be interpreted as some other character.
Newline characters play a special role in files. They are used to indicate structure in the file and some Python commands are designed to detect newline characters and automatically translate the data in the file into Python data structures.
Example of writing to a file using the .write() method (as seen previously):
first_line = "Goin' into the file!"
with open('datafile.txt', 'wt', encoding='utf-8') as file_object:
    file_object.write(first_line)
An alternative to the .write() method is using the print() function. Previously, we have used print() to output to the console (computer screen), but by adding the file=some_file_object_name argument, we can redirect the output to a file instead of the screen.
Example of writing to a file using the print() function:
first_line = "Goin' into the file!"
with open('datafile.txt', 'wt', encoding='utf-8') as file_object:
    print(first_line, file=file_object)
As we saw when using the print() statement to output to the console, it automatically adds a newline after printing the contents of the first argument(s). The behavior is the same when we write to a file. After writing the string to the text file, print() inserts a newline character automatically.
Notice that .write() is a method, so it’s added to the end of the names of file objects, while print() is a function and the file object is passed into it as an argument. Also note that if you want to have newlines separating lines that you’ve output to a file with the .write() method, you can just add a newline to the end of the output string, like this:
fileObject.write(firstLine + '\n')
Writing a list of strings (5m27s)
Triple single-quotes can be used to define a string that contains newline characters (and therefore spills over several lines).
multiline_string = '''First line
Second line
Third line
'''
This accomplishes the same thing as writing the string on a single line and explicitly specifying escaped newline characters as part of the text:
multiline_string = '1st line\n2nd line\n3rd line\n'
It would be a rare situation where we would want to have to hard code a list of strings with newline characters between them. It would be far more useful to create a single string from a Python list of strings by inserting newline characters between each string. Here is an example that produces exactly the same output as the previous two examples:
list_of_strings = ['1st line', '2nd line', '3rd line']
multiline_string = ''
for string in list_of_strings:
    multiline_string += string + '\n'
We start the single string as an empty string, then with each iteration of the for loop, we append the next string in the list to the growing single string, followed by a newline character. This includes the final interation, so the single constructed string ends with a trailing newline character just like in the previous examples.
Iterating a file object (5m18s)
A file object that is created by opening a text file is an iterable object. The newline characters in the file define the boundaries between the strings that are each of the iterable items in the file object. That is, each line in the text file is treated as a string that is an iterable item. We can iterate through the lines of file object using a for loop just like any other iterable object. As we do, each line is assigned to the iterator variable. Here is an example:
with open('datafile.txt', 'rt', encoding='utf-8') as file_object:
    for one_line in file_object:
        print(one_line)
print(len(one_line))
In this example, we have a for loop nested inside a with open ... as ... code block. That’s why there are two indentation levels. When the inner (more indented) code block is done (the for loop finishes), the indentation level drops one level to the left (the with open ... as ... code block). When the outer (less indented) code block is finished, the file object is closed and writing to the file is completed.
If we want to construct a Python list object containing each line of the text file as one of the items in the list, we can use the following code:
line_list = []
with open('datafile.txt', 'rt', encoding='utf-8') as file_object:
    for one_line in file_object:
        line_list.append(one_line.strip())
print(line_list)
The .strip() method must be applied to each line, since the trailing newline character is included as each line is assigned to the iterator variable one_line. Since the newline character is only there to impose structure on the text file, we really don’t want to include it as part of the strings in the list.
Variations on reading lines from files (4m26s)
An alternative method to iteration for reading in a text file list is to read the entire file in as a single string, then separate the lines according to the positions of the newline characters in the file. The .splitlines() method will do this automatically without the need to specify the separator character as we did with the .split() method. It also automatically drops any empty strings that might otherwise be added to the end of the list because of a trailing newline.
This method is very useful if the amount of text in a file is small enough to be read in as a single string. If the file is very large (with many thousands or millions of lines), it is better to iterate through the lines of the file. Iteration allows the script to deal with the input data in smaller chunks (a single line at a time).
Accessing files via the Internet (6m43s)
The requests module is the best way to load files from somewhere on the Internet using a URL. It is not part of the standard library, so you may need to install it using the PIP or Conda file managers.
Getting a file via a URL is very straightforward using requests:
response_object = requests.get(url)
file_text = response_object.text
The URL is passed into the get() function and the function returns a requests response object. That object has a number of attributes and methods, but the one we are most interested in now is the .text attribute. It specifies the text of the file that was retrieved as the response object and can be assigned to a variable as in the example above.
If the text we have retrieved is composed of lines separated by newline characters, we can assign its lines to a Python list using the .splitlines() method as shown in the previous section:
import requests
url = 'https://gist.githubusercontent.com/baskaufs/ac80f6dd287d1013b7c584f0c0d56e8b/raw/432d25307325a5563cf4d09b790301863c8d467d/months_list.txt'
response_object = requests.get(url)
file_text = response_object.text
months_list = file_text.splitlines()
print(months_list)
If we wanted, we could make the code more compact (but less readable) by applying all the methods and attributes on a single line:
import requests
url = 'https://gist.githubusercontent.com/baskaufs/ac80f6dd287d1013b7c584f0c0d56e8b/raw/432d25307325a5563cf4d09b790301863c8d467d/months_list.txt'
months_list = requests.get(url).text.splitlines()
print(months_list)
Practice exercises
-
If you are using Colab, mount your Google Drive in your notebook environment. Create a subdirectory of your root Google Drive directory. Call it
storageand assign the path string for this directory (including a trailing slash) to a variable. Optimally, you will have the Google Drive application installed on your computer so you can create the file locally, but you can use the web interface if you don’t have the application. If you are using a Mac or Windows installation of Jupyter notebooks, locate the directory from which you launched your notebook environment (using thegetcwd()function) and create a subdirectory of that directory. Call itstorageand assign the path string for that directory (including a trailing slash) to a variable. Ask the user to input the name of the file into which they would like to store some text. Open that file for writing in thestoragedirectory you created. Ask the user what text they would like to store in the file. Write that text to the file. Use a text editor to open the file and examine its contents. (If you are using Colab and don’t have the Google Drive app installed, you’ll have to download the file using the web interface.) -
It is a bad idea to put usernames and passwords in scripts because if the script accidentally gets published, your credentails are compromised. A simple solution is to store the credentials in a file that is in a separate location from the rest of the script. Create a text file called
credentials.txtand put it in the home folder of your computer (or the root of your Google Drive if using Colab). The file should consist of a single line of text with the username first, followed by a dollar sign (no spaces), followed by the password. If you have a local installation of Jupyter notebooks, use the.home()method to find the path of your home folder. If using Colab, see the videos and notes for finding the path to the root of your Google Drive. Append the credentials file name to that home folder path to create the full path to the file. Open the credentials file and read in the string. Use the.split()method and$as the separator to split the string into a list of strings. Assign the zeroith item on the list to a variable calledusernameand the oneth item on the list to a variable calledpassword. Print the username and password on the screen (something you normally wouldn’t want to do in a non-practice script!). -
This query will find the names of all of the presidents of the United States in Wikidata: https://w.wiki/fpC. Run the query by clicking the blue “run” (triangle) button. After the query runs, drop down the
Downloadoptions and selectCSV file. If you are using a local installation of Jupyter notebooks, save the file in your Downloads folder. (If you are using Colab, you will need to save or upload the file to your Google Drive.) Because there is only a single column in the results, the CSV file will contain the results with each president’s name on a separate line. You can open the file to verify this. You will also probably want to delete the first line, which contains the textnamerather than an actual name. If you do, don’t forget to save the file. If you are using a local installation, use the.home()method to store the string representation of the path to yourDownloadsfolder in a variable calleddownloads_path. Include a trailing slash at the end of the string. If you are using Colab, you’ll just need to use a path to some directory in your Google drive where you have put the file. Append the name of the file you downloaded the value of thedownloads_pathvariable to create the full path to the downloaded file. Write a script that opens the list of presidents file, reads the lines into a list by iteration, asks the user for the name of a president, then loops through the list to check if what the user typed in is the name of any president on the list. If you are uncertain about how to approach this problem, I recommend reviewing this lesson on conditional execution. If there is a match, print “Yes, (president name) is a president.” -
Because there is such a variety of ways to type a name, modify the script above to make it case-insensitive by using the string method
.lower(). You should also make the search look for a substring within each string on the list by using the conditionif variable1 in variable2:, which returns true if the string variable1 is part of the string variable2. For brownie points, make the script say “Sorry, (input string) is not a president.”. -
Create two GitHub Gists. The first should contain the names of the days of the week in English as a list with each day of the week on a separate line. The second should contain the names of the days of the week in some other language. Because the
dateobject from thedatetimemodule numbers days of the week starting with Monday as zero, you should list the days from Monday through Sunday on both lists. Ask the user what language they would prefer using an input statement. Based on their choice, set the value of the variableurlto the correct URL for the Gist list of days of the week in the chosen language. Retrieve the list using therequestsmodule and assign the days to a Python list. Don’t forget tofrom datetime import date. Use thedate.today().weekday()method to determine the number of the day of the week, then print “Today is (insert string for day)” using the list item that corresponds to the day of the week number determined using thedate.today().weekday()method. For brownie points, make the text for “Today is “ also be in the chosen language.
Next lesson: Complex data structures
Revised 2021-05-04

Questions? Contact us
License: CC BY 4.0.
Credit: "Vanderbilt Libraries Digital Lab - www.library.vanderbilt.edu"